
Lowering the bar

How to build your own basement bar with custom features all while learning absolutely nothing about marriage and love
A friend of mine told me they were getting married. And while I can’t say I can relate – if I ever tie a knot it won’t be cause for celebration– I know that for most people this is a pretty big deal.
This friend also asked if I would build a basement bar as a wedding present. While I’m not the biggest supporter of the concept of marriage, I do support anything that facilitates alcohol consumption so naturally I agreed. Other than a budget and size of the bar, I was given free reign of this project. Which from what I’ve seen in married couples, is the opposite of the married life.
This was a very involved project. To avoid a never-ending blog post I will be going over the bigger picture of this piece. Over the next few weeks I’ll be putting out other posts addressing specific parts and how-to’s. I could say I’m doing this to avoid overloading you with too much information at once, but really I don’t want to all that work at one time.
Do You have a plan?
I’ve never built a bar before, but I’ve sat at plenty. The only parameters for this project was that the bar needed to be 6’ long, not permanent, include cabinets, and had to fit a 34”x20”x22” mini fridge. My first step was to get some design ideas from the internet. Once I had some ideas to plagiarize I then sketched up my bar. I tend to hand sketch my ideas first on graph paper to translate what I see in my head to paper. Then I use SketchUp to get actual dimensions.
SketchUp is an “easier-to-learn” CAD software that is free. There is still a learning curve to using it so you’re going to have to take some time and be patient. I’ve been waiting years for my life turn around, so patience is definitely a trait that I have. Taking the time to learn a CAD program and sketch your projects, especially complicated ones, is worth it in my unprofessional opinion. With a CAD program you get a 3D visual of your project so you can get a better sense of size and proportions. And your measurements will always be right. If you go off of a hand drawn sketch you’re relying on yourself to do math and measurements accurately. I just am not that smart. I’m guessing you aren’t either, otherwise you wouldn’t be reading this right now.
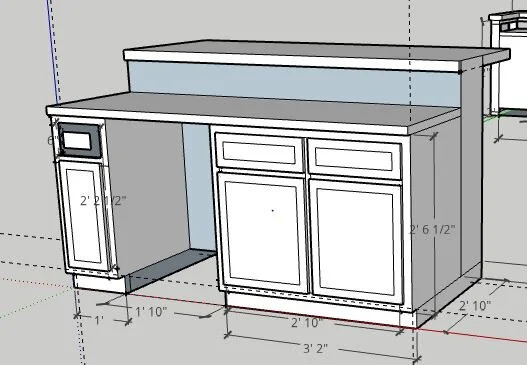
I decided the bar would consist of: the base which was framed with 2x4’s and wrapped in planking, a bar top, a counter top, and 2 separate cabinets with drawers and doors.
I did 3 separate sketches in SketchUp. The first one was a final product to make sure everything looks proportioned right and fits together. This gives me the final dimensions of the finished project. I also sent this one to my friend so that he could could tell me if this is what he wants. Like I told my ex multiple times, I’m not a mind reader.
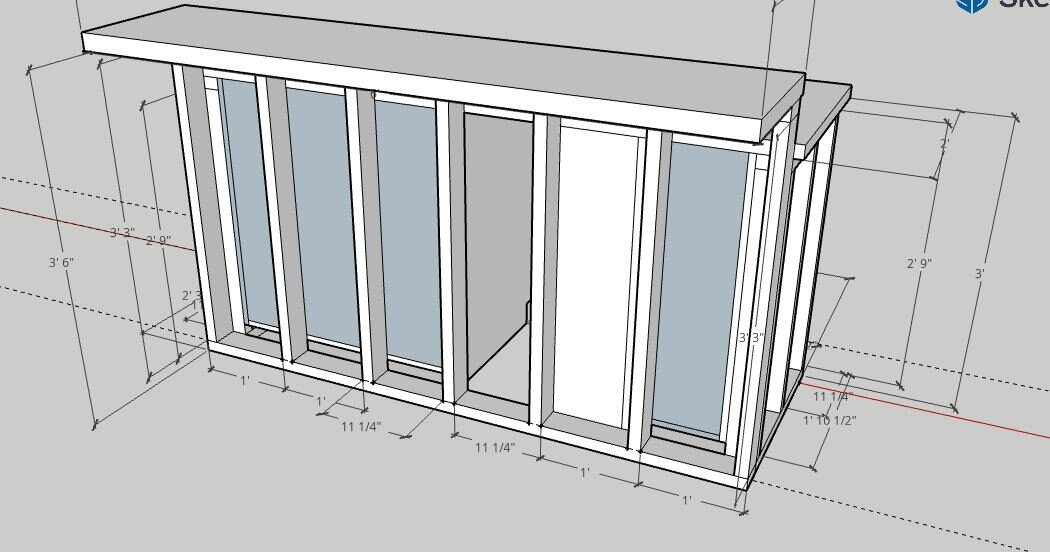
Once my sketch was approved, I then did a second sketch where I detailed how I was going to frame the bar. I would use this sketch to measure and place all of my 2x4’s.
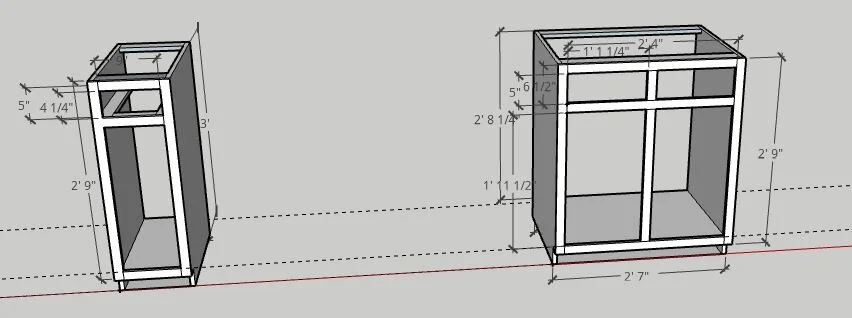
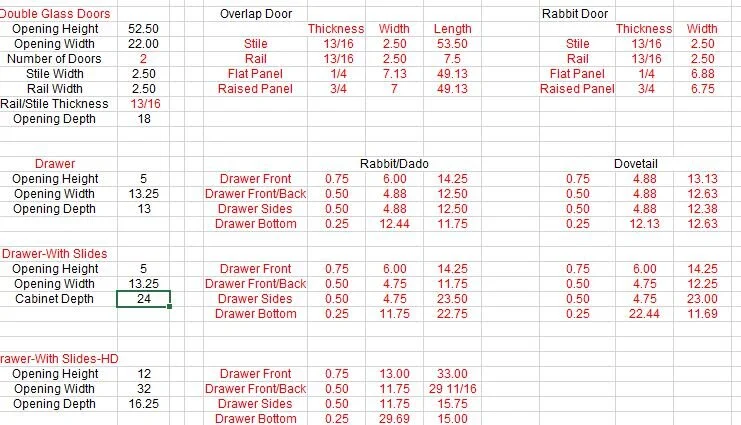
My 3rd sketch was to detail the cabinets and the face frame that I would attach to these cabinets. I would also use this to measure my door and drawer openings which would dictate the sizes of said doors and drawers.
Bill of Materials
Once I had everything dimensioned out I then created a bill of materials. Perhaps the greatest opportunity I’ve had in my life was being a student of my high school woods teacher. This guy could out-carpenter Jesus Christ himself. He had an excel document called a Bill of Materials that had built-in formulas to calculate how much material you would need and it even provides the cost. This program also had a feature where you can put in your door and drawer openings and it will tell you what dimensions of each door and drawer part you need. How a high school woods teacher created this Excel document is nothing short of a miracle. But like I said, he gives Jesus a run for his money.
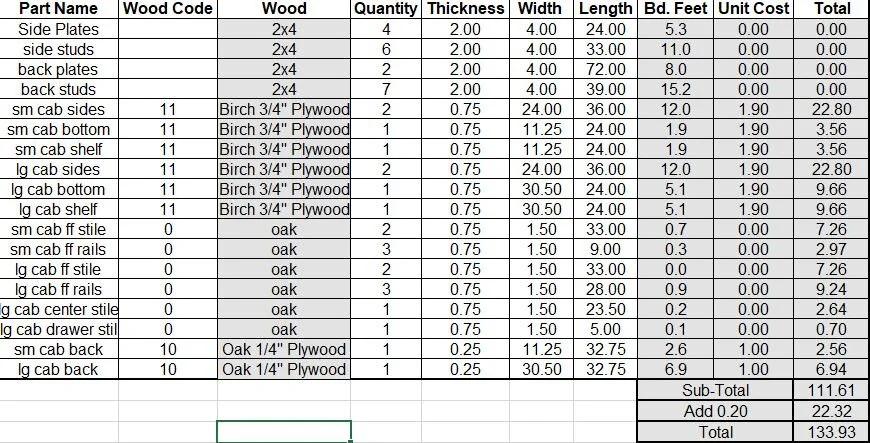
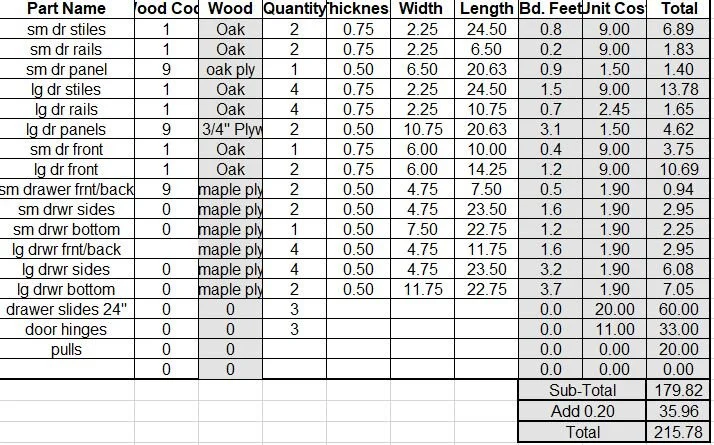
If I can figure out how to upload this file I will so that you can download it. Otherwise hit the contact button and I can email it to you. I can also walk you through how to read and use it.
Cabinets: They’re a lot of work

By far the most time consuming and expensive part of this bar was the cabinets. If you have limited tools, knowledge, and money I would suggest buying cabinets. A great place to find good deals on cabinets is the Habitat for Humanity Restore if you’re lucky enough to have one near you. The Restore not only sells used cabinets of different varieties, but also new ones. Contractors that have a surplus often dump them off. I’m guessing that if I hunted for a deal on cabinets it would’ve cost me half of what I put into making my own, and would’ve save a solid week.
The Restore is also where I got all of my oak wood for the trim and doors and drawers. It’s about half the price than a big box store, however you have to be able to mill it yourself.
One of the few things that brings me joy in life is building stuff, so I wanted to make my own cabinets, doors, and drawers. Because I wanted to have a 6’ long bar and fit a mini fridge under it, I was going to need very specific cabinet sizes. I also planned on loading the cabinets with various custom features. If you are going to go the route of buying pre-fabricated cabinets, I would plan to purchase those first and then dimension the rest of your bar around the cabinets. Also be prepared to have to have refinish them or replace hardware if you want to upgrade.
On a side note, while pricing out the lumber for these cabinets I realized that whoever said lumber prices went back down is probably the same person that came up with the lie that I had a bright future ahead of me. I’m on to you, mother.
Let’s Build a Wall

The base of the bar is essentially 3 half walls that wrap around the cabinets. They will also support the bar tops. I wanted a countertop to be at a height where it’s comfortable to do food and drink prep, or 36” without the countertop ( I got this height from my kitchen cabinets). This was also the height of the cabinets so that they could help support the countertop. I wanted the bar top to be at a height where it would be comfortable to stand or sit on a bar chair. This height was 42” not including the bar top. I framed the walls the exact way you would frame an actual wall in a house, with a bottom and top plate and studs running between the two.
Everyone Needs an Outlet
I couldn’t build a basement bar and tell my buddy he has to make his blended margs or ice in the kitchen. So I decided to include an outlet. This bar was going to be placed right by a wall outlet so that the mini fridge could plug into it, which meant I had an electrical source. If this was going to be a permanent built in bar I would’ve ran wiring from the outlet into the bar itself. However, this bar had to be able to be moved in case the newlyweds move to a new home. Or someone gets kicked out of the house. So I decided to use a 15 amp appliance cord that would plug into the wall outlet and run it to an outlet above the bar countertop. In other words it works pretty much like an extension cord.

While on the topic of electrical, now would be a good time to talk about the mini fridge. I wanted to the mini fridge to be sandwiched between the two cabinets for two reasons: it was more aesthetically pleasing to me, and I wanted the cabinets to provide support for the countertop on two opposite ends. In order for the fridge to get power, I had to drill holes through sides of one of the cabinets and make sure there was hole in the side of the bar so that the power cord could reach the wall outlet. This cord ran under the pull out trash so that nobody will ever see it. I’m pretty good at hiding shit.
cheap and easy

In my opinion the best way to start a relationship is to cover up everything on the inside with a thin but attractive layer of bullshit. This is exactly what I did to the base of the bar. I used my go-to 1/4” thick pine tongue and groove planking. I used a few different stains for colors and nailed the boards to the studs. This was cheaper and better looking than using plywood.
Interesting fact: when I went to purchase these boards I was at first disappointed that the poor quality cheap boards were no longer available, as Menards only sells the “premium” ones at a much higher price. But when I opened the packages I saw that the boards were in fact the crappy ones I was looking for just now packaged at the premium prices. While I was initially upset at this, it then gave me an idea to rebrand myself as “premium” on my Tinder profile. It hasn’t worked for me.
Eat off the floor

Given that I had a budget to stay under, I spent a lot of time debating what I should do for the countertop and bar top. The countertop is 74” long by 24” wide while the bar top is 74” long by 15” wide. I was given a tip about an Amish sawmill that sells slabs for cheap. After calling them, this was still going to run me about $400 for both tops.
Instead I decided to take a trip to my local Lumber Liquidators, which is one of the few places you’ll find me walking down an aisle. I was able to get hardwood hickory tongue and groove flooring that was unfinished for a reasonable price. Since the flooring was 3/4” thick I decided to glue the flooring on top of MDF to give it a flat substrate and double the thickness.

In order to cover up the edges and make the bar top appear even thicker, I made a maple frame to wrap around the top. It’s all about the thickness, trust me.
In total both tops wound up costing $200, however I had enough flooring left over to make at least one more. In other words it was less than half the price of slabs.
After sanding I applied 3 coats of water based Polycrylic. I used this because hickory is a lighter toned wood and I did not want the amber hue you would get with an oil based finish.
Trim Around The Edges

Around the edges and corners I used oak, stained the same color as the cabinets as trim. For the vertical corners I glued the two boards together before installing. I wanted it to look like it was all one board.
The Extras

When I decide to commit to something, I go the extra mile. The problem is I can’t commit to much besides building stuff. This would’ve been an alright piece as is, but I wanted make sure my friend loves this bar more than his future wife. With some of the money I was able to save, I funneled it into extra things like soft close hinges and soft close drawer slides.

In the narrow cabinet I was able to find a small trash can to fit and made a pullout trash. It’s right next to the fridge so you don’t have to go far to discard a beer bottle and grab a new one. I’m all about efficiency.

I also installed a wine bottle rack and glass holder in the second cabinet. I made these with some of the left over hickory flooring.
I used the design I had made in my bar cart project for both. The bottle rack can hold wine or liquor bottles. The glass holder can hold wine glasses or whiskey glasses. I prevented one fight in this relationship.

And a marriage present wouldn’t be complete without a sarcastic sign.
I’m still learning how to paint lettering. Among the many faults I was born with, I am left handed and it’s very hard not to smudge.
Something worth noting as that I built this bar in pieces so that it can be moved. Once everything is installed this bar very solid. I can still hang from the bar without it tipping, so that’s a plus. But it was somewhat of a pain to dismantle, move, and reinstall. So while the option of moving is there, this bar was built to be like marriage: sometimes it’s just easier to stay put.
A basement bar is a perfect present for any marriage. It gives the couple a place to celebrate the high times, as well as a place for one person to escape to in the low times. Unfortunately for me, this bar sits in the basement of a soon-to-be married couple, which means it will be one more bar that I won’t have a shot at taking anyone home. But it was fun. And I guess if that’s all you can ask for in a marriage. I think.