
Making the bed

how to make some pull out truck bed drawers that show you got game
Having a truck bed is great, but just like with an actual bed it gets messy when you’re doing the business. Whether you’re looking to embrace homelessness or playing the sketchy contractor role, having some solid bed drawers can really make you look like you got a handle on things. Instead of shelling out over $1k for some manufactured drawers I decided to build my own for $350 and a handful of f-bombs.
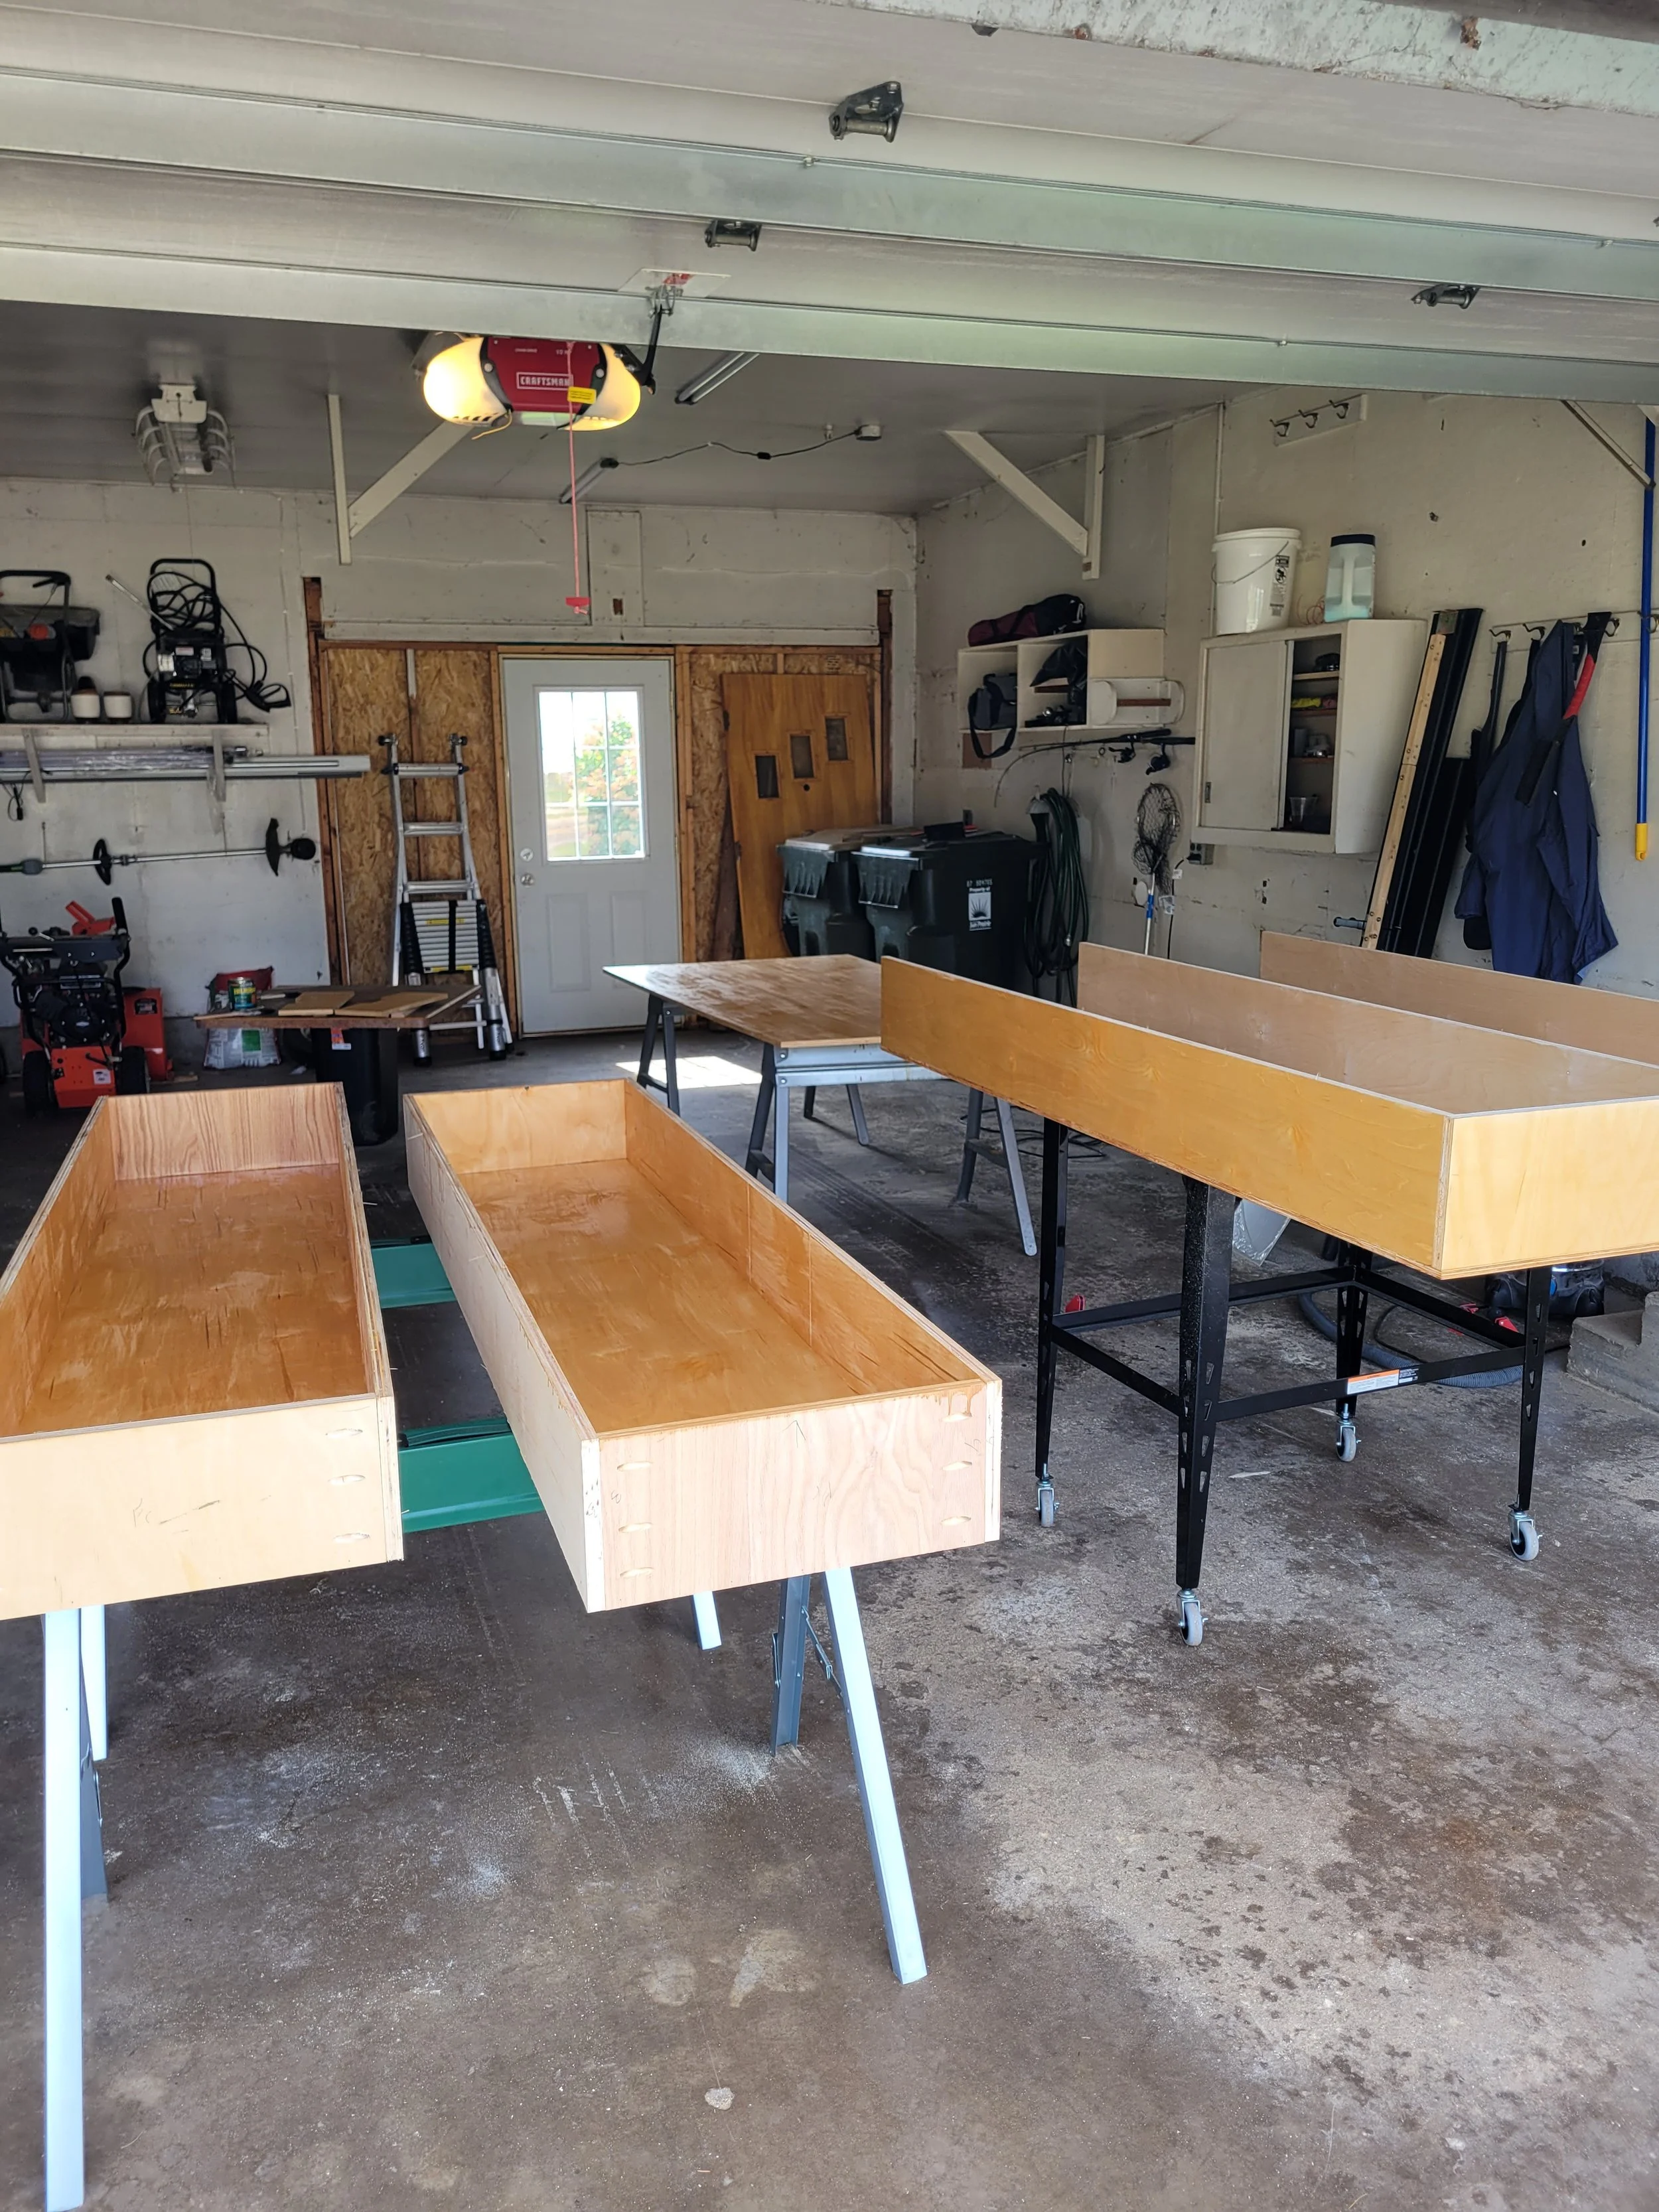
I built two pullout drawers for my Tacoma 6’ bed. Along with these, I also made a platform for hauling things on top of the drawers, for sleeping during a backcountry road trip, or when my life really takes downward spiral and I have nowhere else to sleep. The drawers are the length of the bed and can pull out to about 5’ while holding my bodyweight which makes them extremely solid. I accidentally tested the integrity of the drawers once when I forgot to close them and then took a drive down the freeway. While I wouldn’t recommend it, I can say for certain that these drawers are solid, unlike my mental state.
Most of the design was inspired from a youtube video by Pask Makes (when I say inspired, I mean copied). I did make some modifications however, the most important being that I wanted to be able to easily remove the system because I have commitment issues and also because I may want to haul something taller than the 20” or so that is left over between the drawer system and my topper.
can’t read? Watch the video
Prepare your bottom
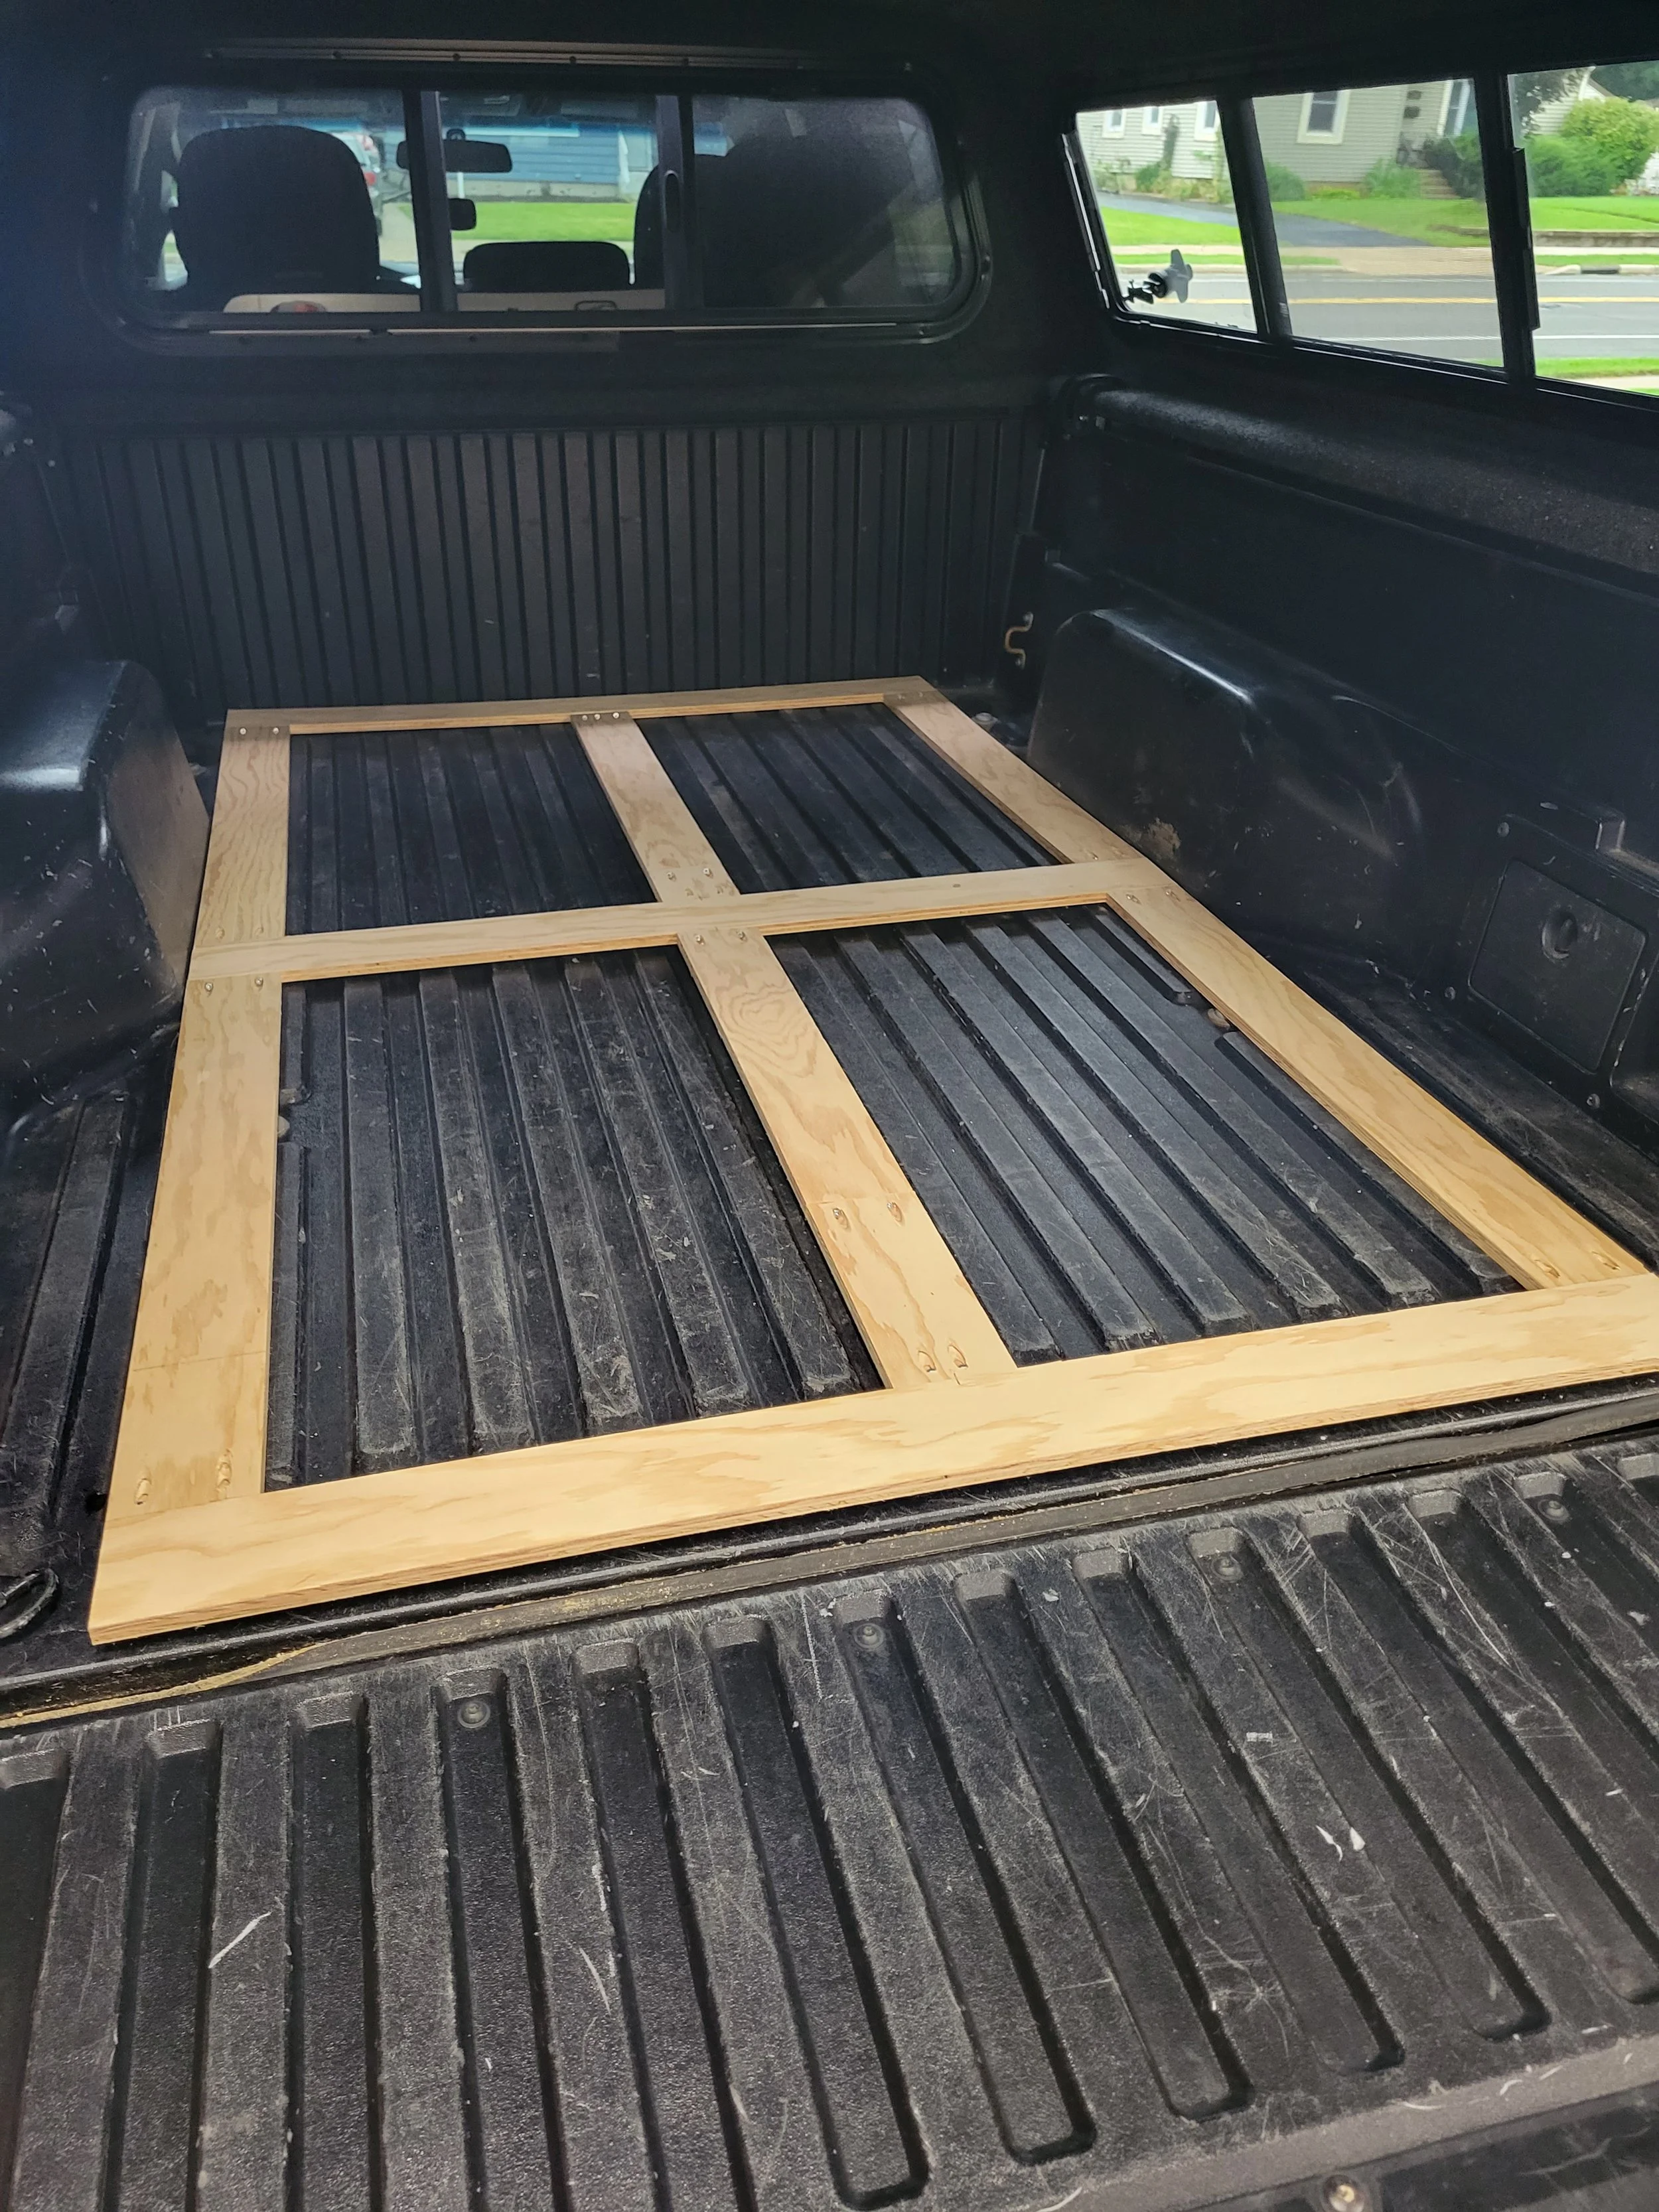
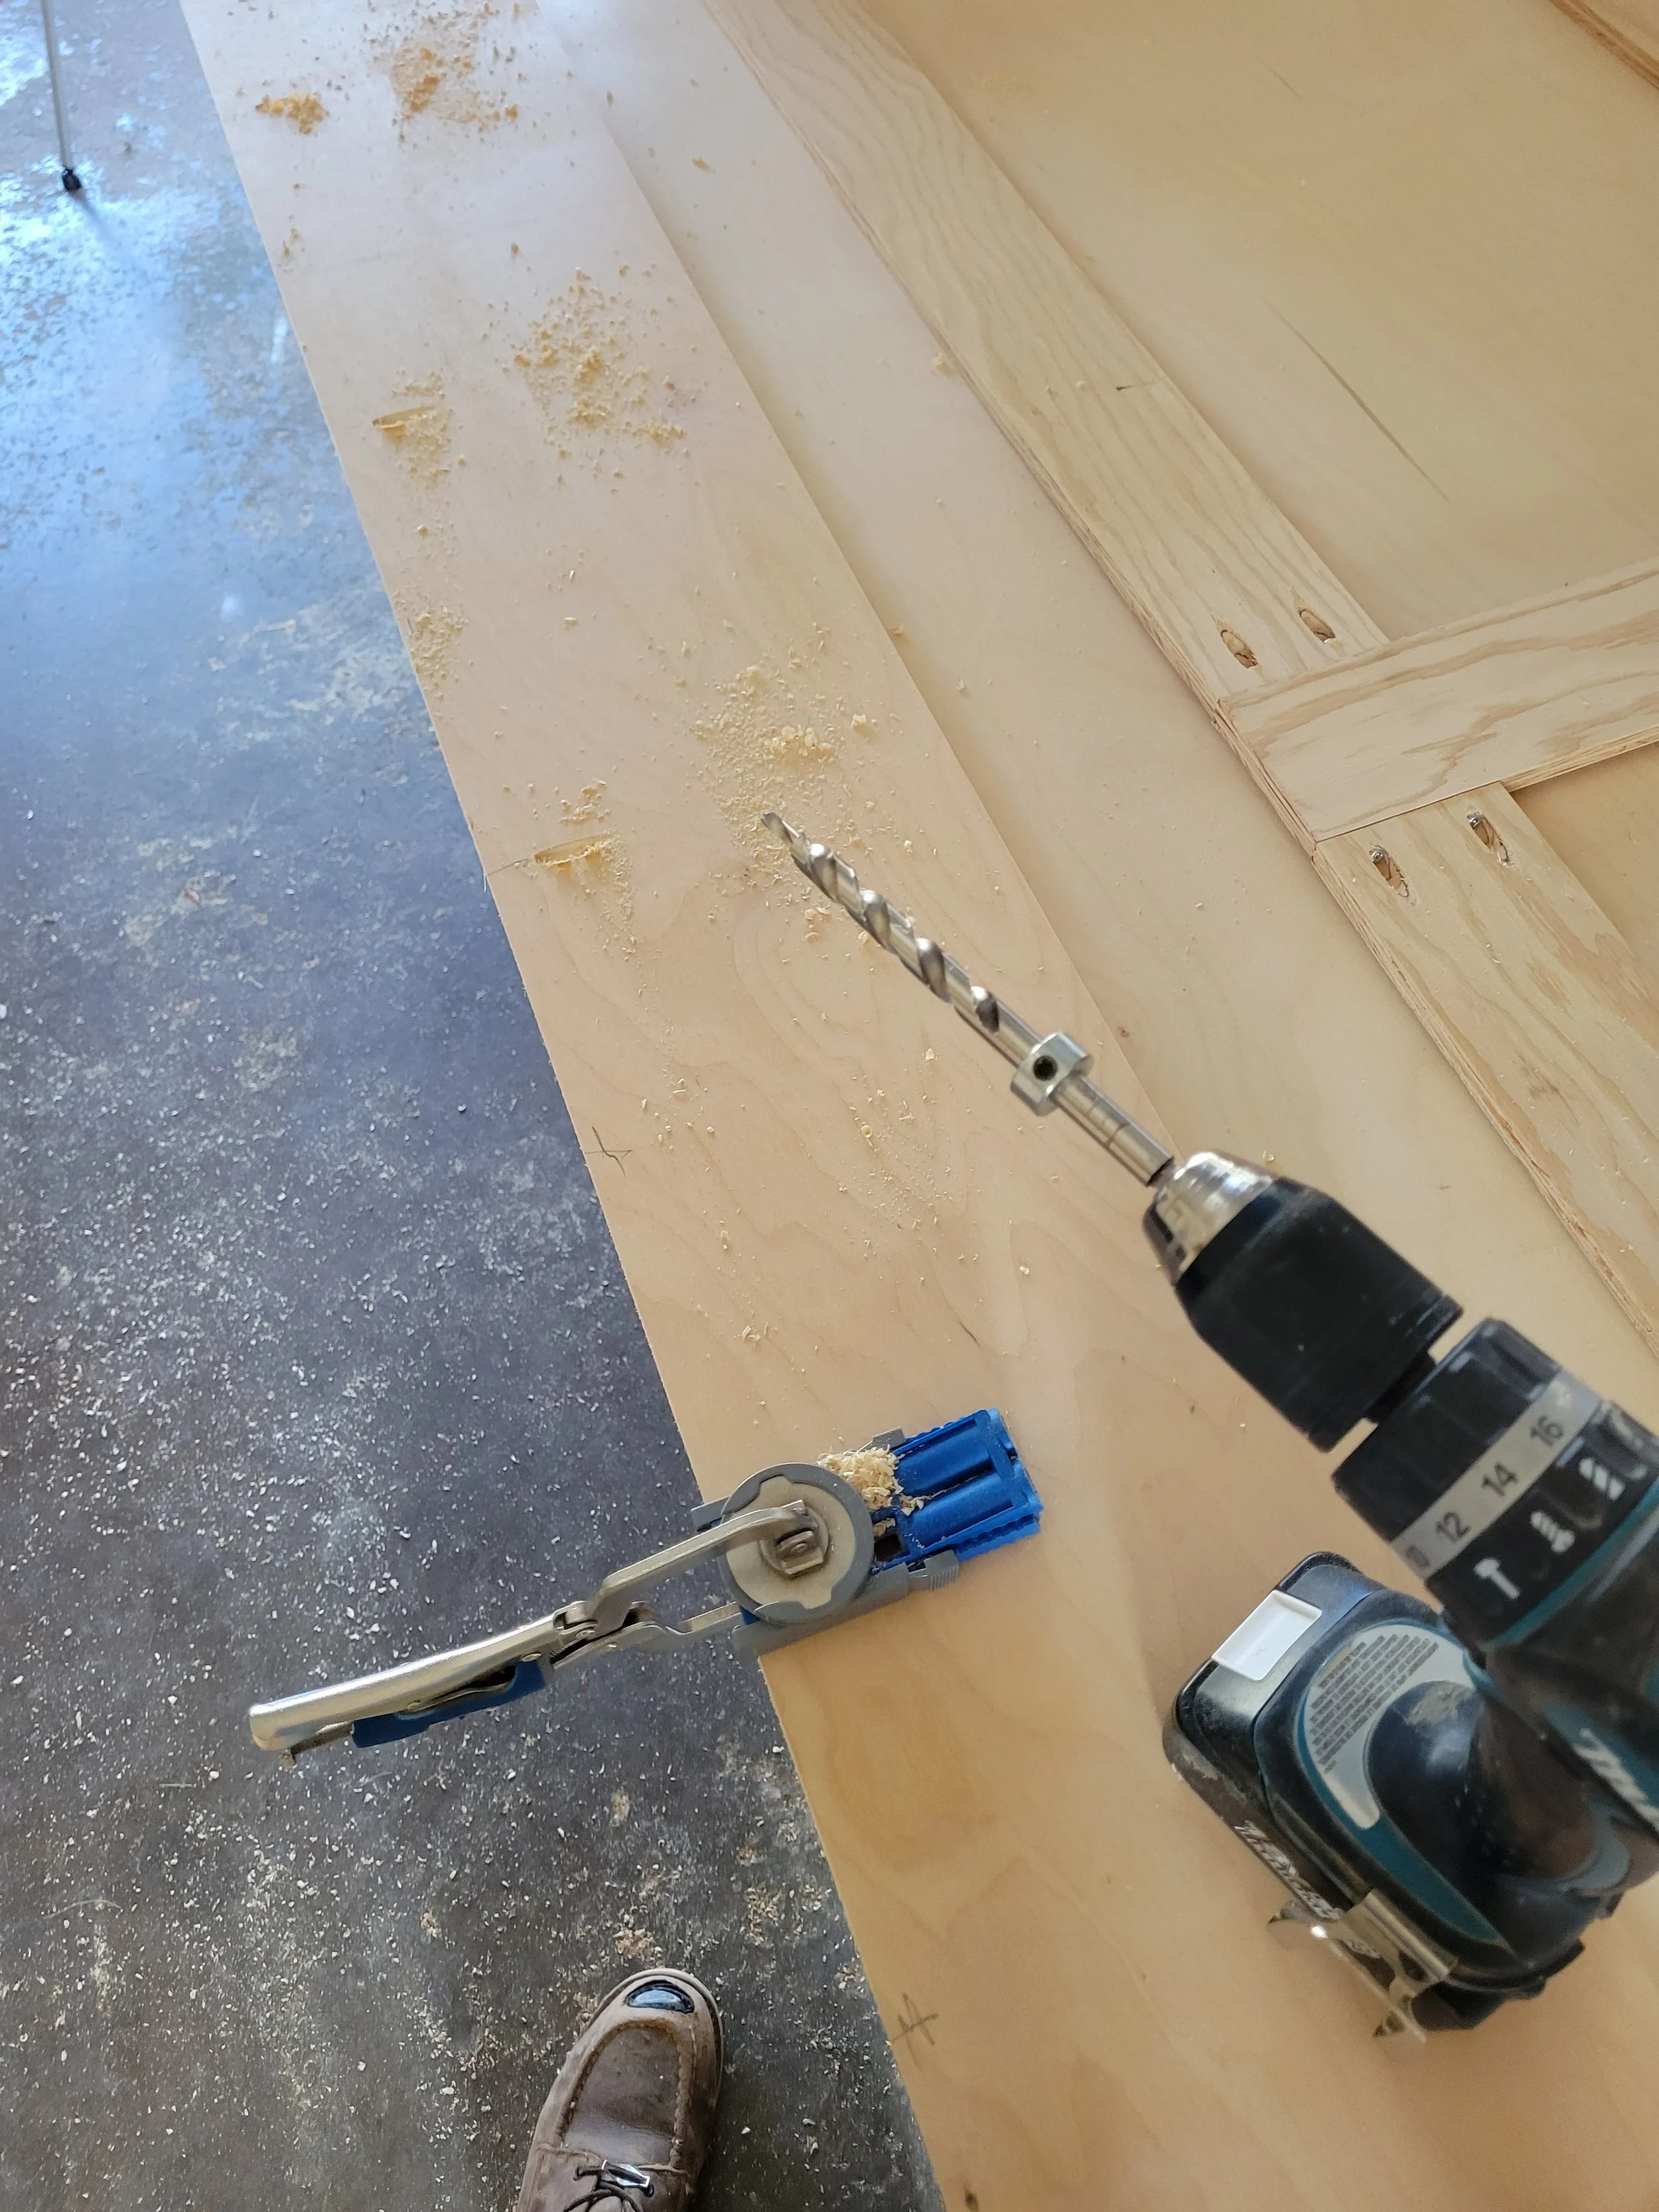
The first thing I did was make a bottom frame that sat tightly between the wheel wells, the back of the bed, and the tailgate when closed. I didn’t want movement in any direction. I made this frame out of some leftover 1/2” plywood from a previous project. I cut it into strips about 3 1/2” wide and cut to lengths. I then used pocket screws to attach them together.
I then cut strips of 3/4” plywood for the sides and back. The lengths matched those of the frame bottom I had built. The sides were cut so that they would sit 3/4” below the top of the wheel wells. I did this because the my top was going to be 3/4” thick and I wanted it to be flush with the tops of the wheel wells for when I slide in full sheets of plywood or drywall. I used pocket screws to attach these to bottom frame.

When attaching the sides it is very important that everything is square otherwise the drawers won’t slide properly. I achieved this using a square and clamps. It also helps to plead with the pieces. As I’ve learned in life, if you want anything to end up in your bed you’re going to have to do a lot of begging.
More than just a junk drawer
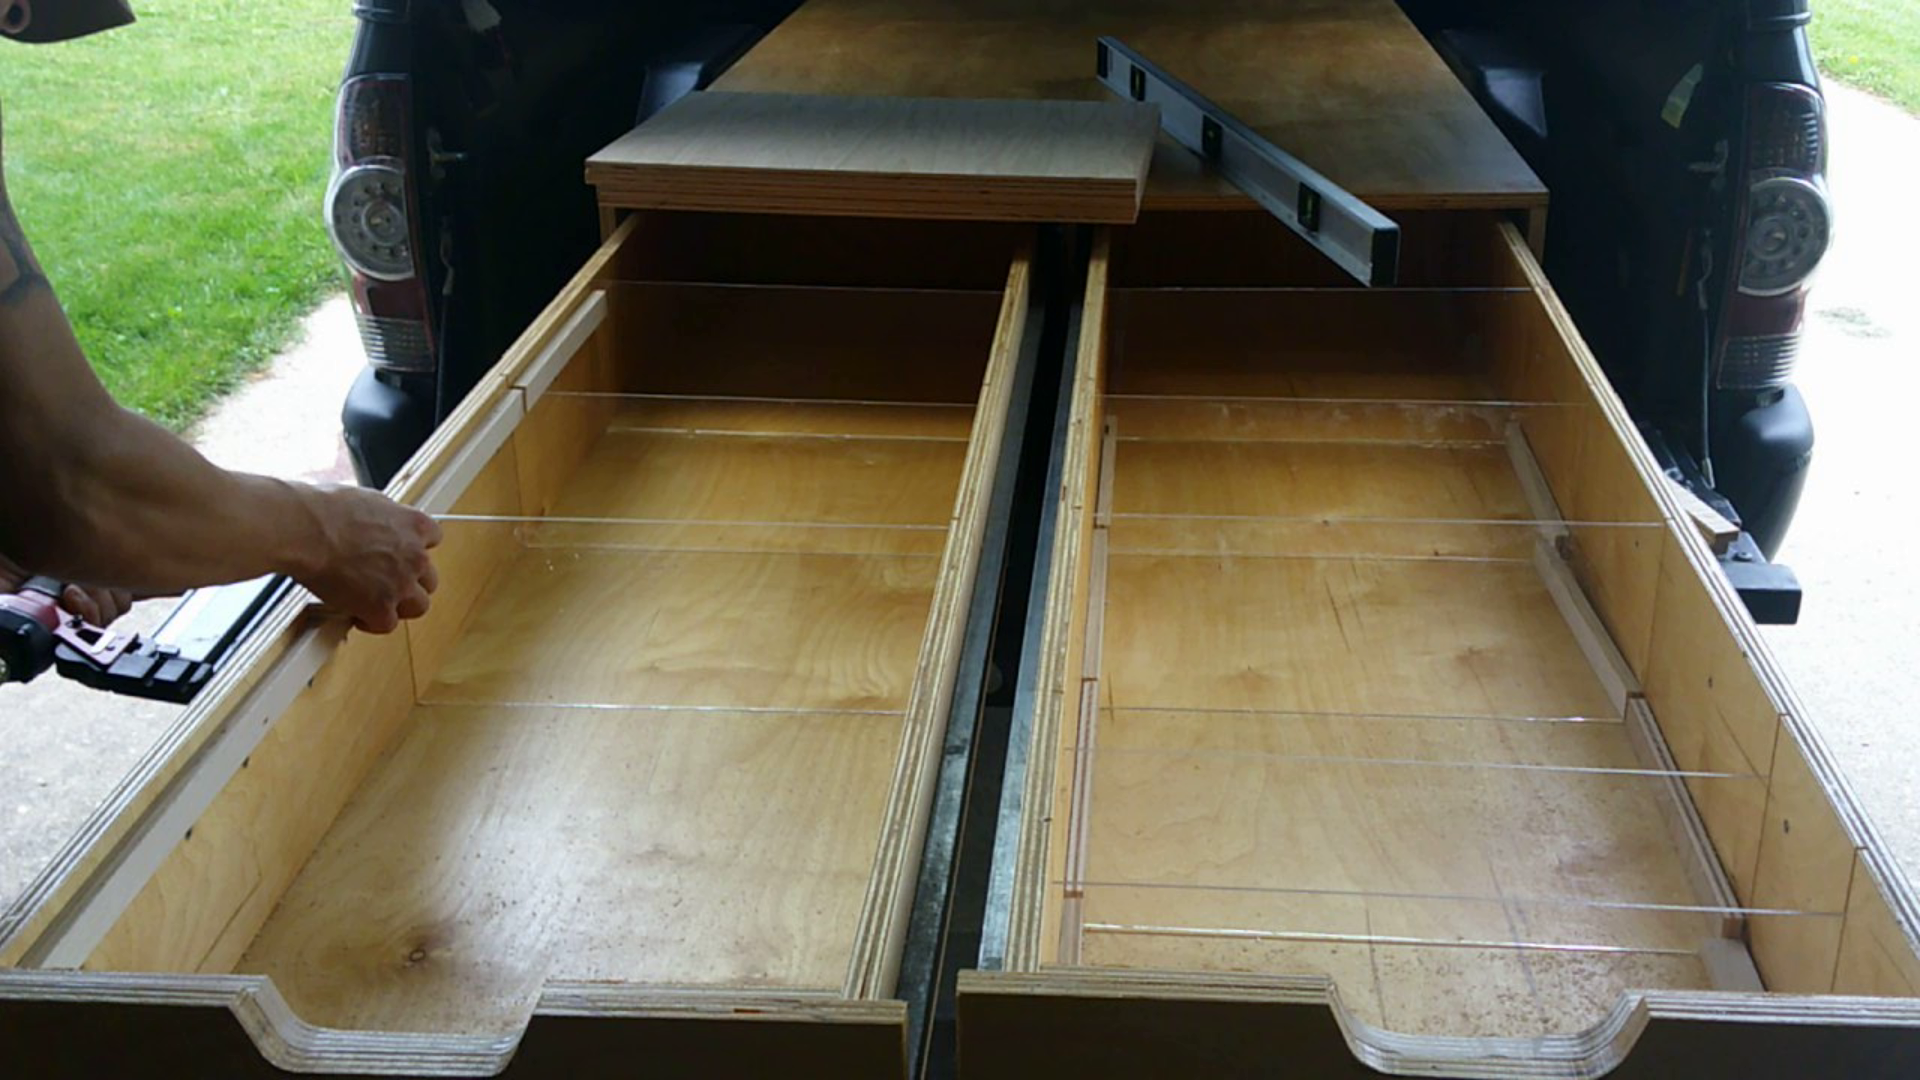
I then cut my drawer sides and bottoms to size. I made my drawers 1 3/4” narrower than the opening to allow space for the rail system. I also made them 1/2” shorter than the opening to allow for some play when opening and closing.
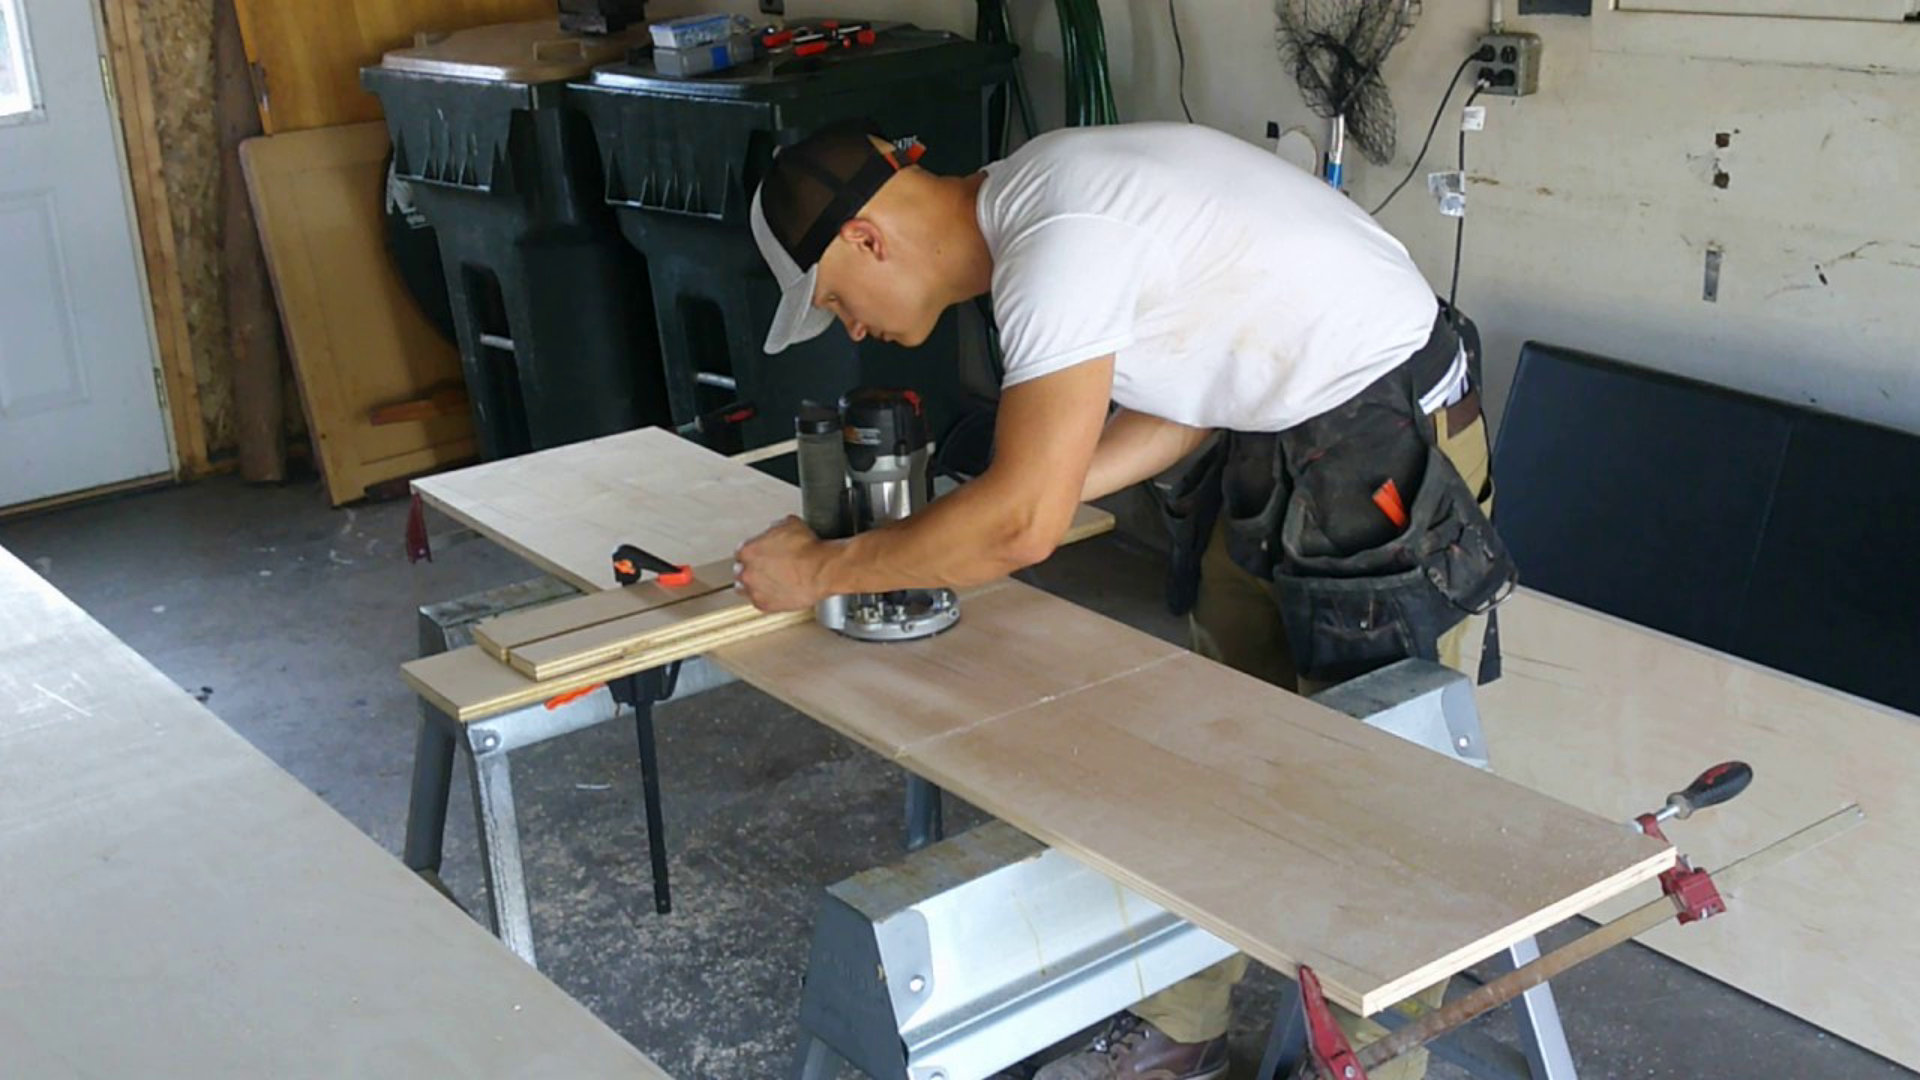
Before assembly I used a router to make grooves in the sides that I could slide plexi-glass into for compartments. I made a number of grooves so that I could adjust where to place the dividers. I used plexi-glass because I had some left over from a project and because I can see through them when I forget where I placed the one tool I need.
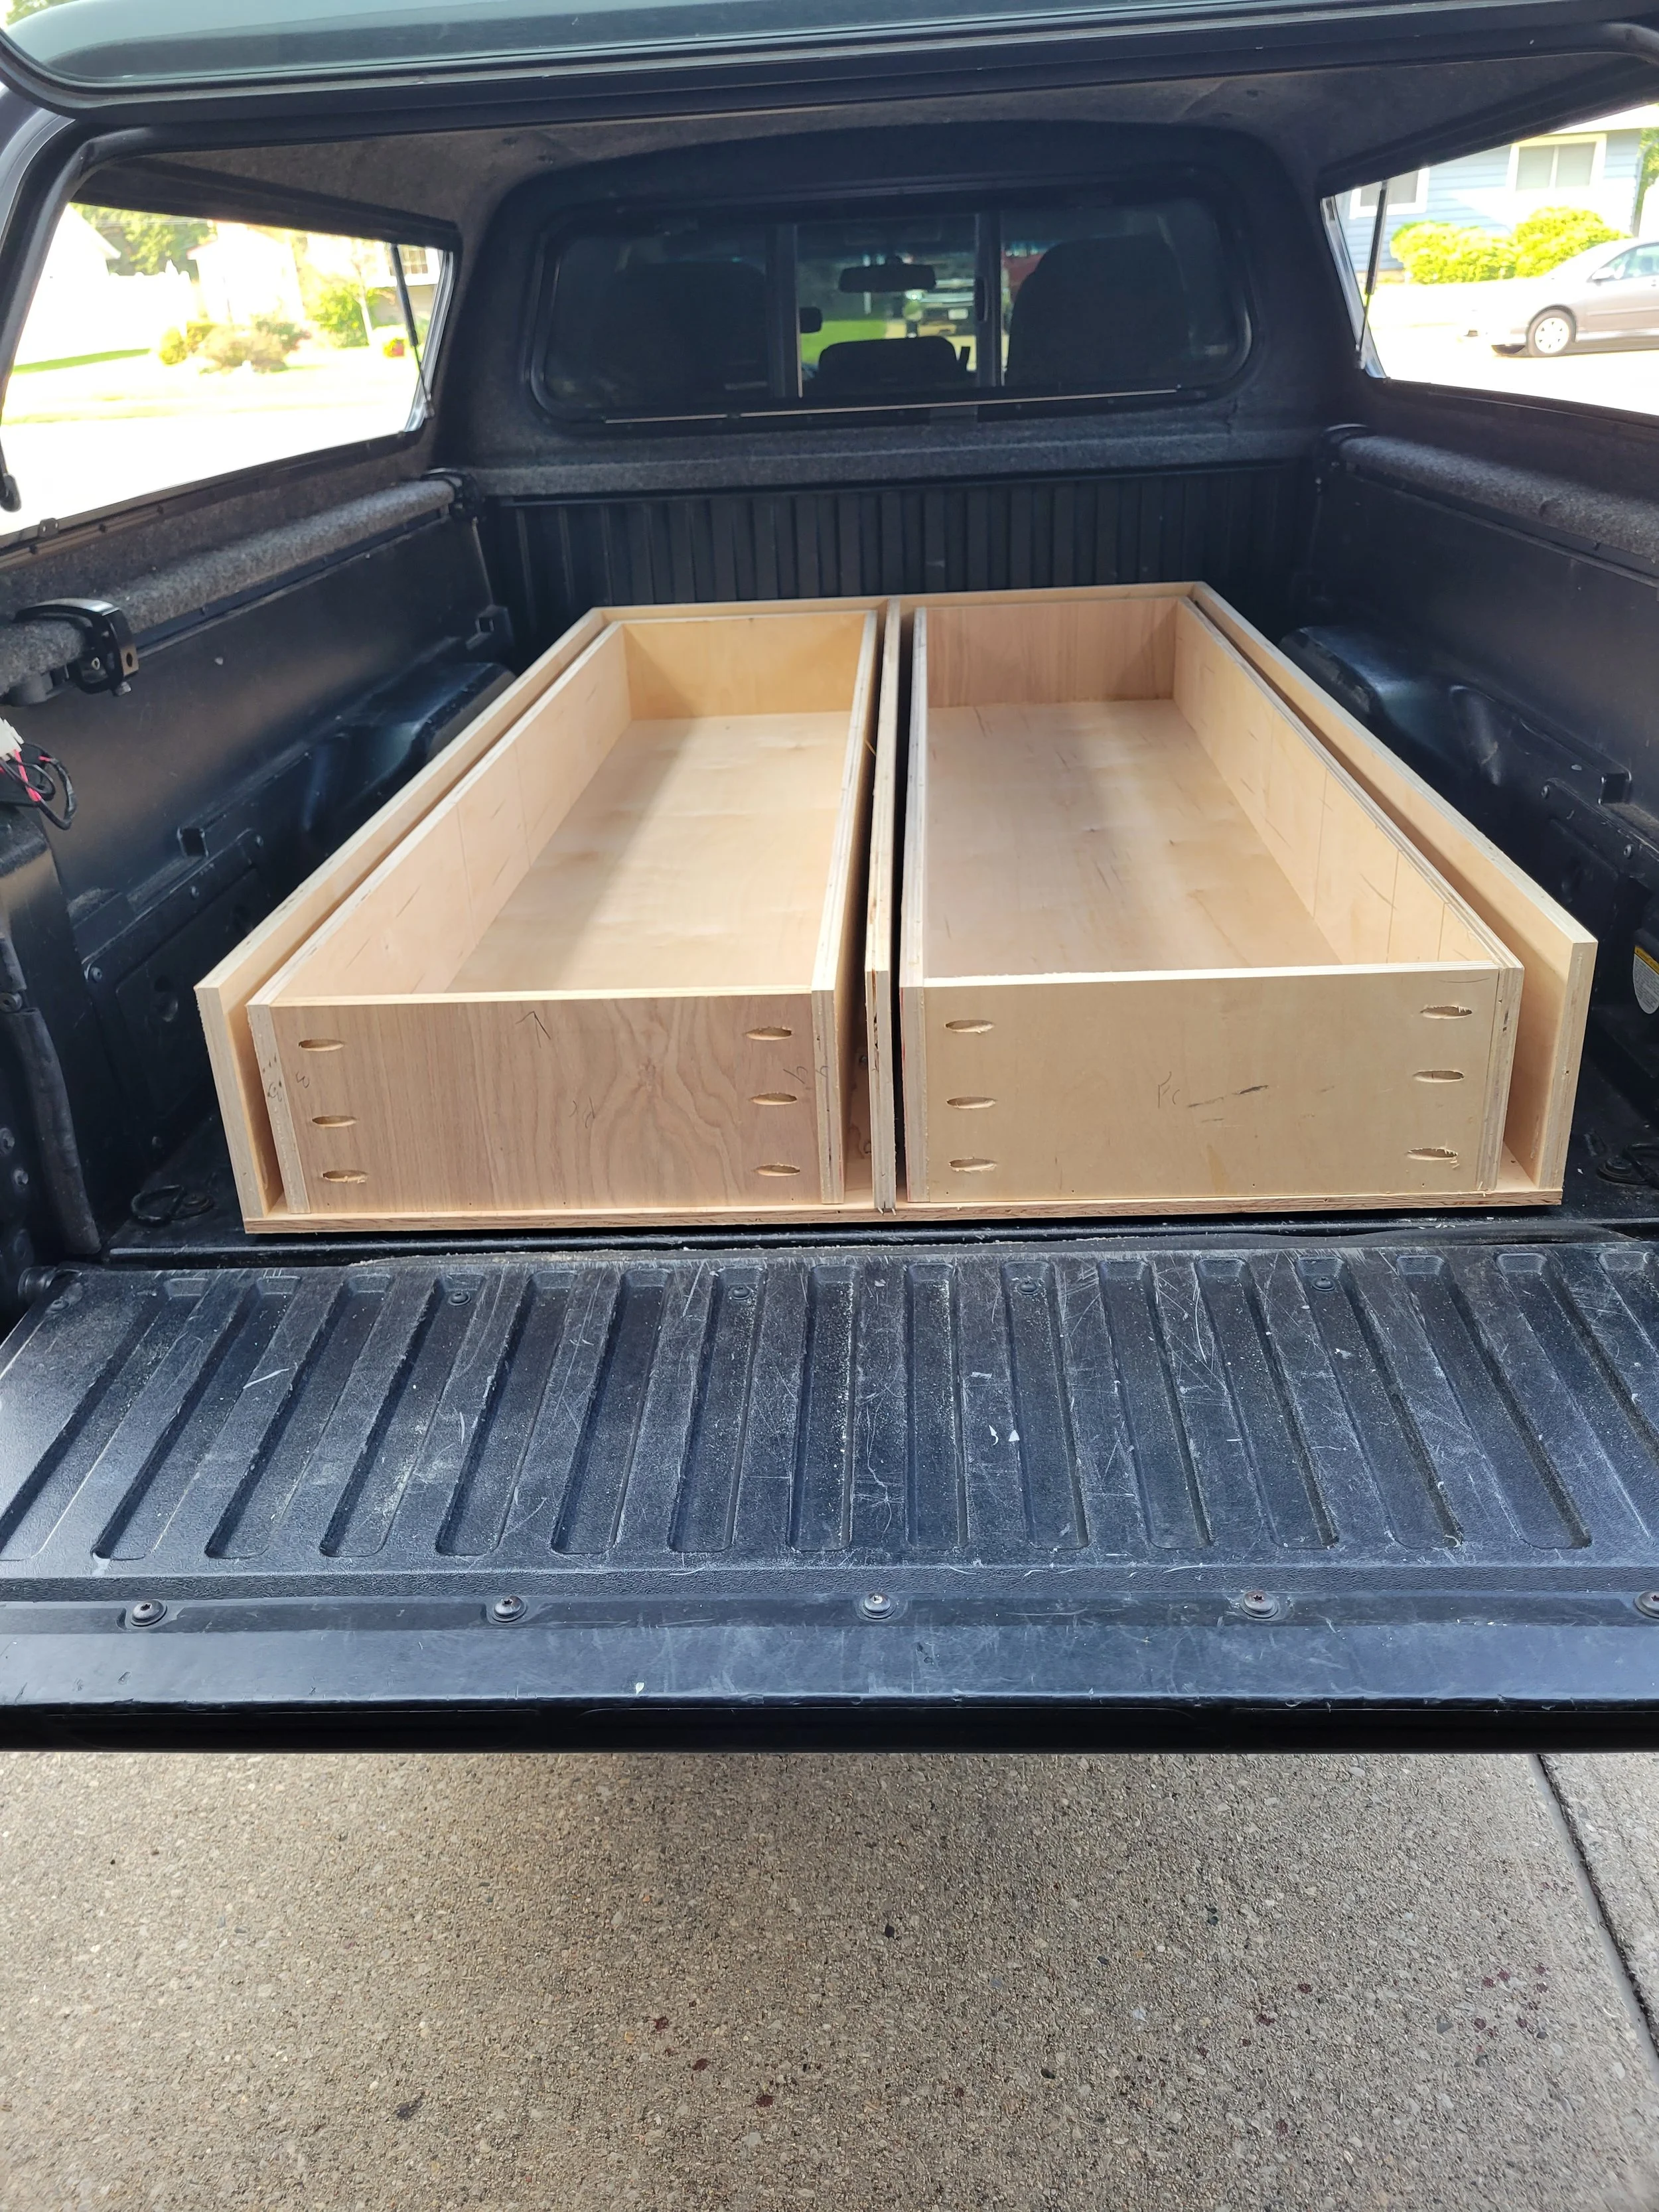
I then used pocket screws to assemble the drawers. I used a lot of pocket screws for this project. I don’t generally use pocket screws for finer woodworking but for something that’s just going to live a life of constant abuse I am fine with it. They also are one of the easier and stronger ways to fasten plywood.

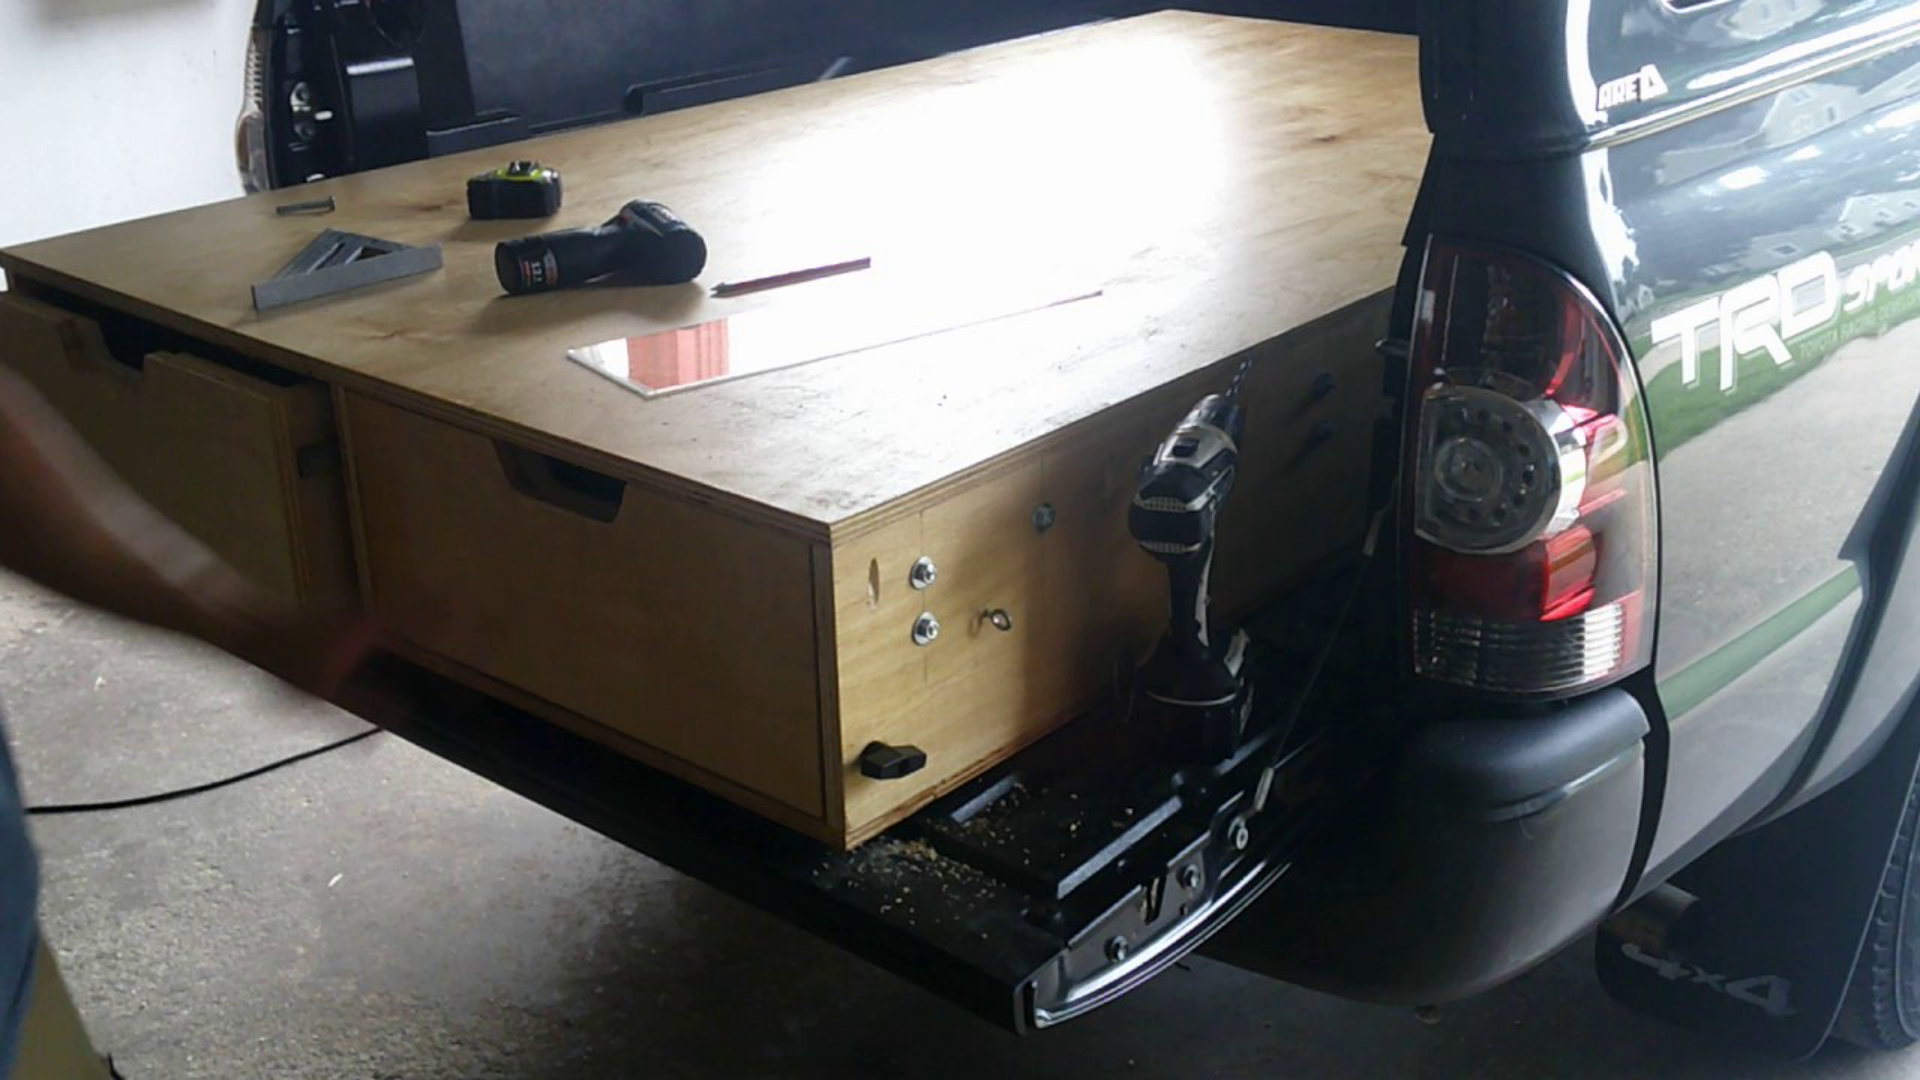
I made drawer fronts that I would attach to the drawers. I used a bandsaw to cut out a handle shape for easy grabbing. The drawer fronts aren’t necessary but I made them bigger than the drawers to cover the gaps left for the rails.
I then cut my top to size out of 3/4” plywood. At this point I applied Spar Urethane to all of my pieces to give it some protection from any water that makes it’s way into the bed. If you plan on ever using a car wash you’re going to want to do this. If you plan on having no top over your bed drawers then I don’t know what to tell you.
Skater Boi

Now came the part that would make or break the project. For the drawer slides I used 3/4” steel square tubing that would run along skateboard bearings. So I collected all of my skateboards from my poser skater boi days and got to work.
I had to cut the tubing to the length of my drawers with an angle grinder. I then attached them to the drawer sides using self drilling screws that are made for wood to metal attachments. I used a couple of blocks to set the tubing at the right height and alignment on each side.

The bearings would be attached to the frame sides using 5/16 bolts spaced 10” apart. At every 10” I had a pair of bolts that would contact the top and the bottom of the rail. At the nearest 20” to the opening, I spaced the bolts 5”. This was because as the drawer is fully extended there is a lot of leverage on those bearings so more support is needed.
In order to make sure all of the bearings were properly aligned I used a jig that I had made out of scrap wood. I drilled two holes in a piece of wood that will rest on the top edge of the sidewall. The holes will be at the same heights every time. For the first time in my life, I couldn’t mess it up.

I then inserted the bolts, some washers, the bearings, and nuts. I used blue threadlocker (the removable kind) to make sure nothing loosened up over time. I made sure to not overtighten everything because if the bearings don’t spin then they’re pretty useless.

With the bearings on, I then attached the top to the framework with pocket screws yet again. I slid the assembly into my bed and then slid the drawers into the assembly. I installed the drawer fronts and dividers and I was just about done.
Turnbuckles. Not just for pirates.

Because I wanted to be able to take this bad boy out whenever I want, I couldn’t just attach it to the bed. But it can’t sit unsecured because once a fully loaded drawer opens the whole thing will tip up.
So I channeled my inner pirate and came to the conclusion that a turnbuckle was needed. I already had mounting points in the truck bed. All I needed to do was attach a screw eye on both sides at the back of the assembly and then use turnbuckles to secure them to the bed mounting points. Whenever I want to remove the system all I have to do is loosen the turnbuckles and unhook them. I can remove the entire system in less than 5 minutes. As with most things in life, if it takes more than 5 minutes then you’re not doing it right.
Because I’m never satisfied I decided to make a way to keep the drawers closed or open, and to prevent them from sliding all the way out for those times I forget to close my tailgate before driving on the freeway. I nailed a couple blocks to the sides of the drawers. I then used a bolt, t-handle, and a spring (all of which I had lying around) to make a spring loaded knob. The bolt will hit against the block preventing it from moving. Once I pull on the knob the bolt pulls past the block and slideage can occur.
Put a Lid on it
As I was planning on using these drawers for my sketchy contractor business, I wanted to be able to also them for work benches. I nailed small strips of plywood to the insides of the drawers 1/2” from the tops so that I could make plywood covers that would rest on these strips.

I then cut 1/2” plywood tops and cut out some holes for handles. My drawers were finally done and I was ready to fill that lonely space in my bed. with tools.
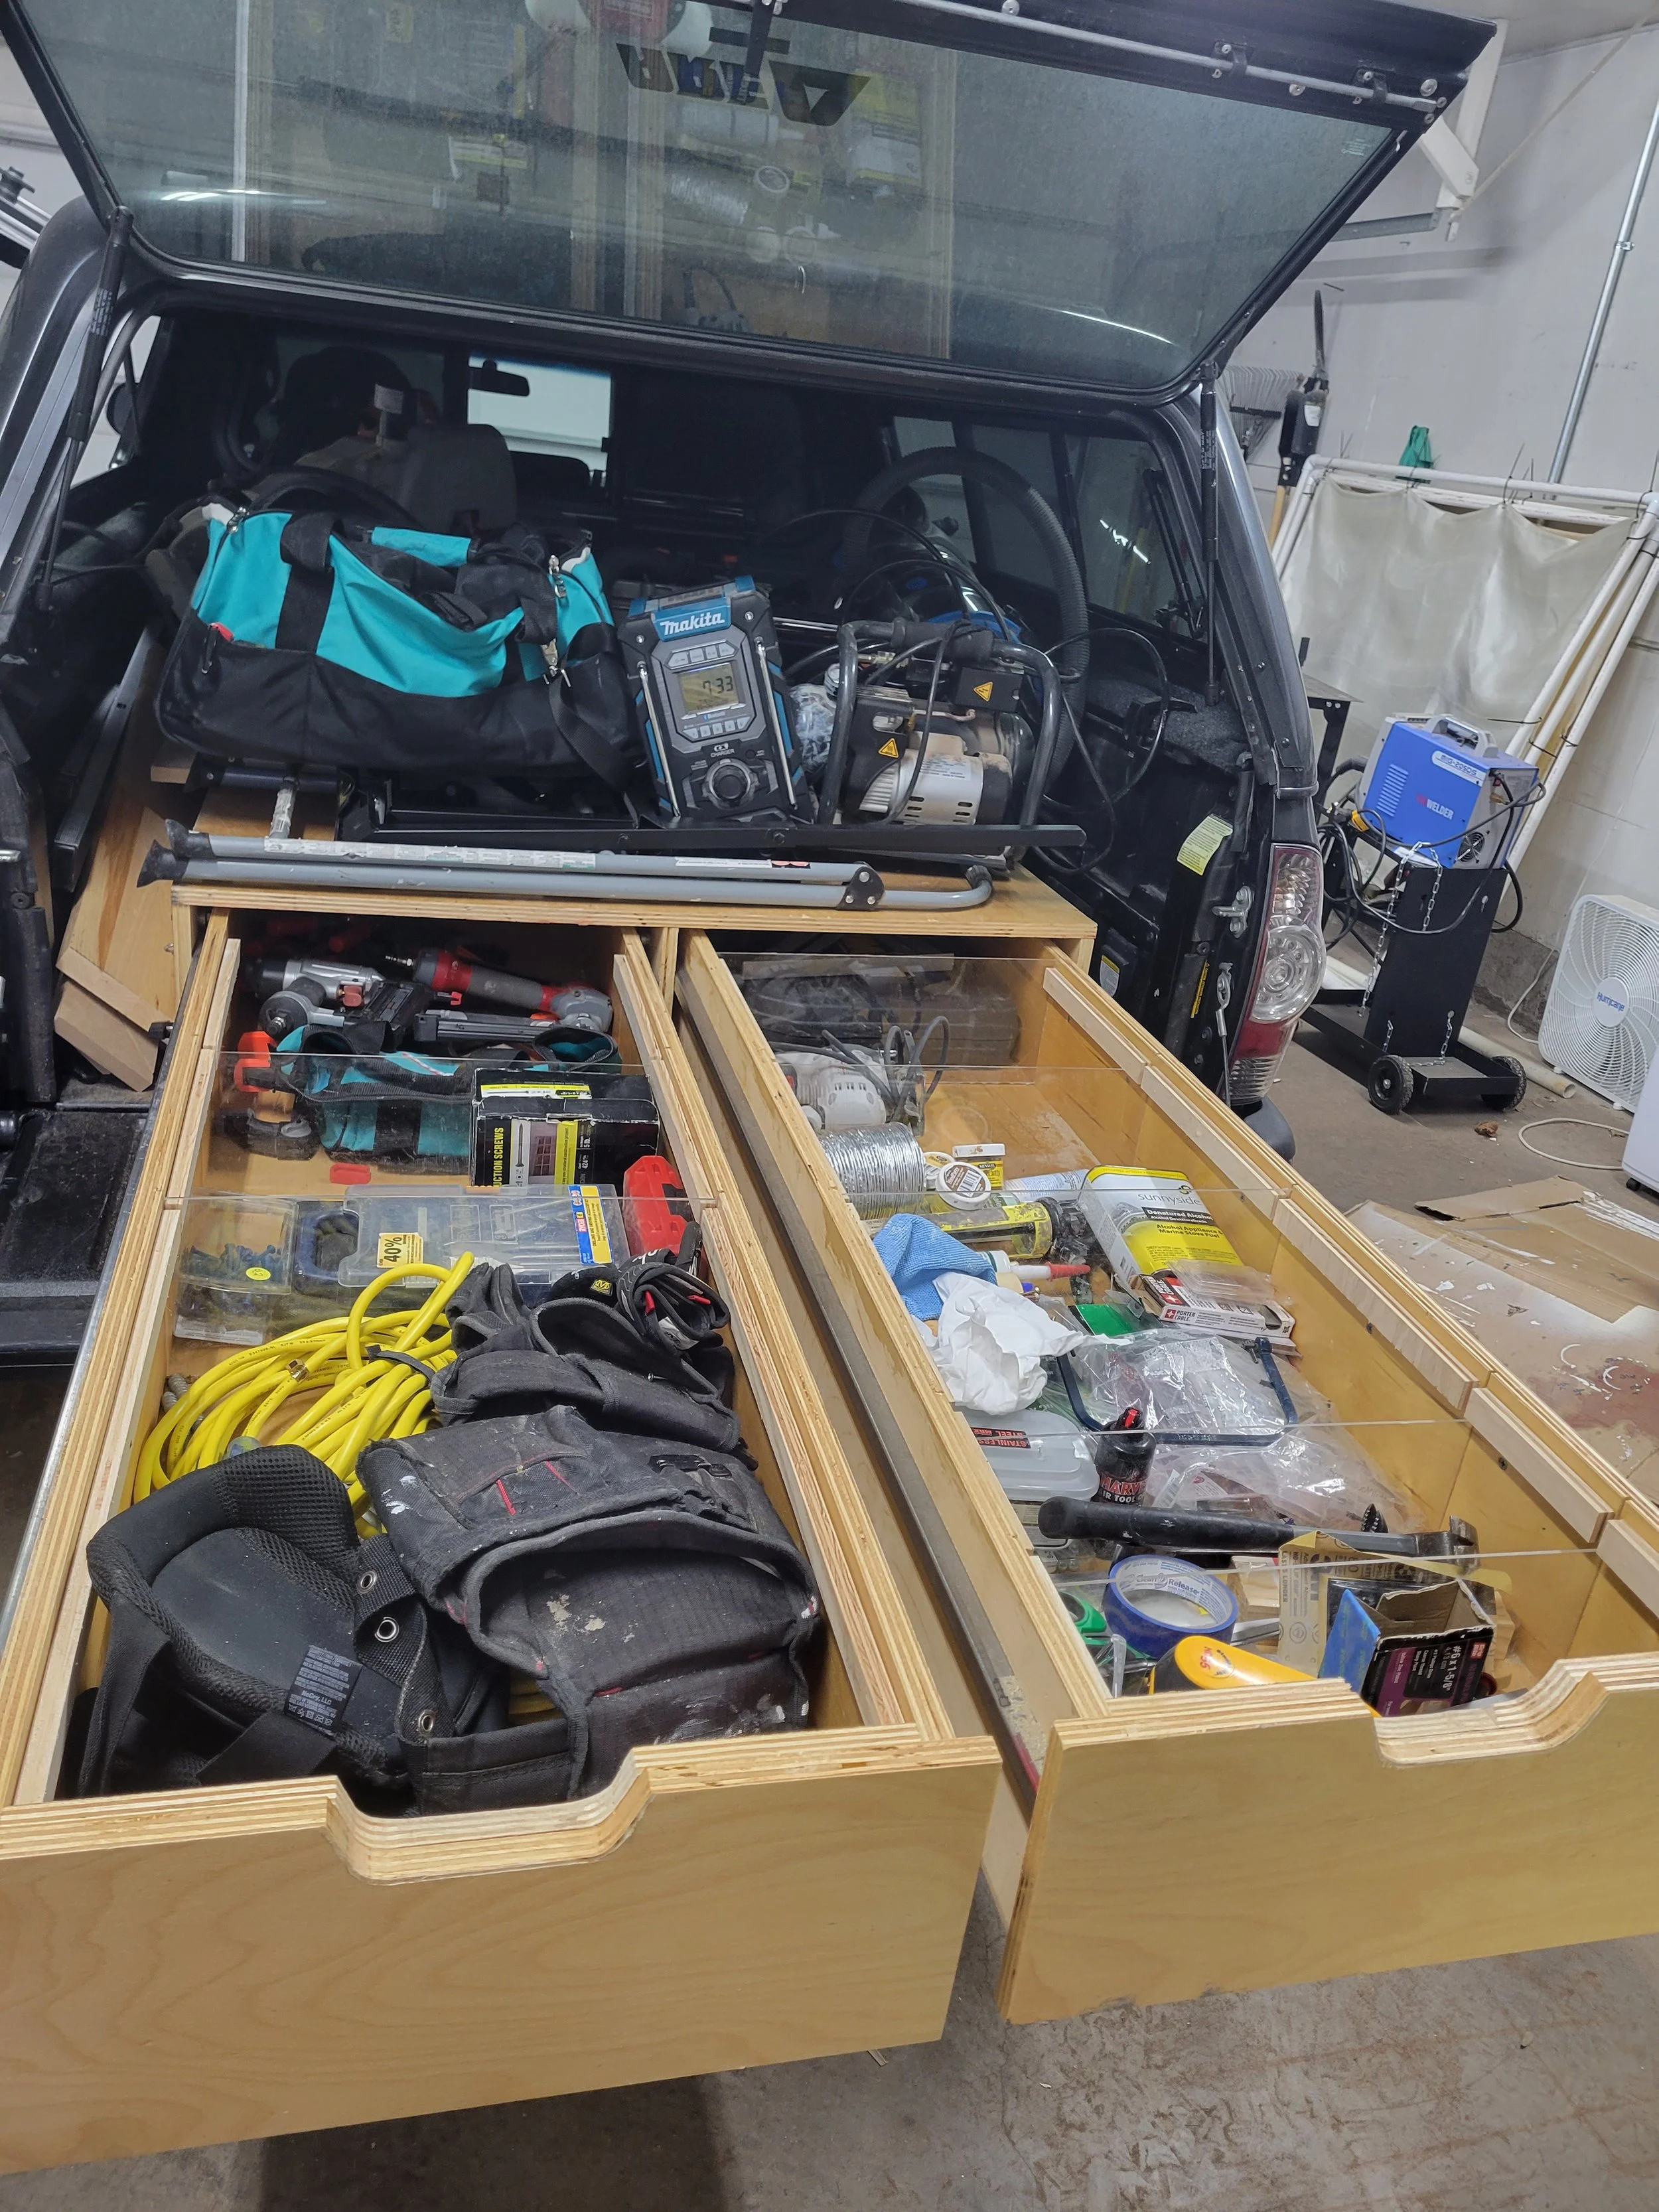
I made these drawers a couple months before getting around to writing this and I have had zero issues. They hold a ton of junk. They’re even big enough to hold two bodies should the need ever arise, as long as the person is under 5’10”. In this picture I’ve got the drawers pretty well loaded and still have space to store a table saw, miter saw and stand, and other tools on the platform. I also have plenty of space to sleep on the top for camping trips or the impending apocalypse.