
Looks Matter
You can’t change your girlfriend’s looks. but you can make your house look better.
Tired of coming to home to an average looking family inside an average looking house? There may be nothing you can do about your family, but you don’t have to settle for a house that you can’t brag to your friends about. In this blog I run through how I completely redid the exterior of my house which included siding, soffits, gutters, door and window replacements, as well as the 12 pack of cans of worms that I opened along the way. I won’t bore you with the how-to. There are plenty of places on the internet that can teach you much better than I ever could. Instead I’ll talk about materials, design choices, and what to do when you uncover a wall full of rot.
It’s not me. it’s you.
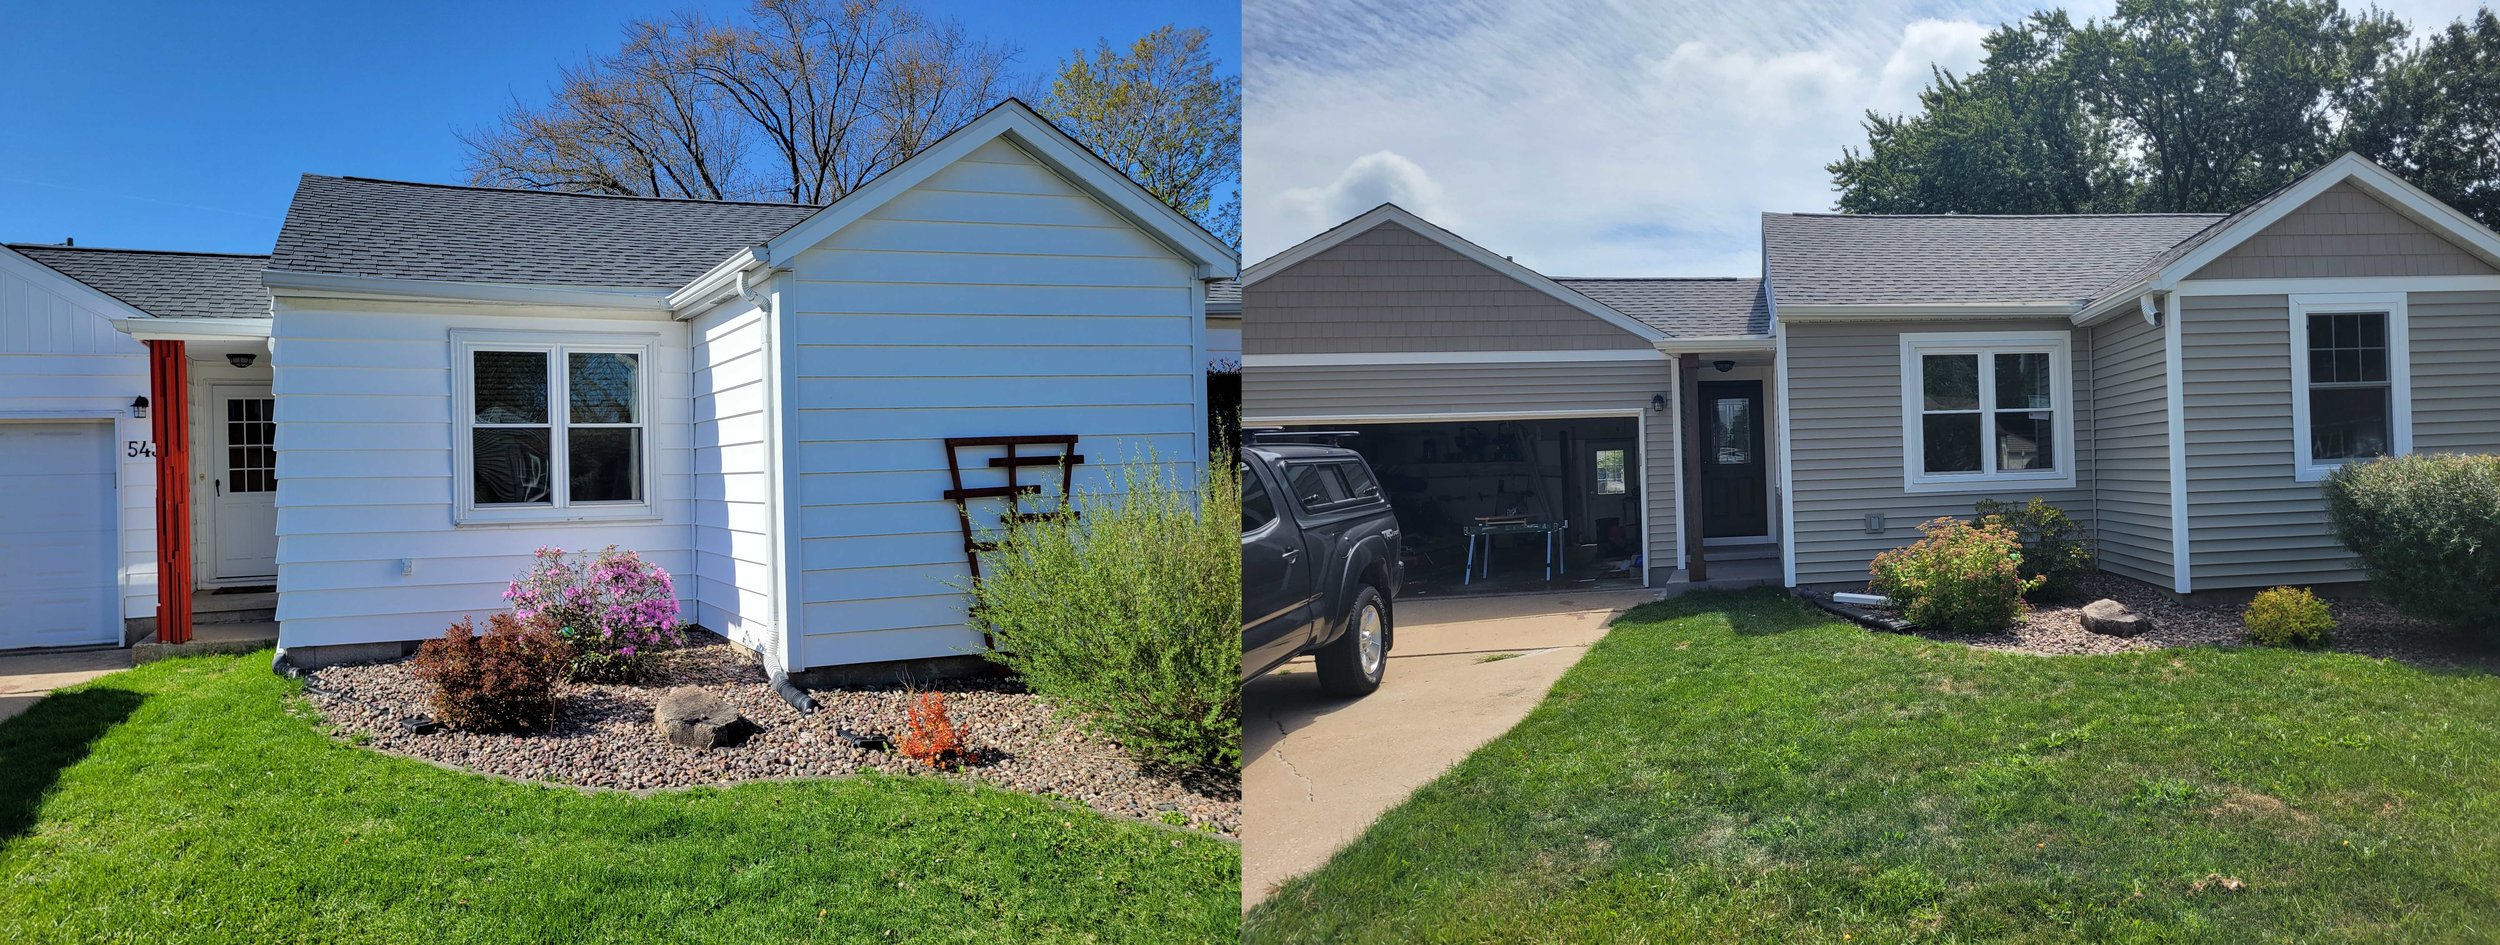
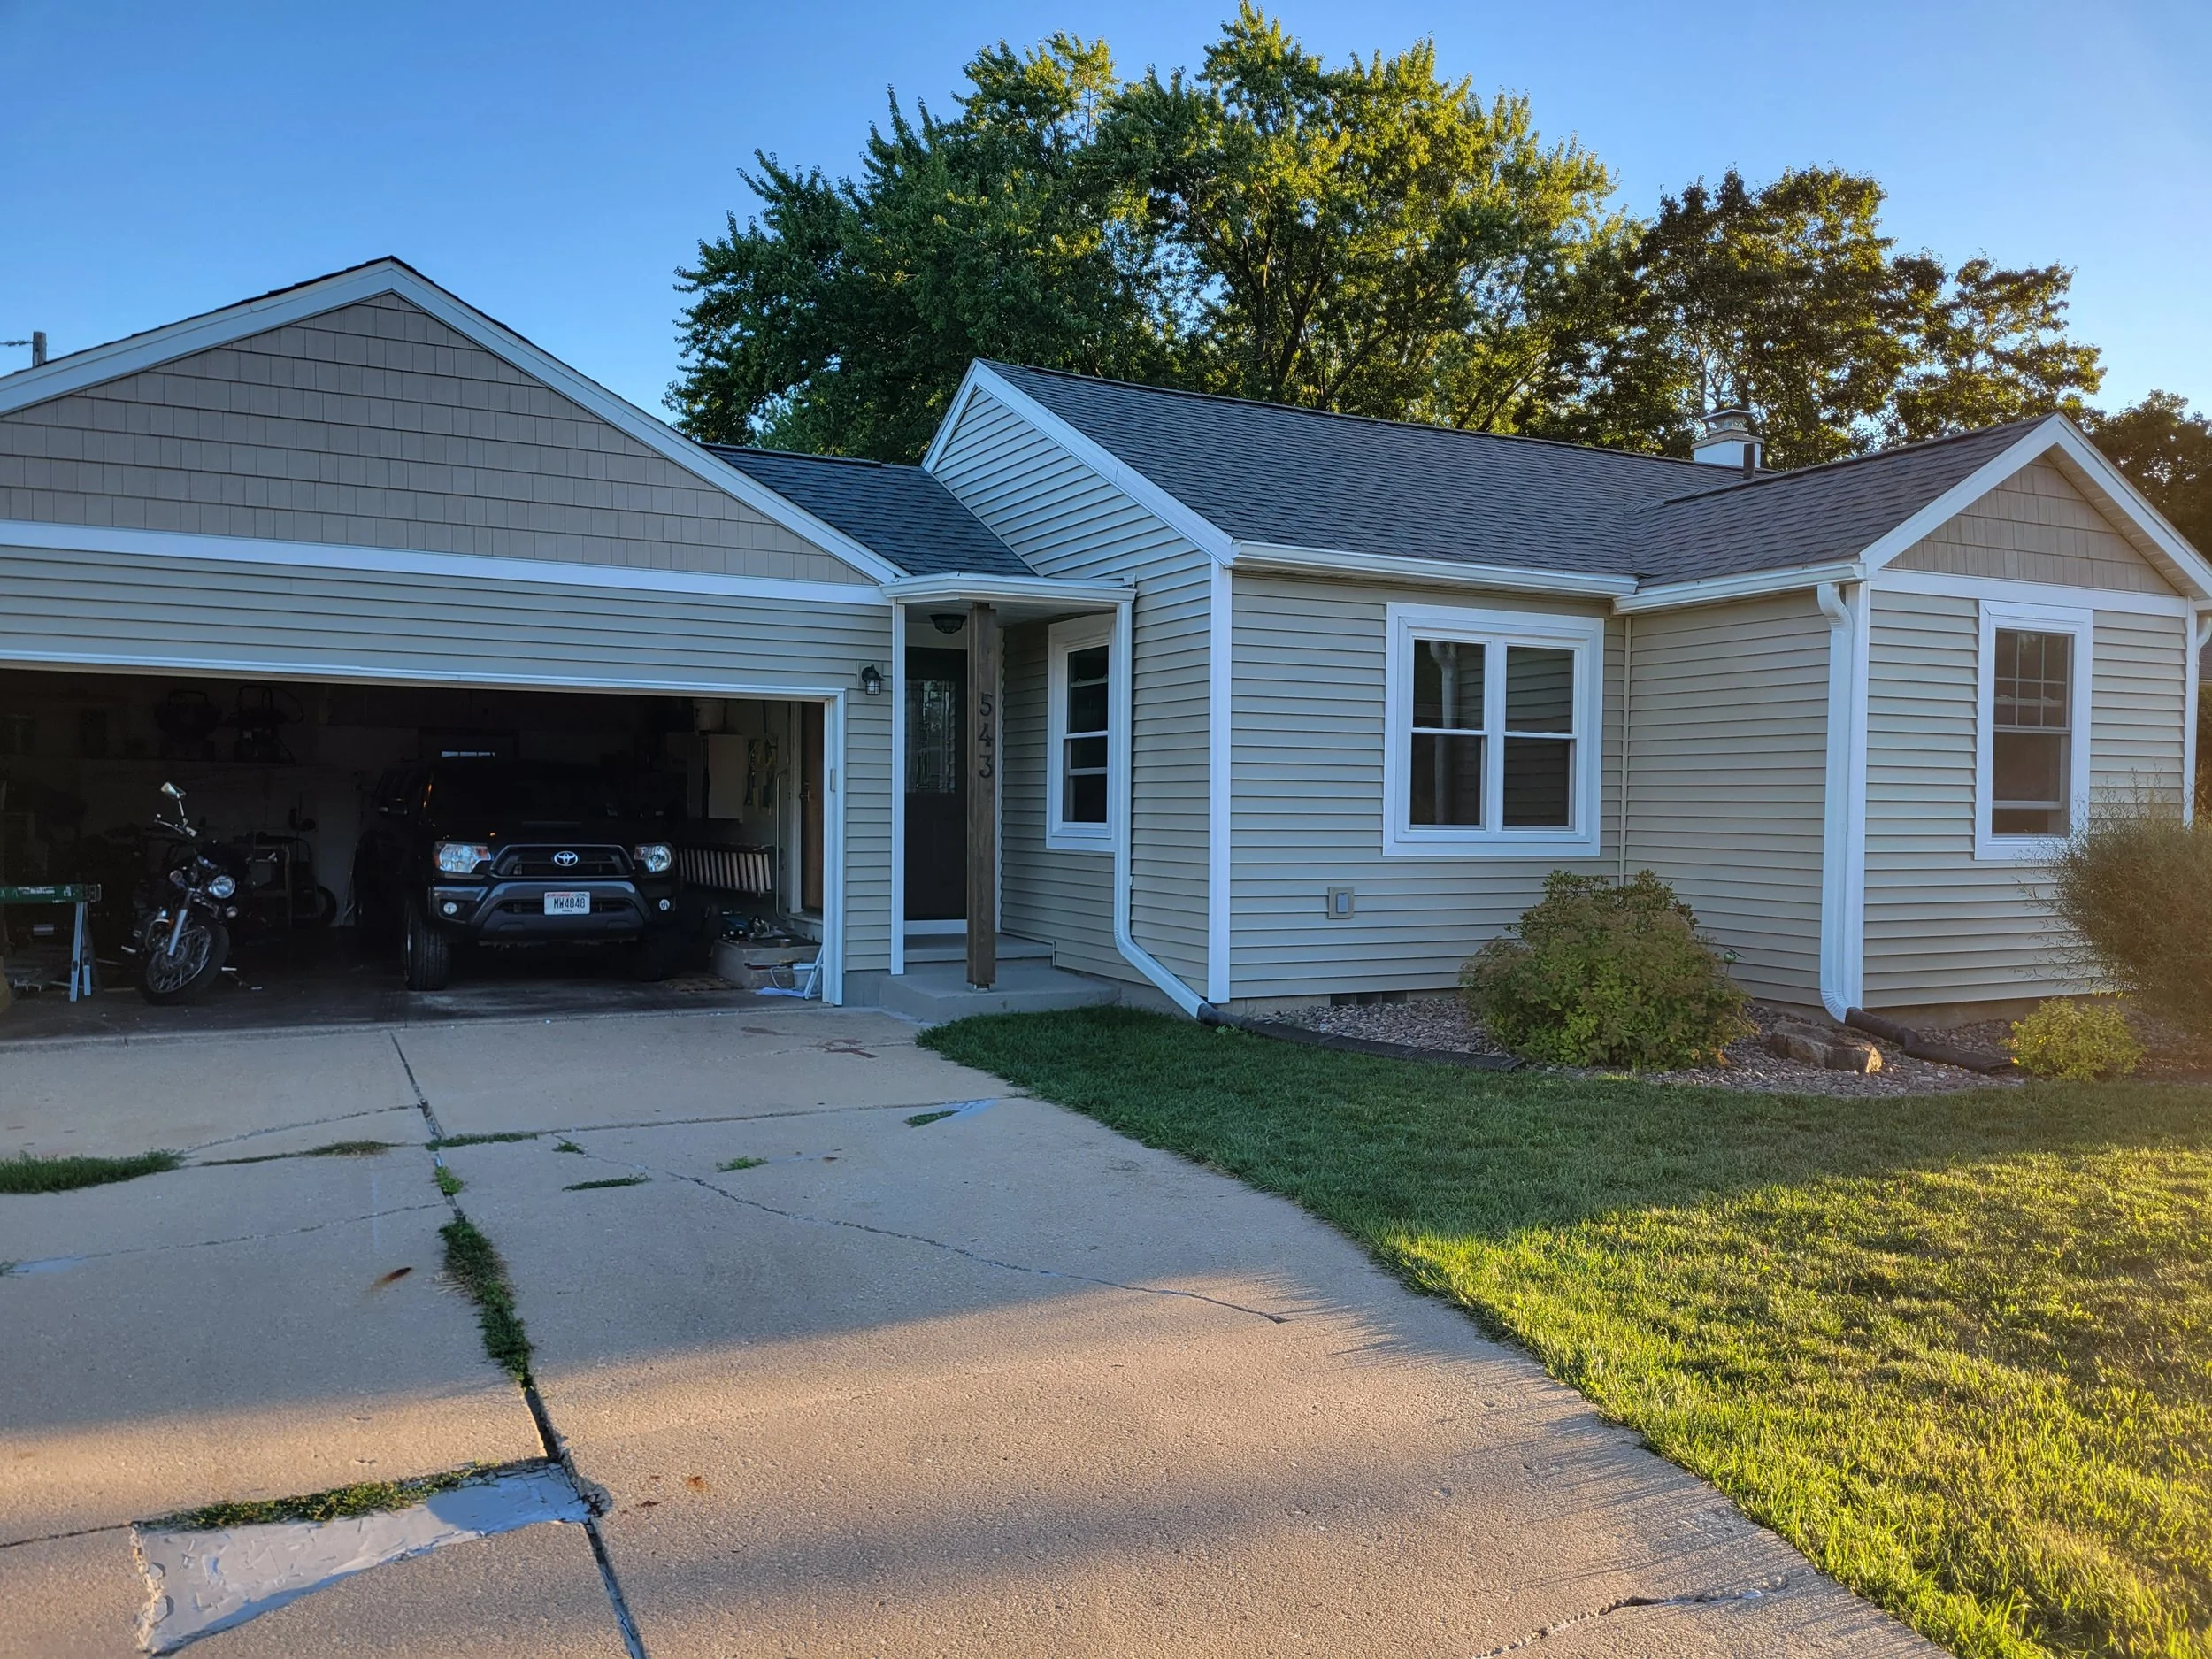
I’ve owned my home for a handful of years and have remodeled the entire inside. But from the outside it still looked like the occupants were an elderly couple whose kids were currently figuring out which nursing home to put them in. The white vinyl siding was very much nearing the end of its lifespan. It was chalking so bad that my dog would turn colors when she rubbed up against it. Chalking is residue from the vinyl material deteriorating. No amount of power washing could get rid of the staining from years (I’m guessing decades) of the elements. Pieces were coming loose and corners were falling off. There were multiple spots where it was clear that water was getting behind the siding. Plants were literally growing up the inside of the siding. At the front door, water would run out from behind the siding during rain.
On top of that, my wood soffits and fascia were noticeably rotted in areas and needed replacement. The caulking between the siding and my windows was splitting, leaving gaps for water to get into. My gutters were functioning for the most part, but given the considerable amount of rust on the inside of them I figured they should be replaced since they would have to be taken down anyway.
Oh and then there’s the 1960’s looking wood front door and an annoying windowless bump out at the front. I was told by neighbors that there used to be a window there but it was closed up so that the owner could mount a TV on the wall. Some people don’t deserve homes.


help yourself. oh, and others too.
After years of the cycle of putting it off, getting a quote that I could never afford, and then putting it off again; I decided to tackle this project myself. I had never done any of this before so I decided to volunteer with Habitat for Humanity. This was one of the best decisions I had ever made. I got free on the job training (and snacks) and was able to make all of my beginner mistakes on somebody else’s house with materials that I wasn’t paying for. If you are a DIY’er with no experience 10/10 would recommend volunteering.
My quotes for siding, soffit, and gutters were in the ballpark of $35K. I was able to do all of that myself, plus a door and window installation for under $15K. I also ran into a number of issues along the way that I undoubtedly would have either been charged for, or would have just gone uncorrected.
The big wide world of siding materials
I put in a solid month of planning this project out. A large chunk of this time was choosing materials and colors, and it was a painful process. I’m sorry to say it sucks and I don’t think there’s much you can do about it.
Obviously the biggest choice is going to be the siding material. I looked into three options: basic vinyl, LP Smartside (engineered wood), and insulated vinyl. The cheapest by far is the basic vinyl. My issue was that I knew that my walls were not even close to flat and I was going to need something a little more rigid to compensate for this so that the new stuff wouldn’t look wavy. Smartside and insulated vinyl are pretty similar in price but I had no experience installing smartside while insulated vinyl installs just like regular vinyl, which I knew how to do. Also insulated vinyl claims an R value of 2 and is supposed to insulated against outdoor noise. I live on a busy street.
Something that would have been nice to know, however, is that insulated vinyl is a pain in the ass to install. A sheet of foam is glued to the back of the siding and this foam has to be cut or scraped away when installing partial pieces. Looking back I think I would go with the Smartside next time.

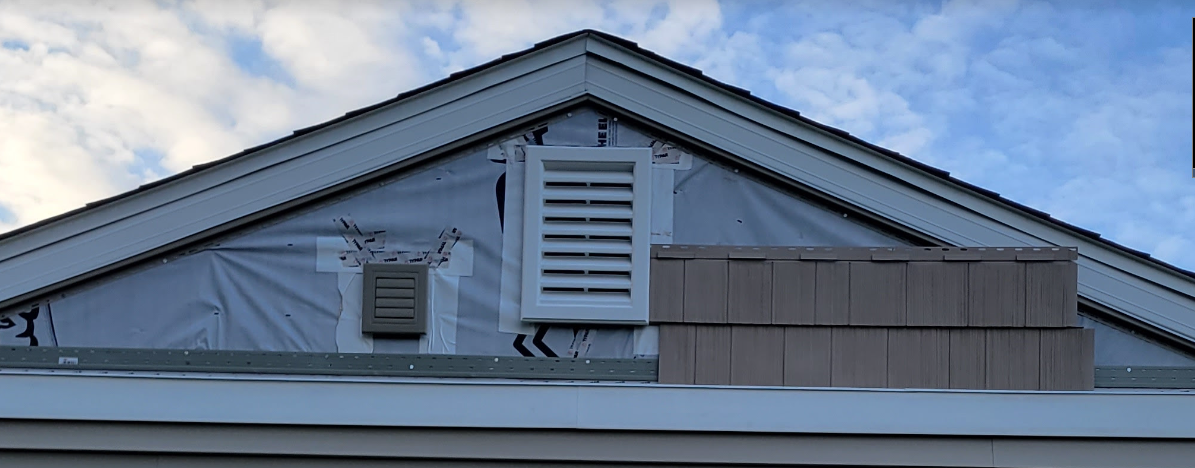
For the peaks I chose a vinyl shake. It’s a lot more expensive than normal horizontal lap but it adds a nice texture.
I also chose to use what are called lineals (or band board) to transition from the lap siding to the shake siding. If you plan it out right, you don’t need to use any J Channel, which makes it look a lot cleaner in my opinion.
Window Pain
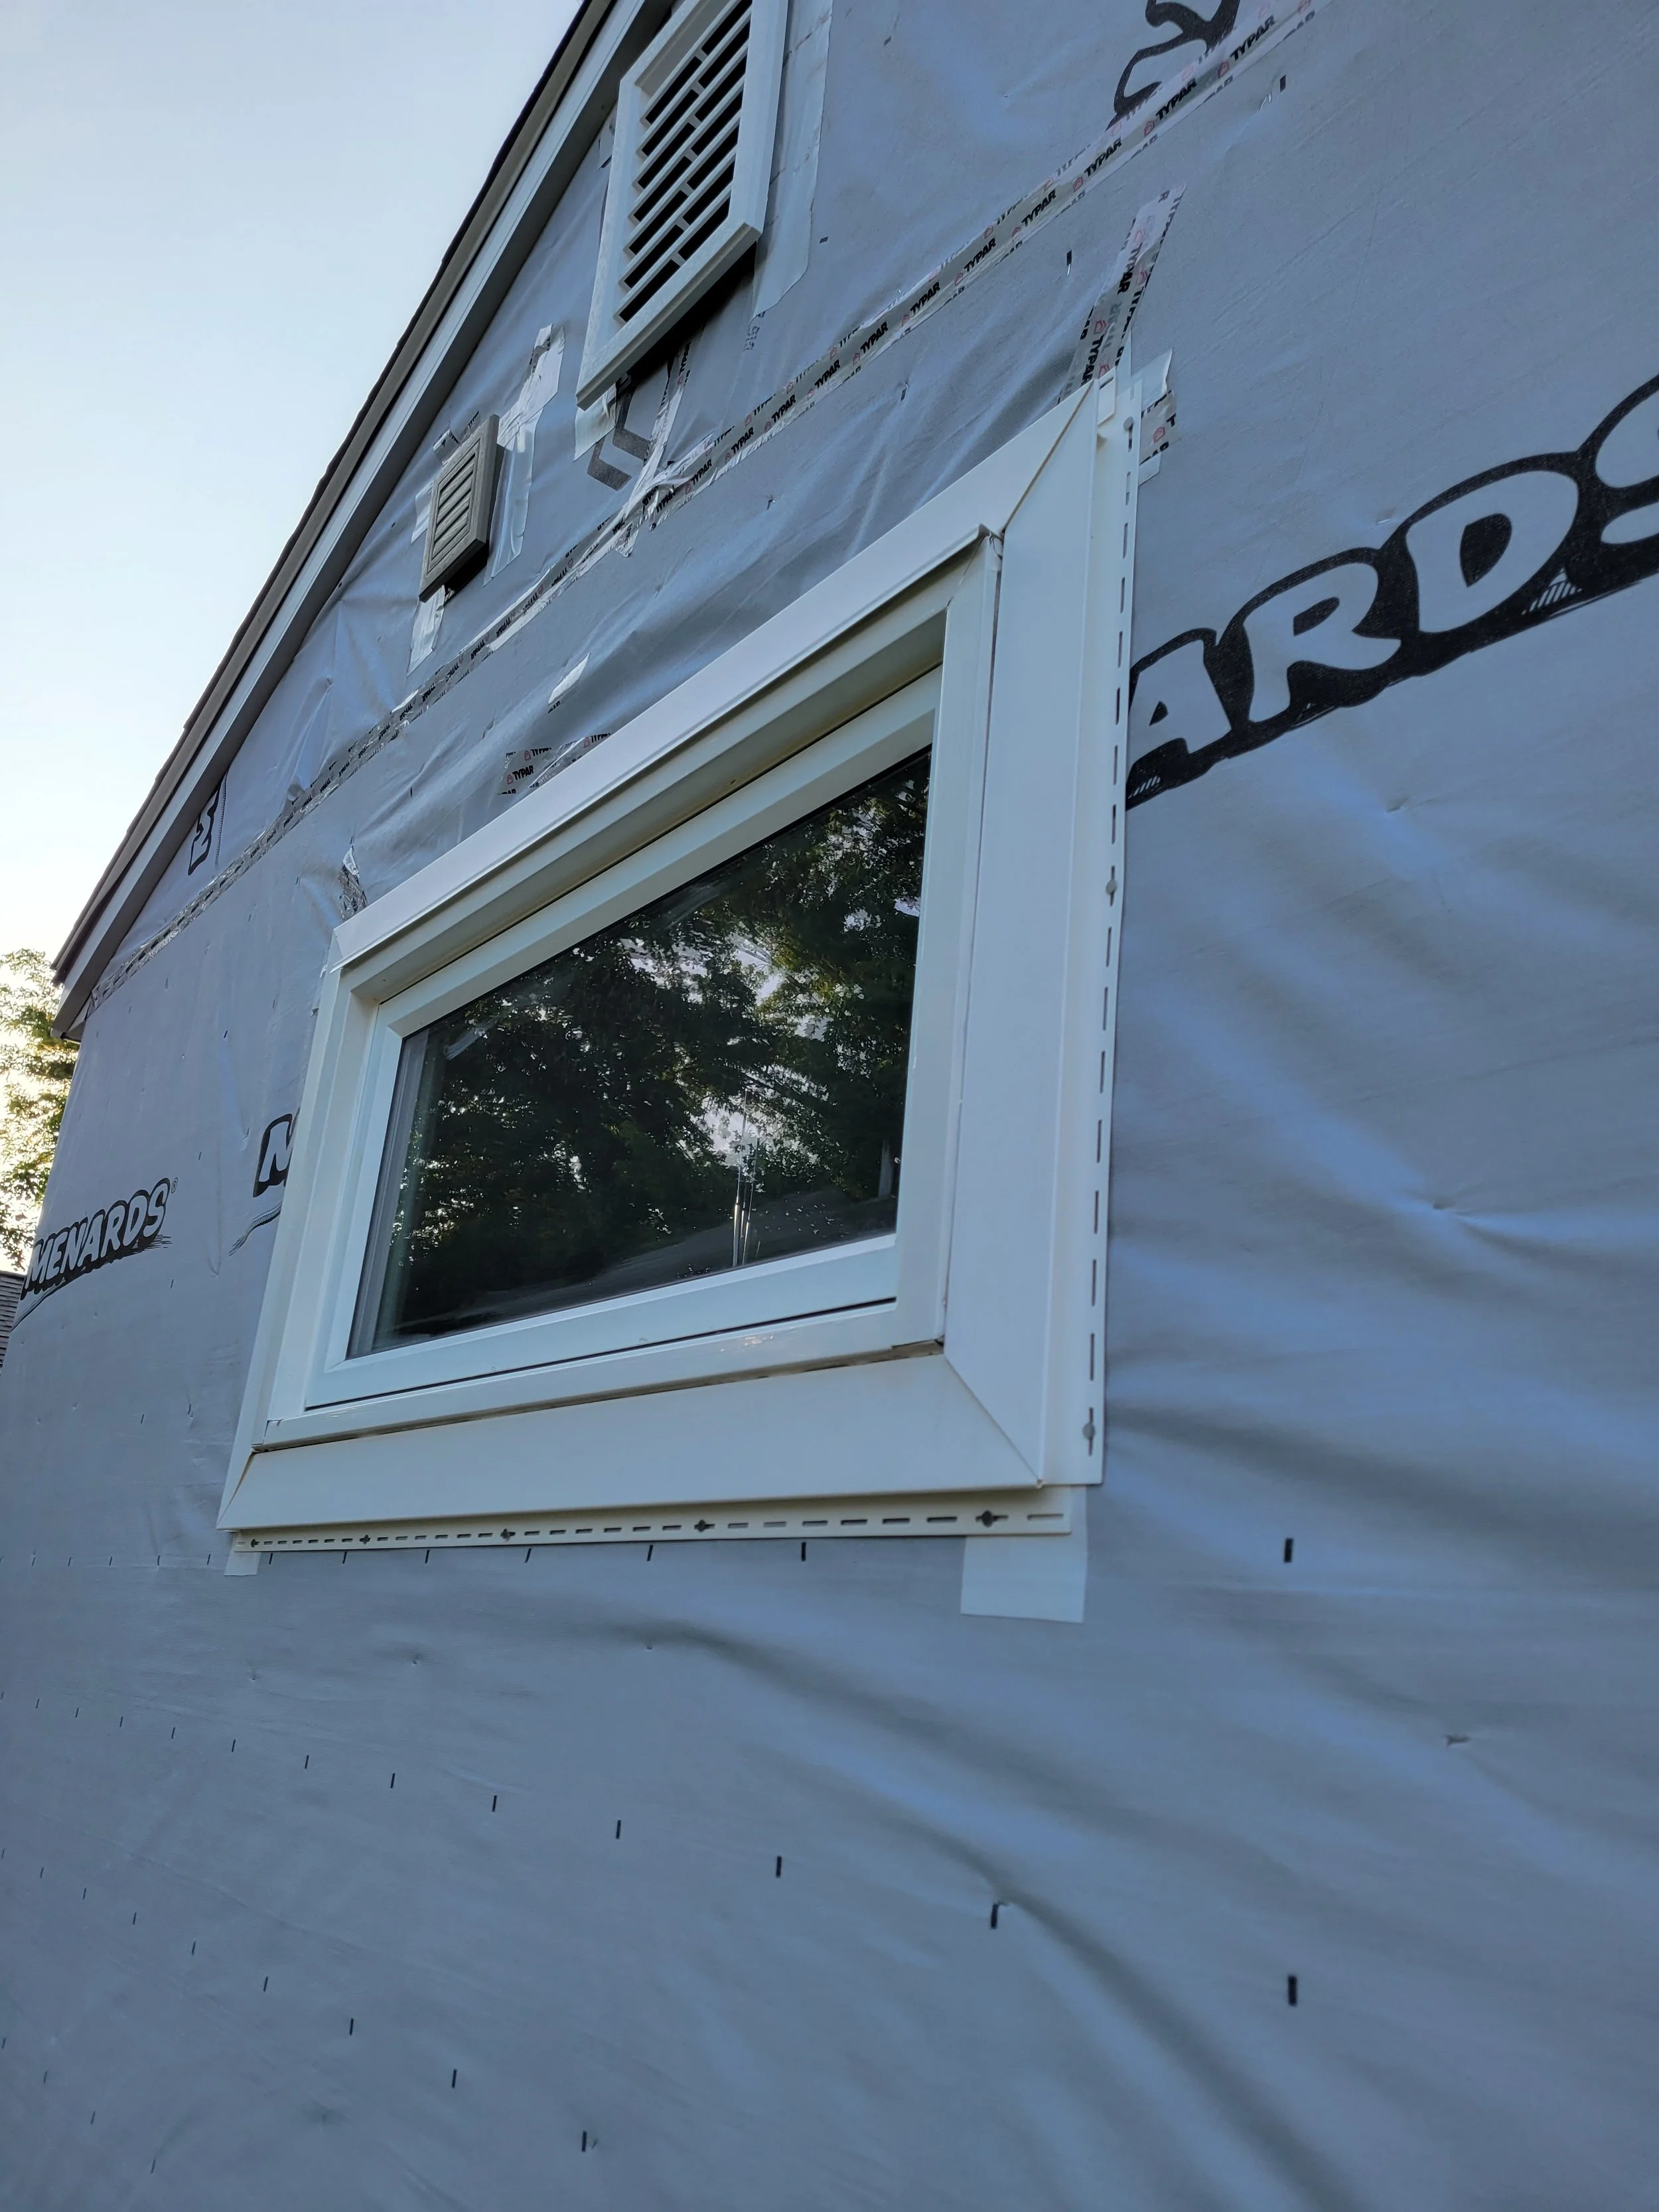
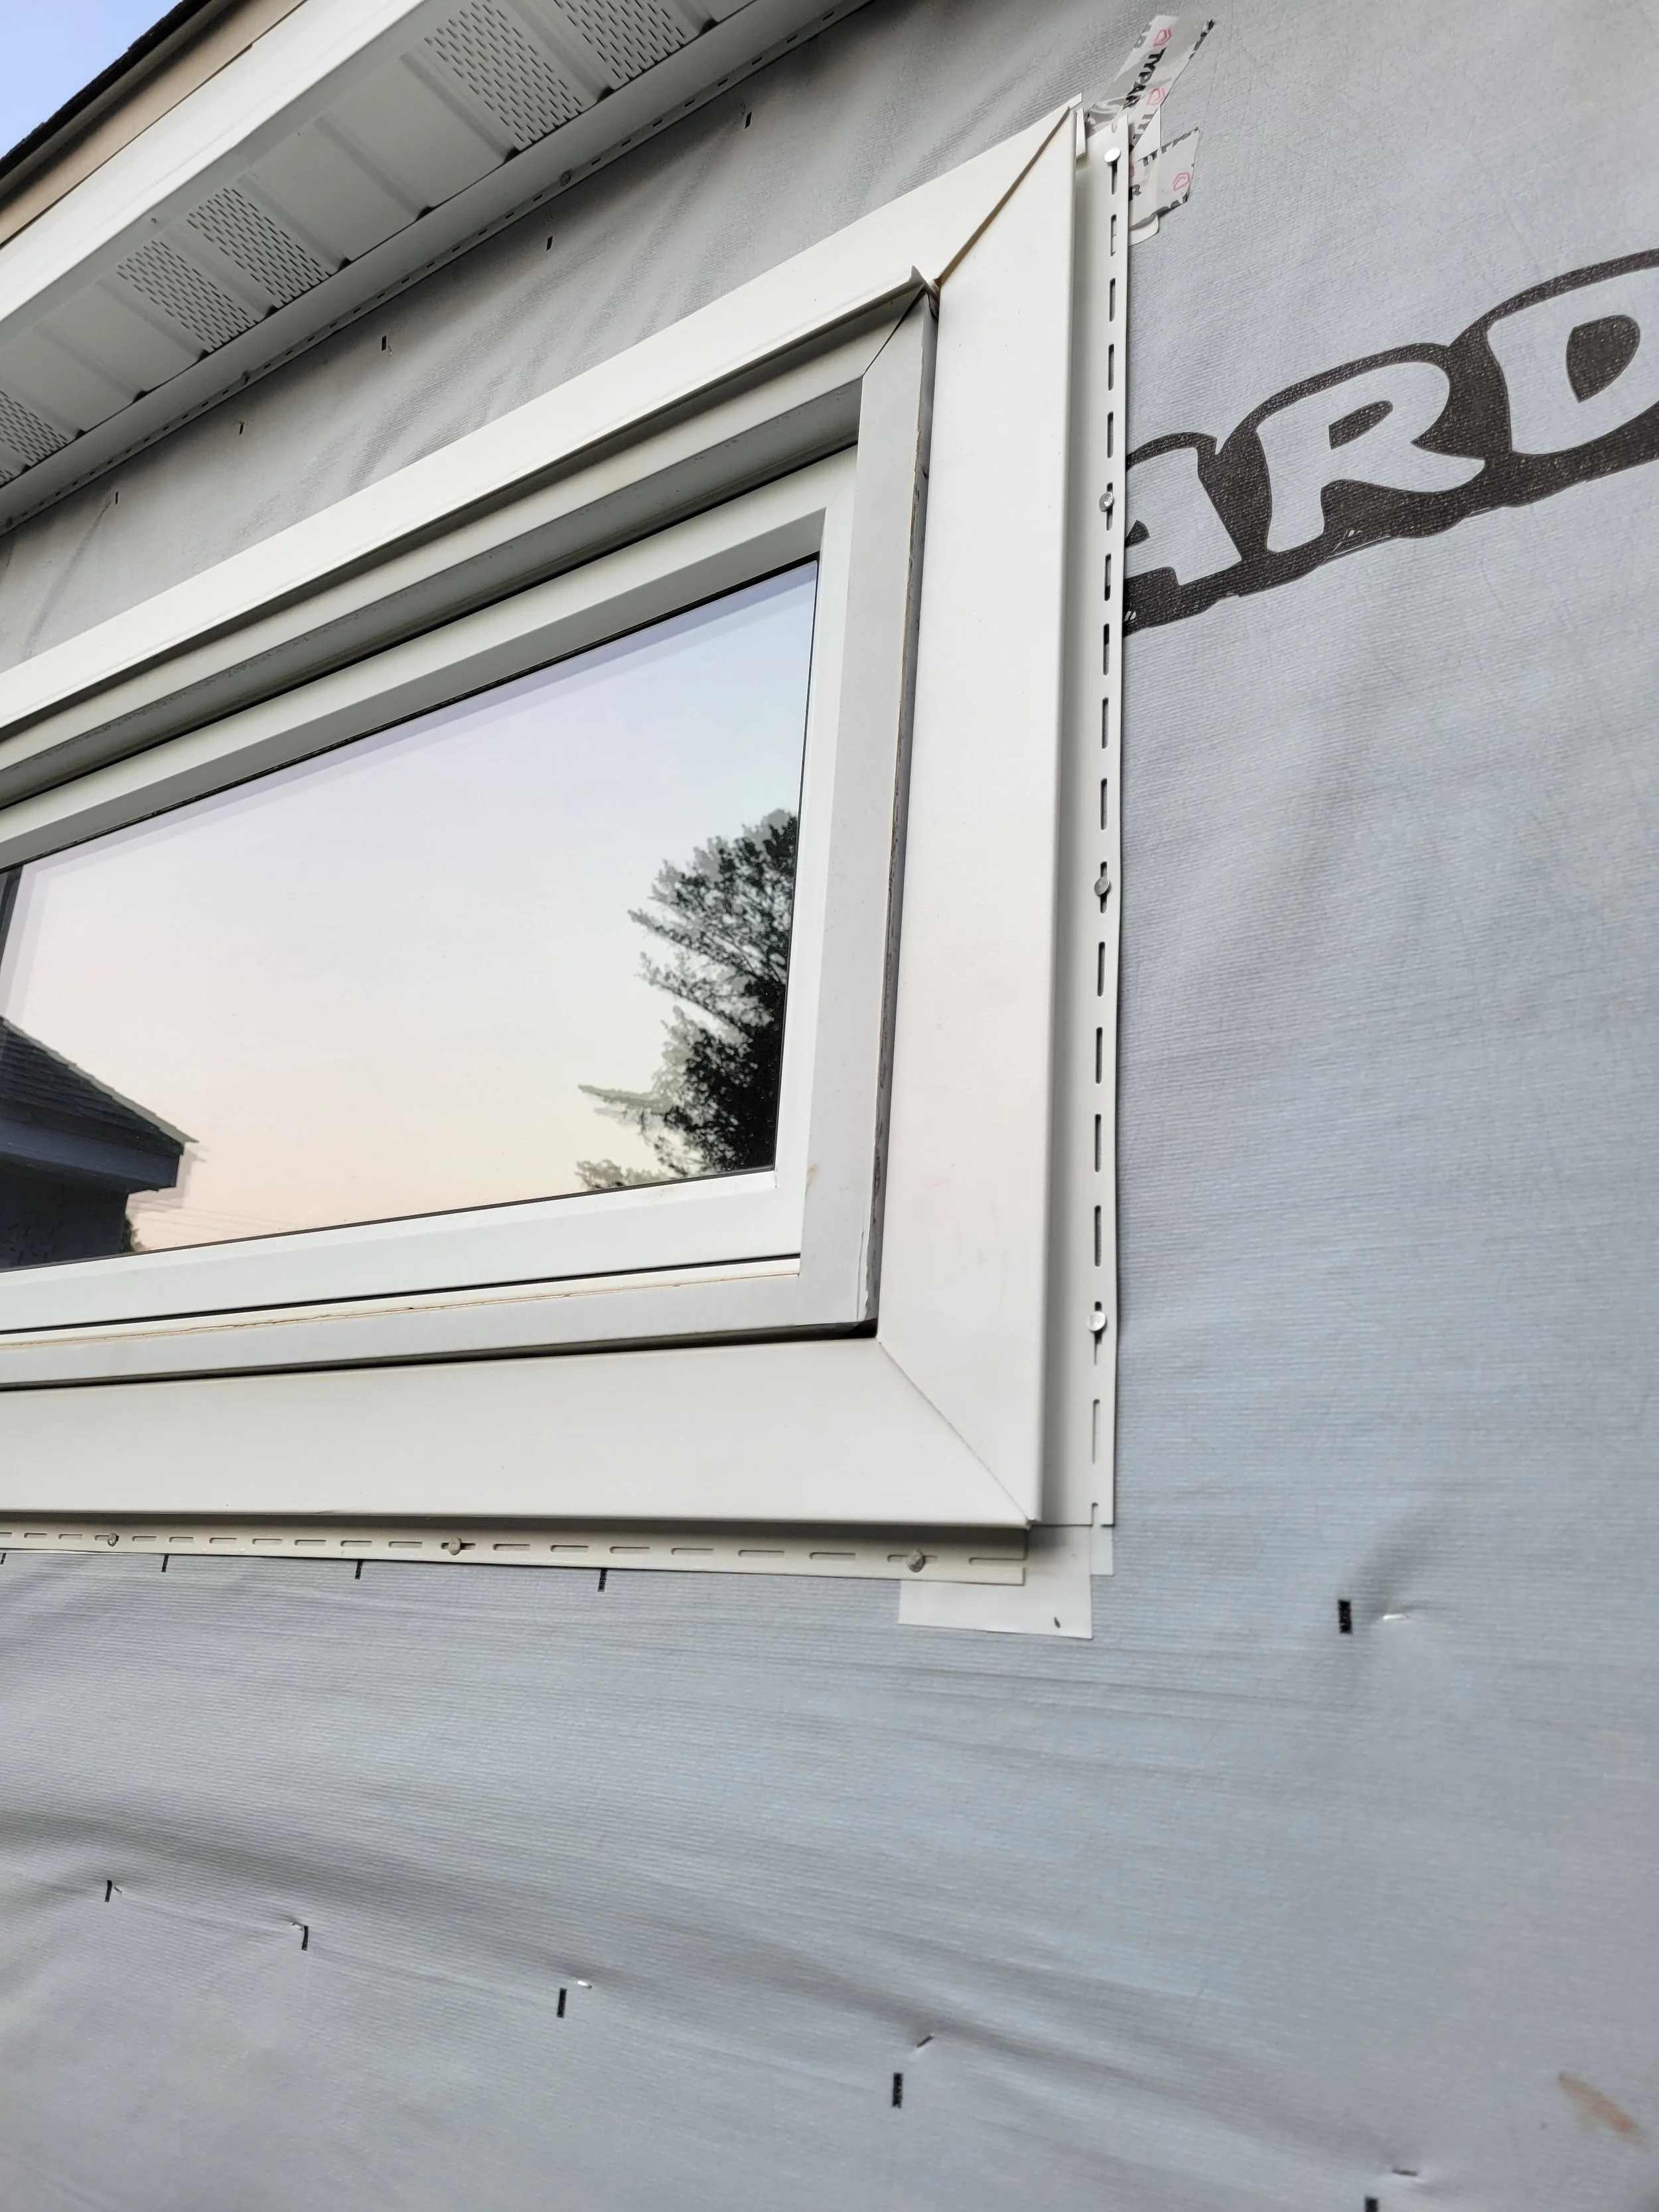
Another important design aspect is how the windows will be trimmed and flashed. The headache of having a house with multiple additions at various times means that I had all replacement windows that were done at different times with different methods. They were all wrapped in aluminum but with different size trims and in different styles. I could have just redone all the trims and wrapped them all (which I ended up having to do anyways to half of them due to rot) but instead I thought I would try to blend them all together by using lineal that looks like 2x4 window trim. This lineal has built in channels to receive siding which eliminate the need for J channel.
Because my house has no architectural flair to it, I really had to lean on accenting the windows to give it some sort of character. Adding this wide trim helped achieve that.
you should really try flashing
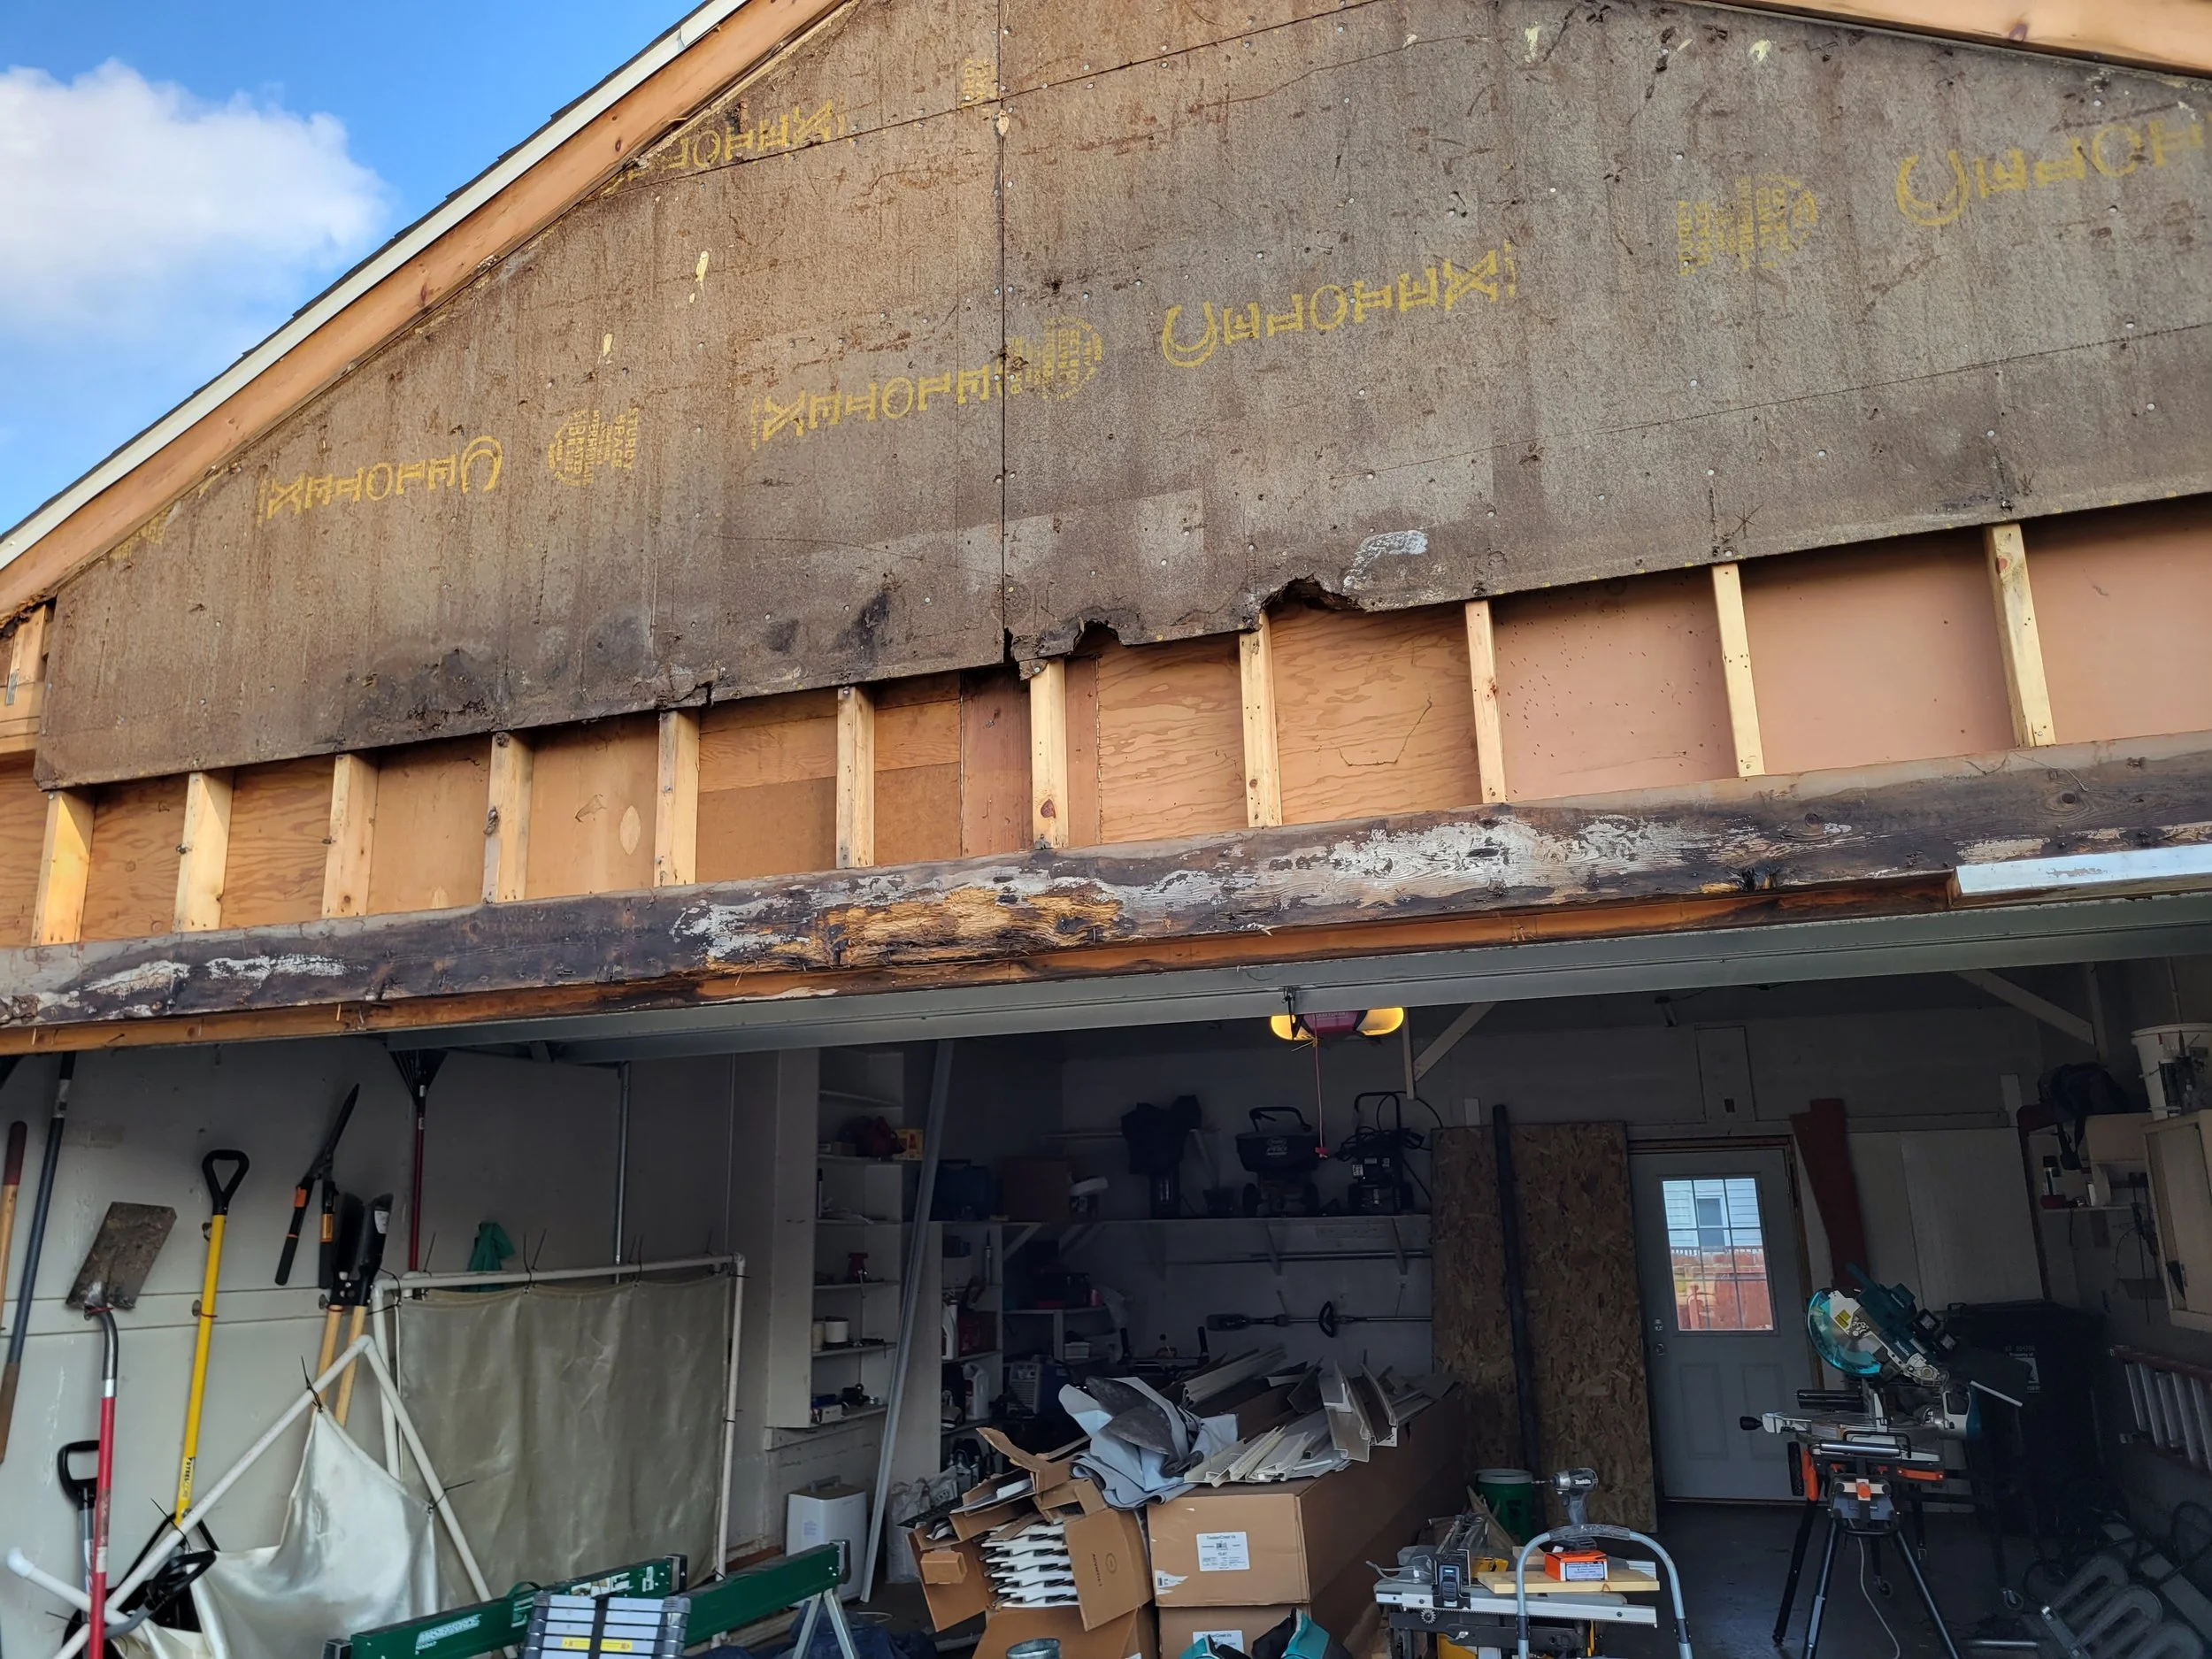
This photo is one of those “I really hate life more than usual right now” moments. And I knew this was going to be bad going in, but not this bad. What you see is my garage sheathing and framing which is rotted from all the water getting behind the siding. Most of the sheathing I had already cut out before taking the picture. Why did it get like this? Because whoever installed the siding didn’t flash anything. Instead they put their caulk in any gap they found and called it good. On my gable (peak) ends I have no roof overhang. So water runs down the face of everything. Where materials had changed horizontally, such as where the siding met the fascia or where the vertical siding met horizontal siding, water found it’s way and ran down the sheathing until pooled at the garage header.
I solved for this by using a Z-flashing (or drip cap) at these places. Z flashing runs underneath the material above it and over the material below it, ensuring that water where it belongs. Outside.
So in the picture I had Z flashing that ran behind the fascia and came over the J Channel. I also had Z flashing that ran over the horizontal lineal and would run up behind the shake . You can see the lip of the flashing overhanging the top of the lineal in this picture.
Vast majority of homes are done the way that my house was, without the Z flashing. It’s cheaper and much quicker. With housewrap, which my house did not have, the caulking method may be OK but still not ideal.
This is a good time to point out that Housewrap is your best friend. My house did not have any which is another reason why I had so much water damage to the framing. I spent way too much time trying to figure out the best housewrap before I finally came to the conclusion that the brand doesn’t matter as much as you long as you have it and it is installed properly.
Soffit: Talk Dirty to Me

The tear-off of all the siding and soffits was more work than putting everything on. It’s not rocket science but it is a lot of work and you’re going to need a dumpster. I just about filled a 30 cubic yard dumpster with everything.
Replacing my wood soffits and fascia was terrible work. For one the fascia was nailed to the roof so I had to be careful not to tear shingles in the process. But also my soffits had become so full of shit over the years that everytime I tore it down I would take a shower in debris, asbestos, and dead mice. I bitch about a lot of stuff, but doing this in 90 degree heat with a respirator on was warranted this time.
I used vented aluminum soffit panels as well as replaced the fascia boards and then wrapped them with aluminum fascia. I should never have to deal with rotted fascia or soffit again.
Cut out the rot
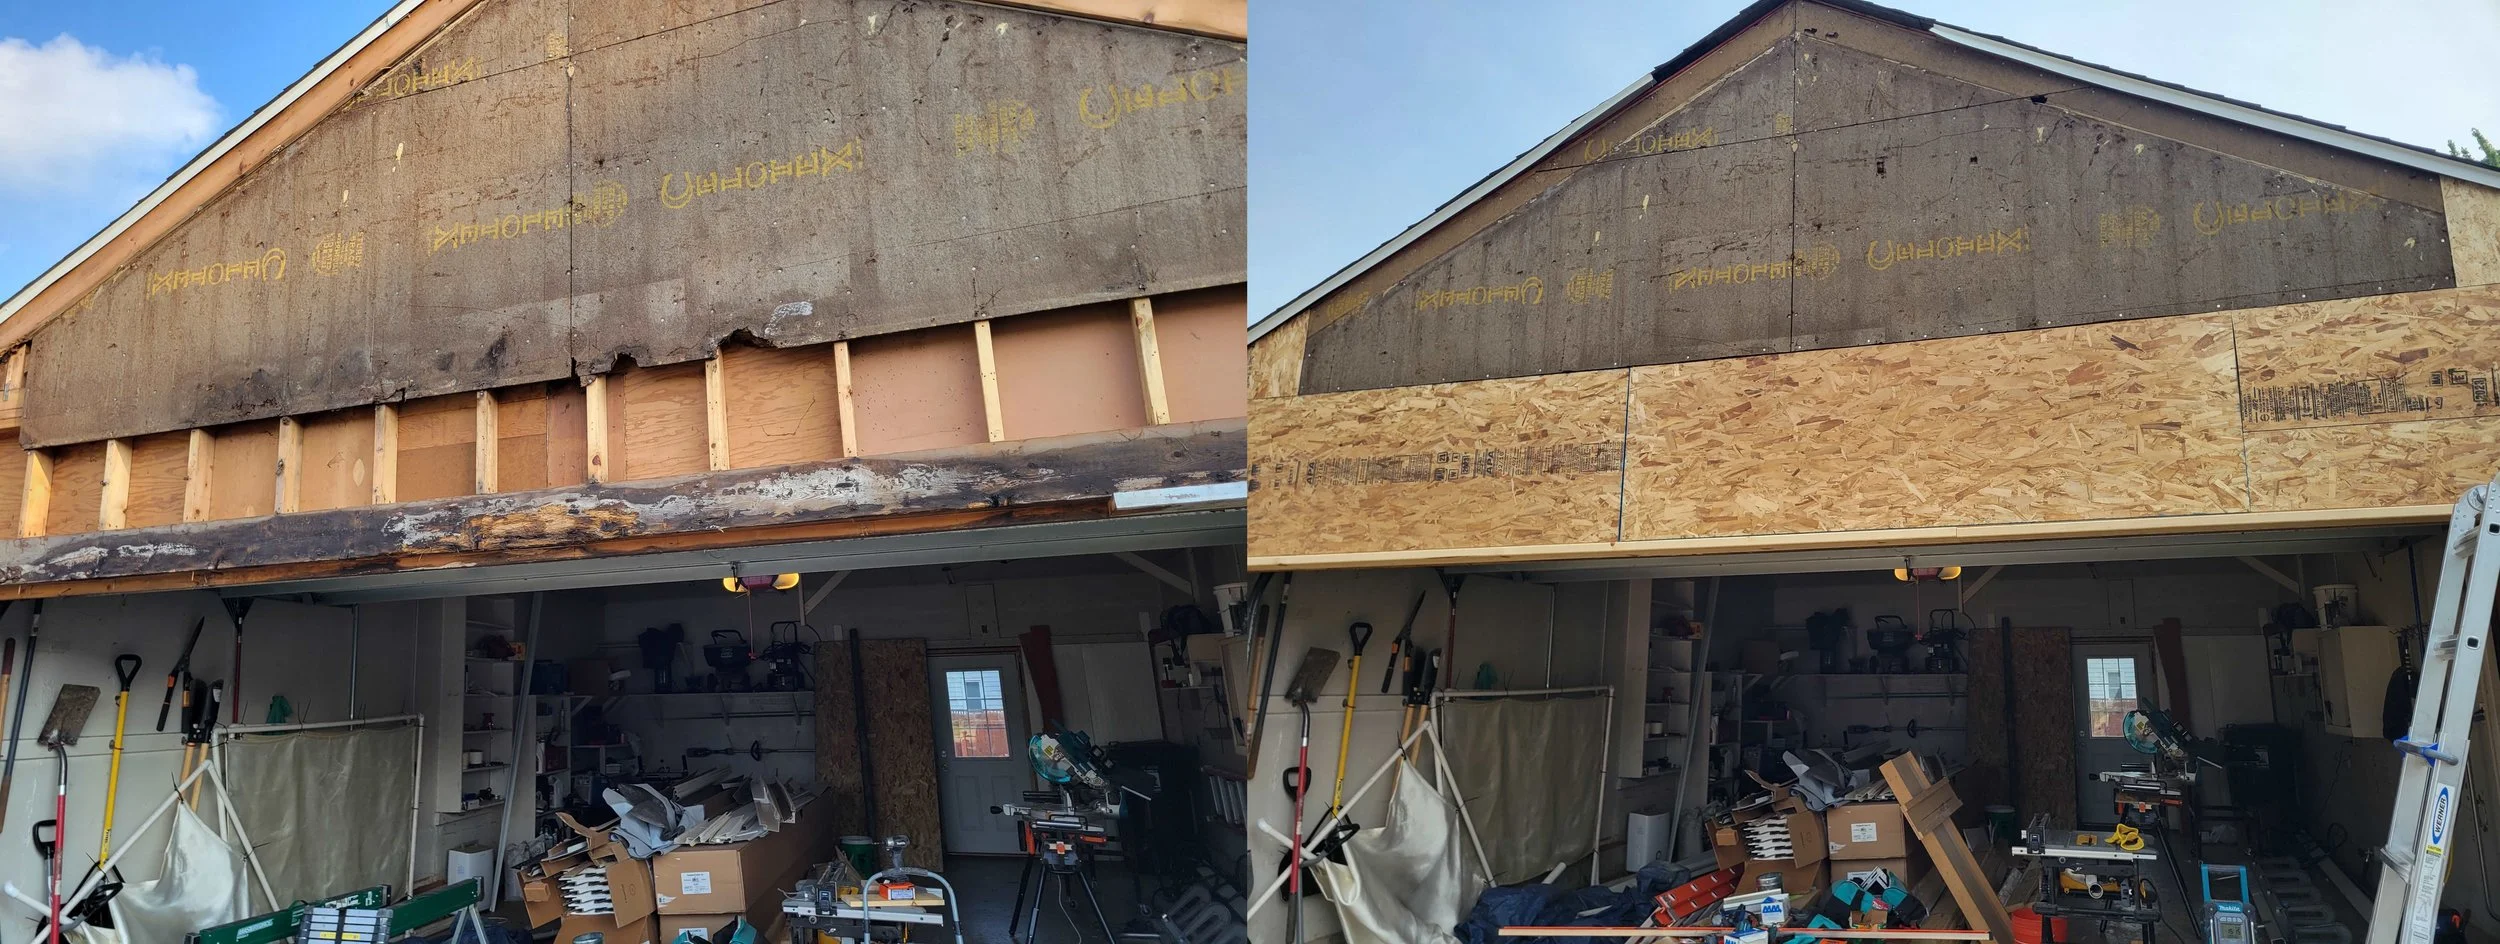
If you’re going to tackle a project you have to expect some speed bumps on the way. I ran into a few of those and then straight up mountains when it came to rot. You saw the photo of the garage earlier in this post but here’s what it looked like after I replaced most of the sheathing as well as that header (which is behind the sheathing). I also had the same issues on the back of the garage.
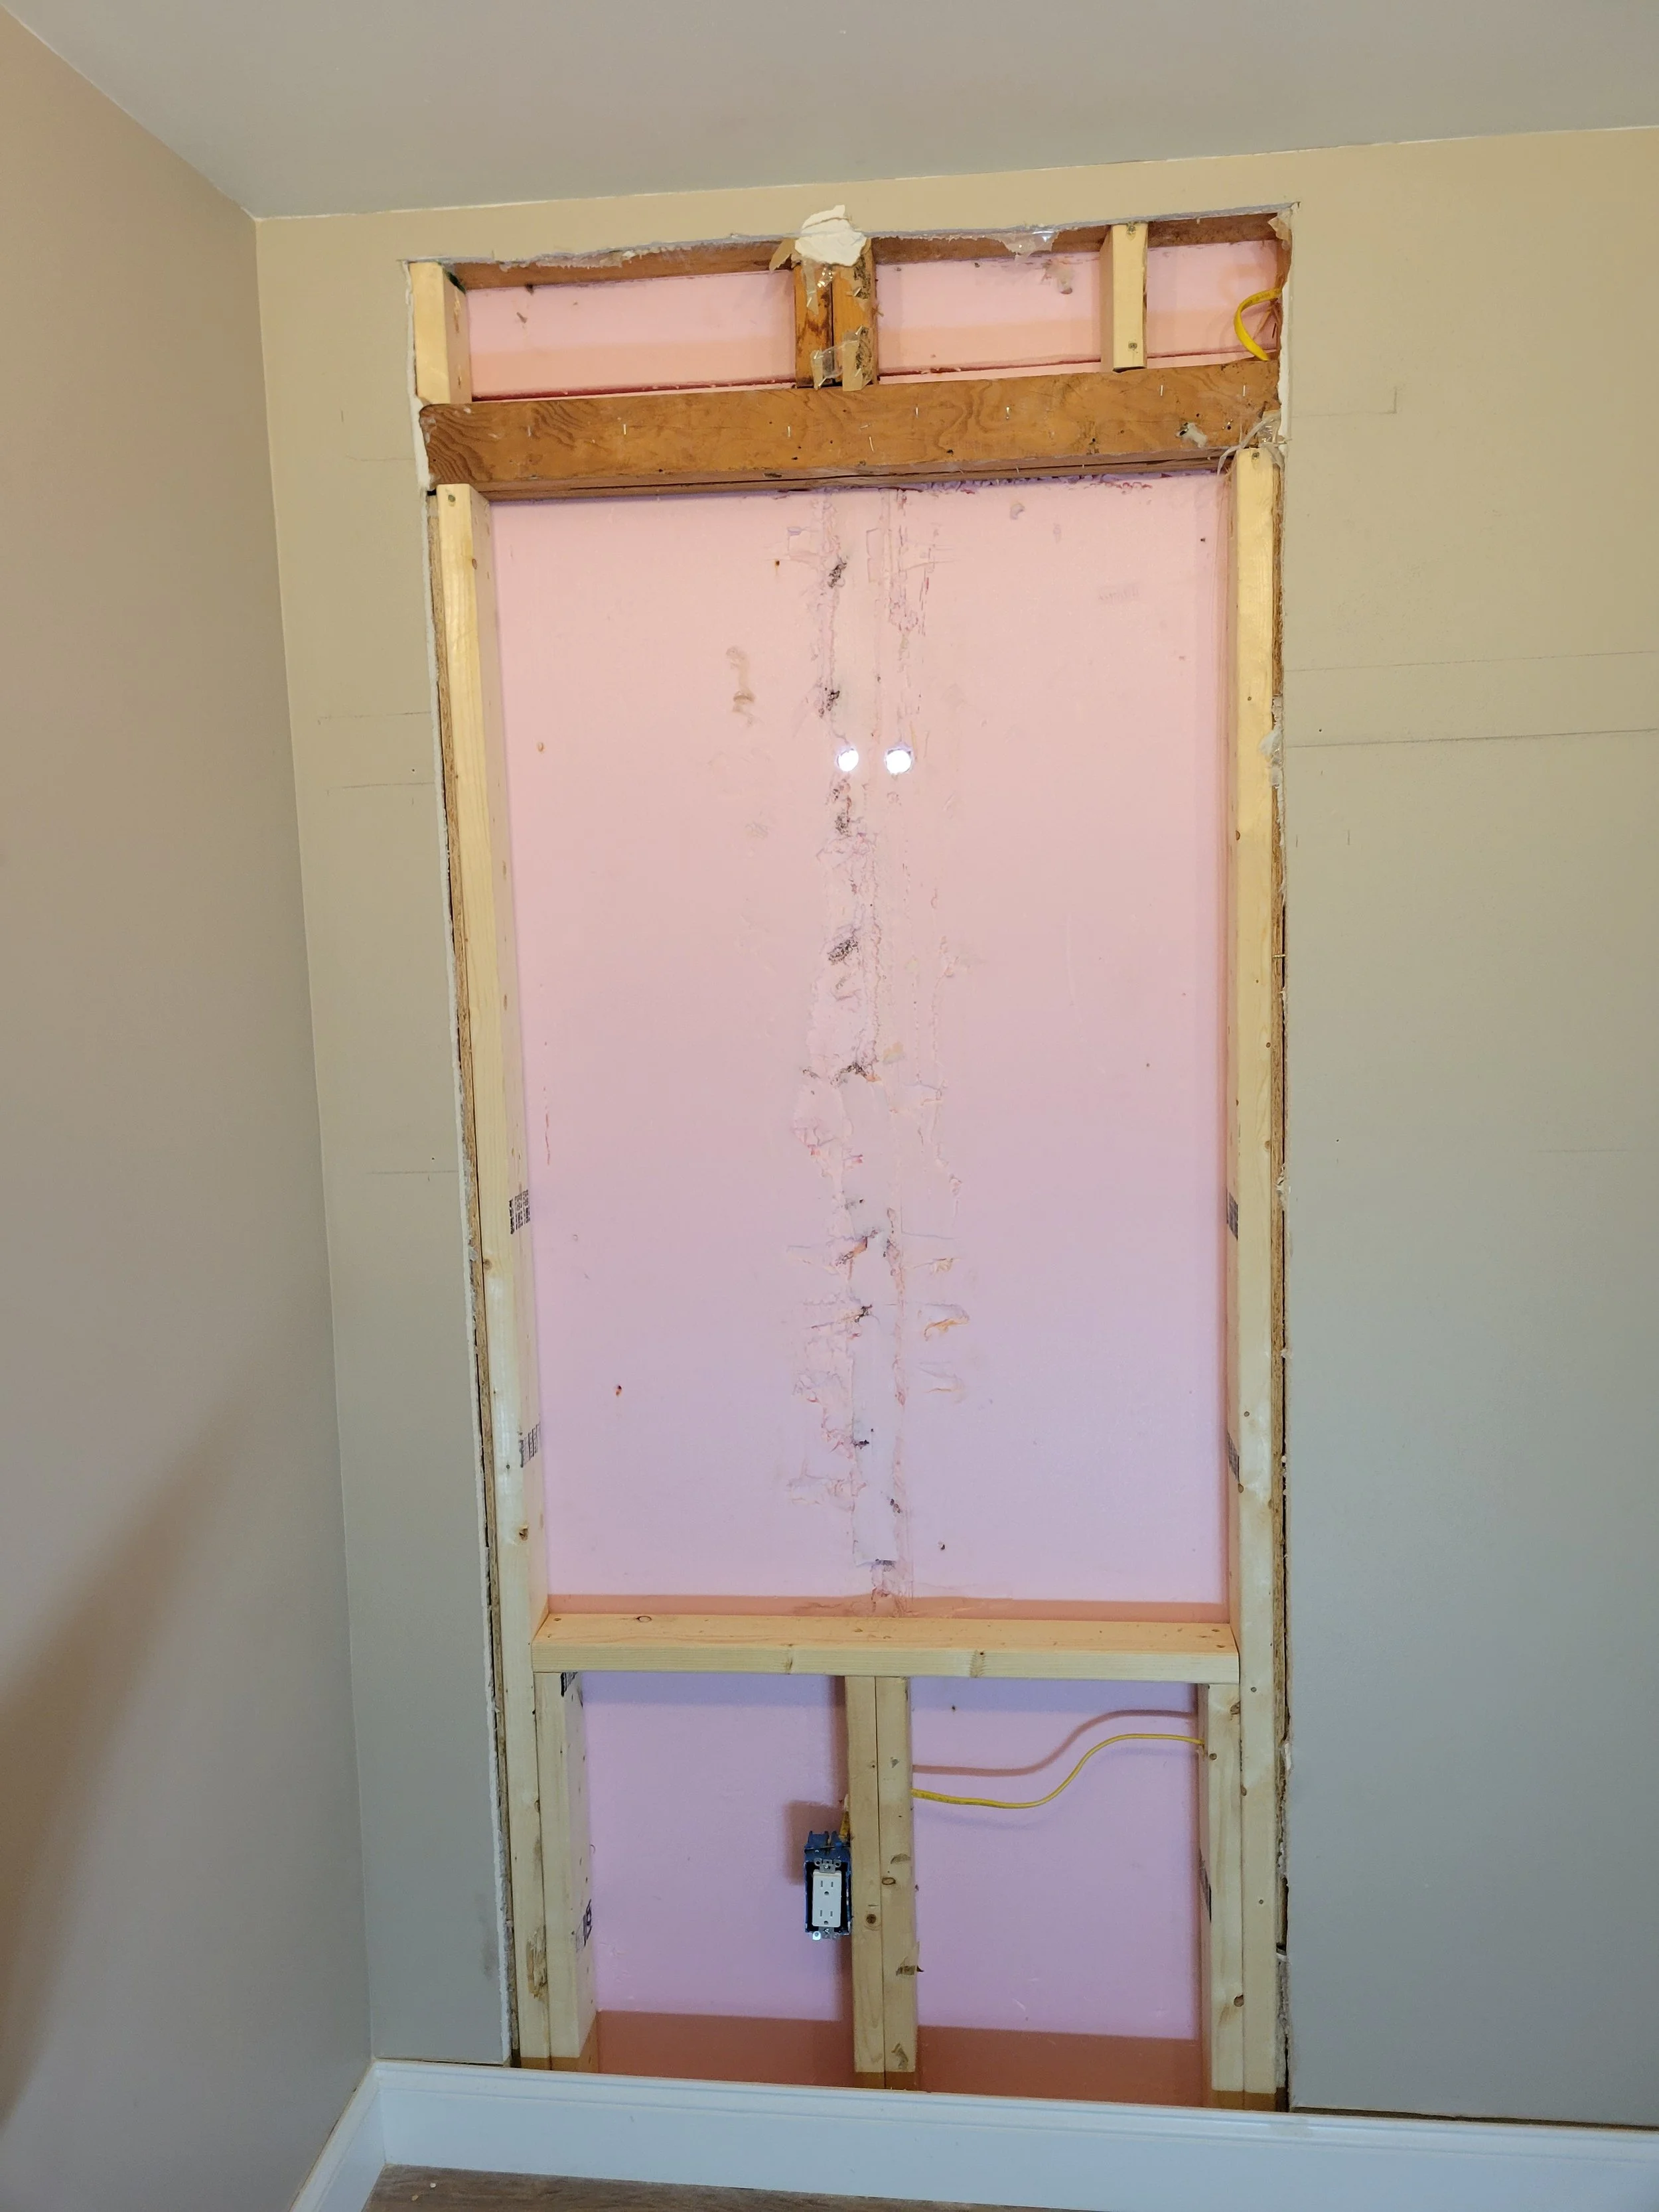
And then there was this guy. This is at the front entrance. The water damage was so bad that the sheathing was pretty much disintegrating and dry rot was growing through the insulation and onto the back of the drywall.
If you’re curious as to why this portion was rotted (which you probably aren’t), it’s not because of water coming from above. This portion is covered by a roof so I thought that maybe water was getting behind the siding where it met the roof. It actually is because the stoop had settled so that it would drain water toward the house. This water would soak up into the wood framing and rise upward through the wall. For all you science nerds this is called capillary action. I remedied this by paying $500 to have somebody come and polyjack the stoop so that it drained properly.
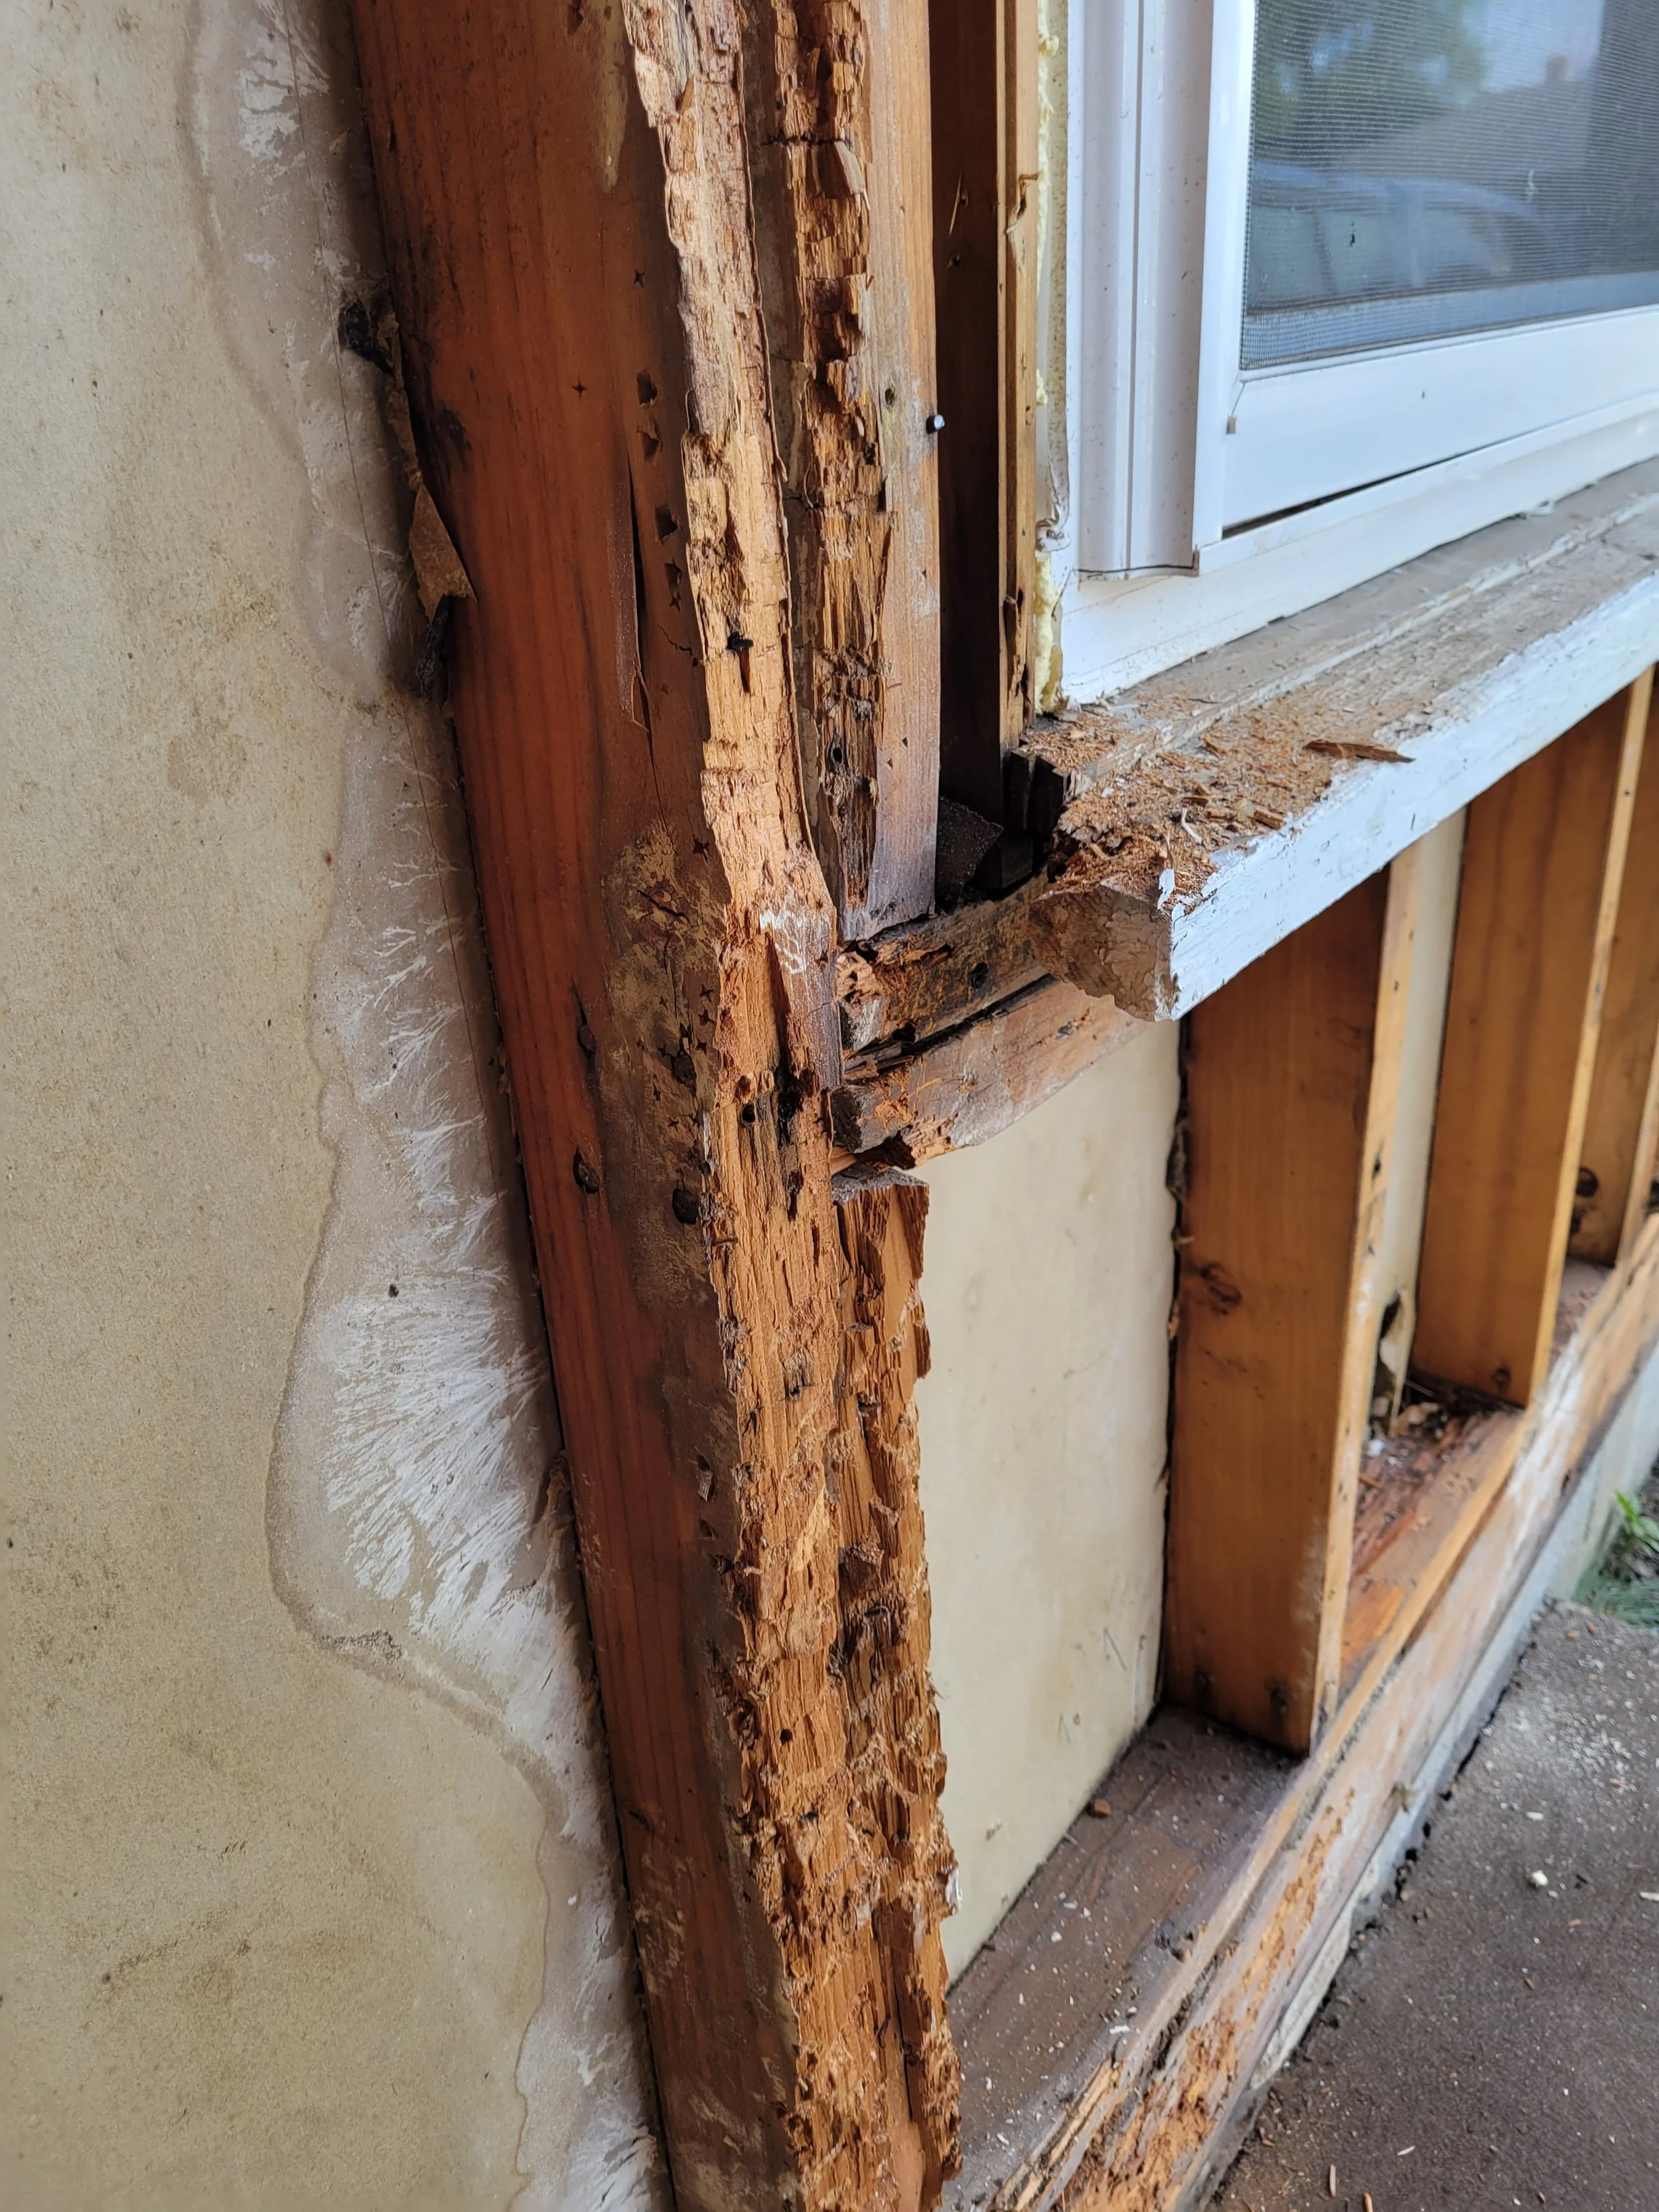
As you can see the framing was completely compromised as well as the drywall. This entire wall was going to have to come out and be rebuilt.
A fun fact about dry rot is that it is incredibly hard to get rid of. Whenever possible it is much better to totally replace materials than try to get rid of the dry rot just to have it come back or spread elsewhere.

I ended up building a temporary support wall in the basement so that I could tear out the framing and the rim board. Before I get the question of why didn’t I use treated lumber at the bottom, I’ll answer that I should have. But I just couldn’t bring myself to do another Menards run and I had a 2x8 on hand. So I used butyl flashing tape where that board would contact any cement to prevent it from sucking up moisture in the masonry.

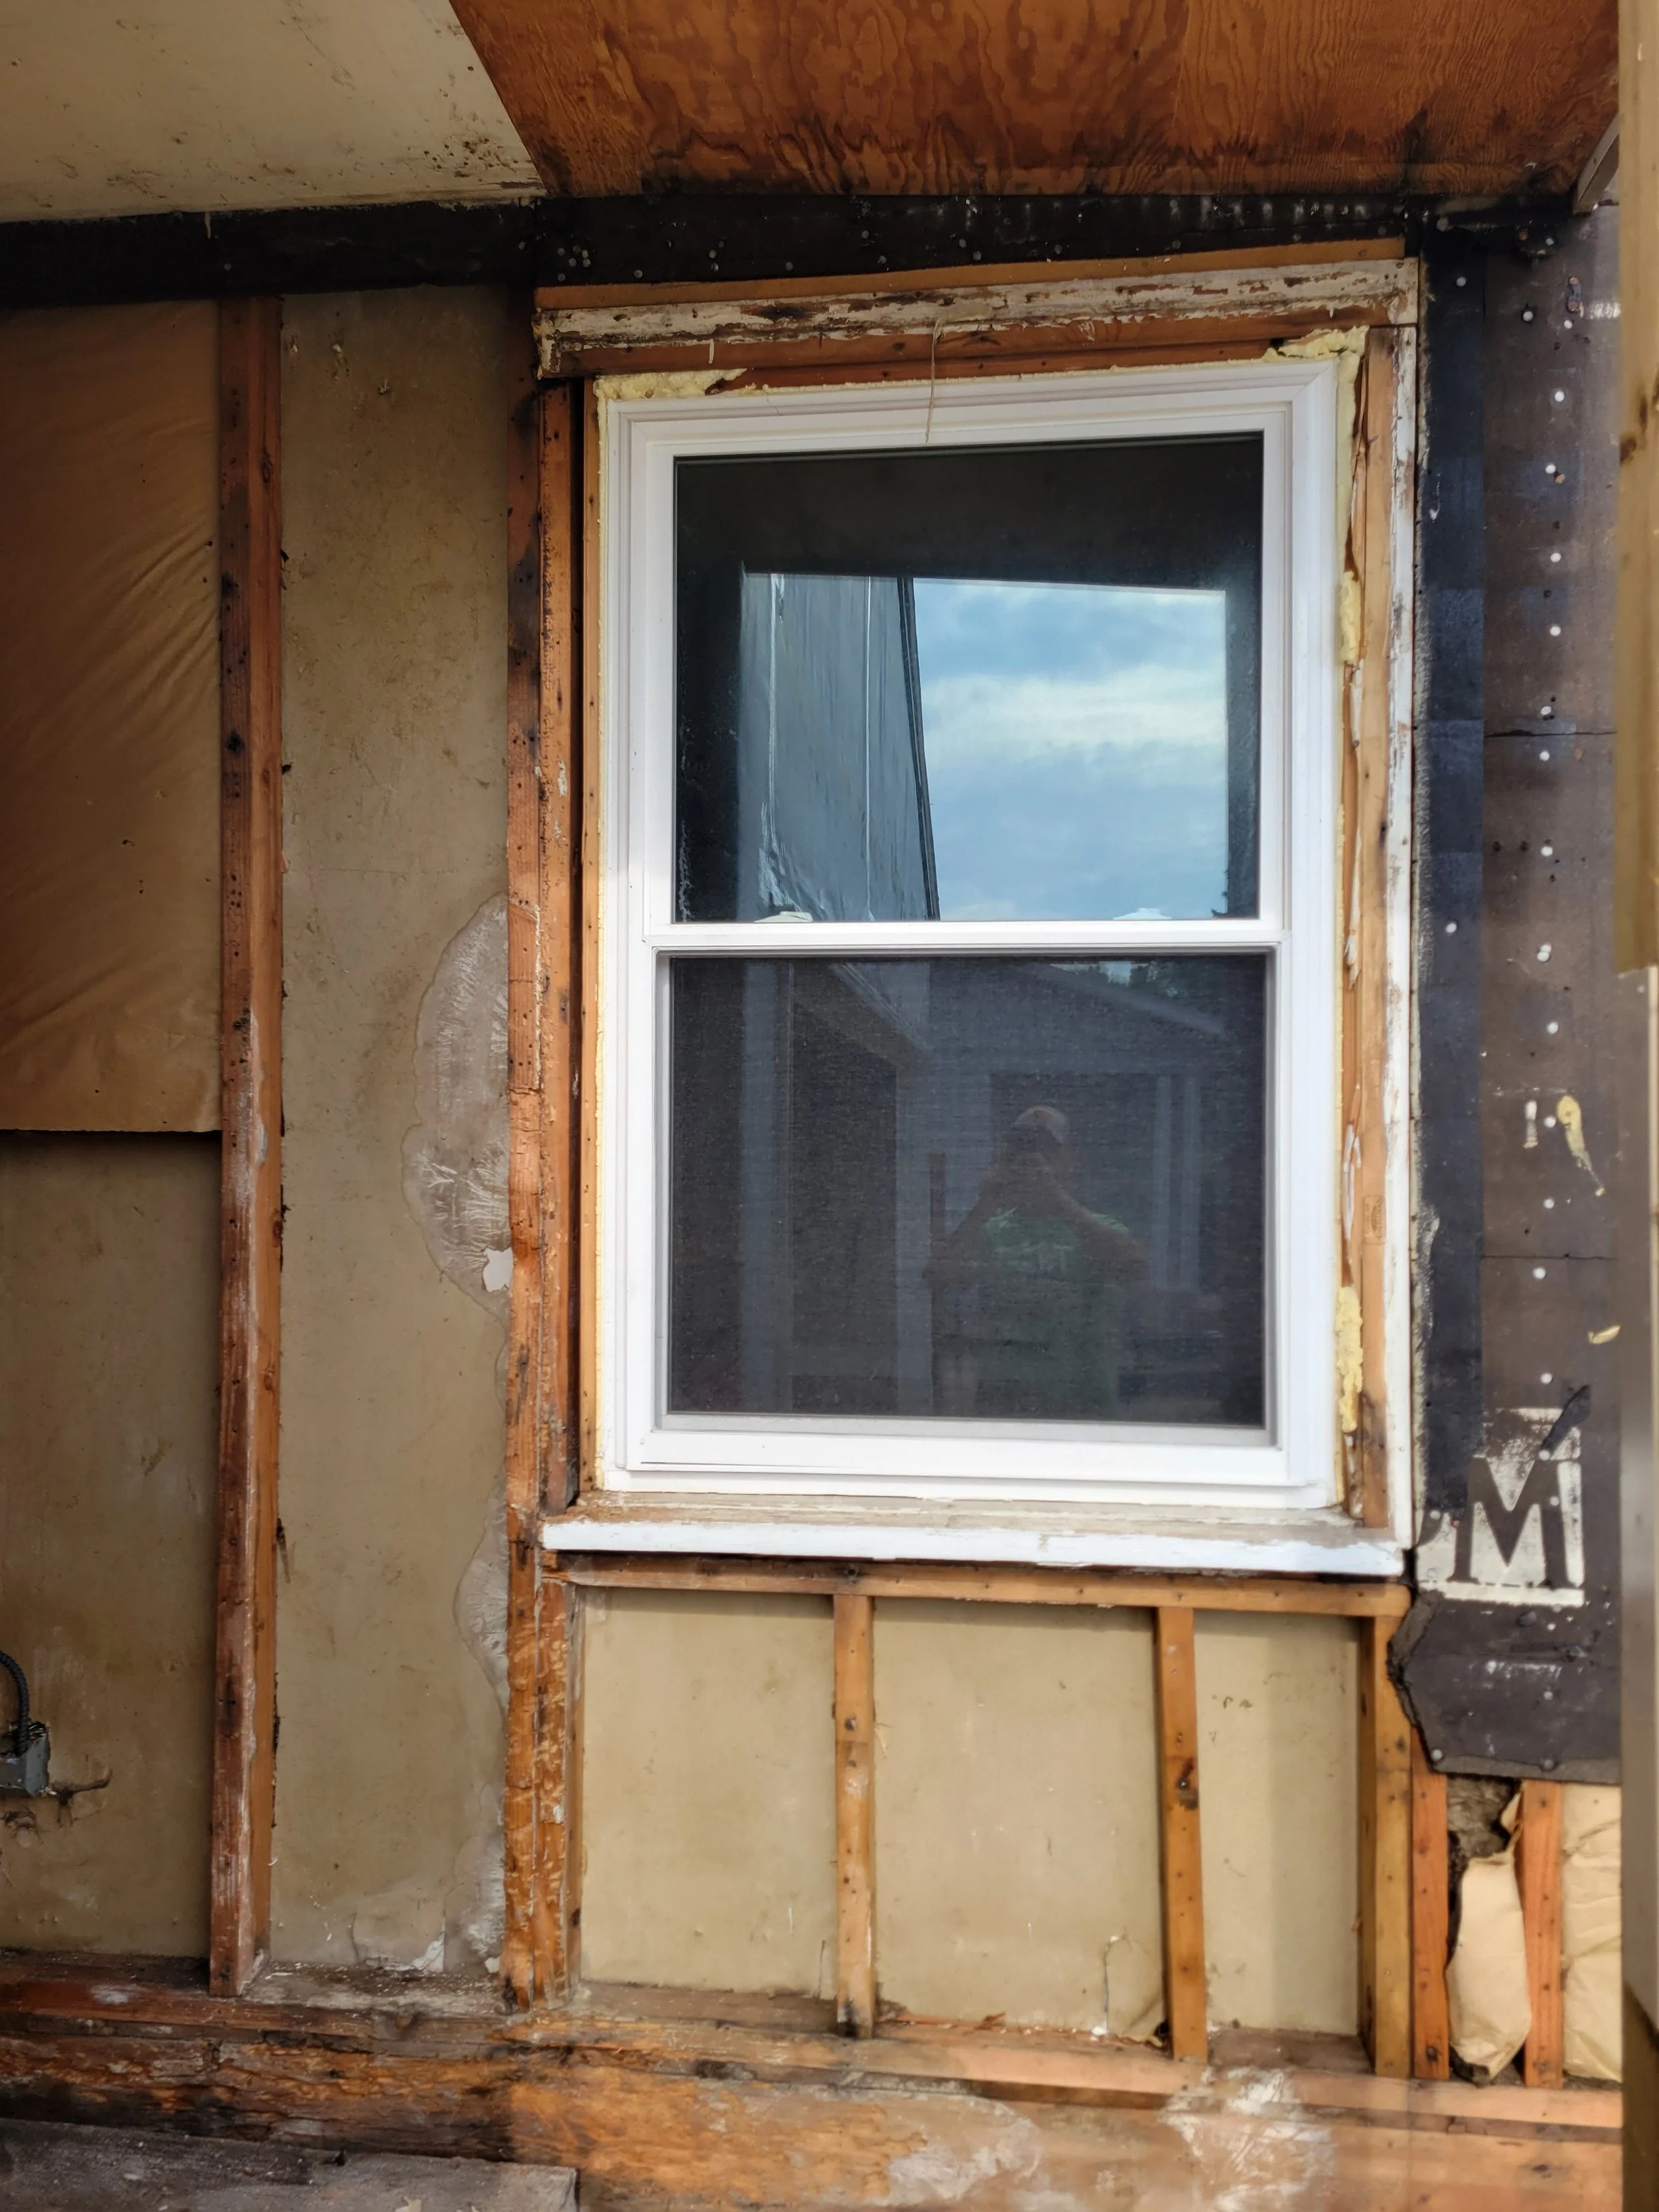
Once I framed the window and wall I was able to put the window back then. I then reinsulated and drywalled.

After drywall, paint and trim you can’t even tell there was an issue. And my wall is now rot free. For the time being.
Let there be light
Back to the windowless bump out… I was able to use a thermal imager that I use for home inspections and found that framing for either a window or a door was already present in that wall. This made my life easier for once. All I had to do was size the opening to fit the window and rerun some electrical that was in the way of the window.
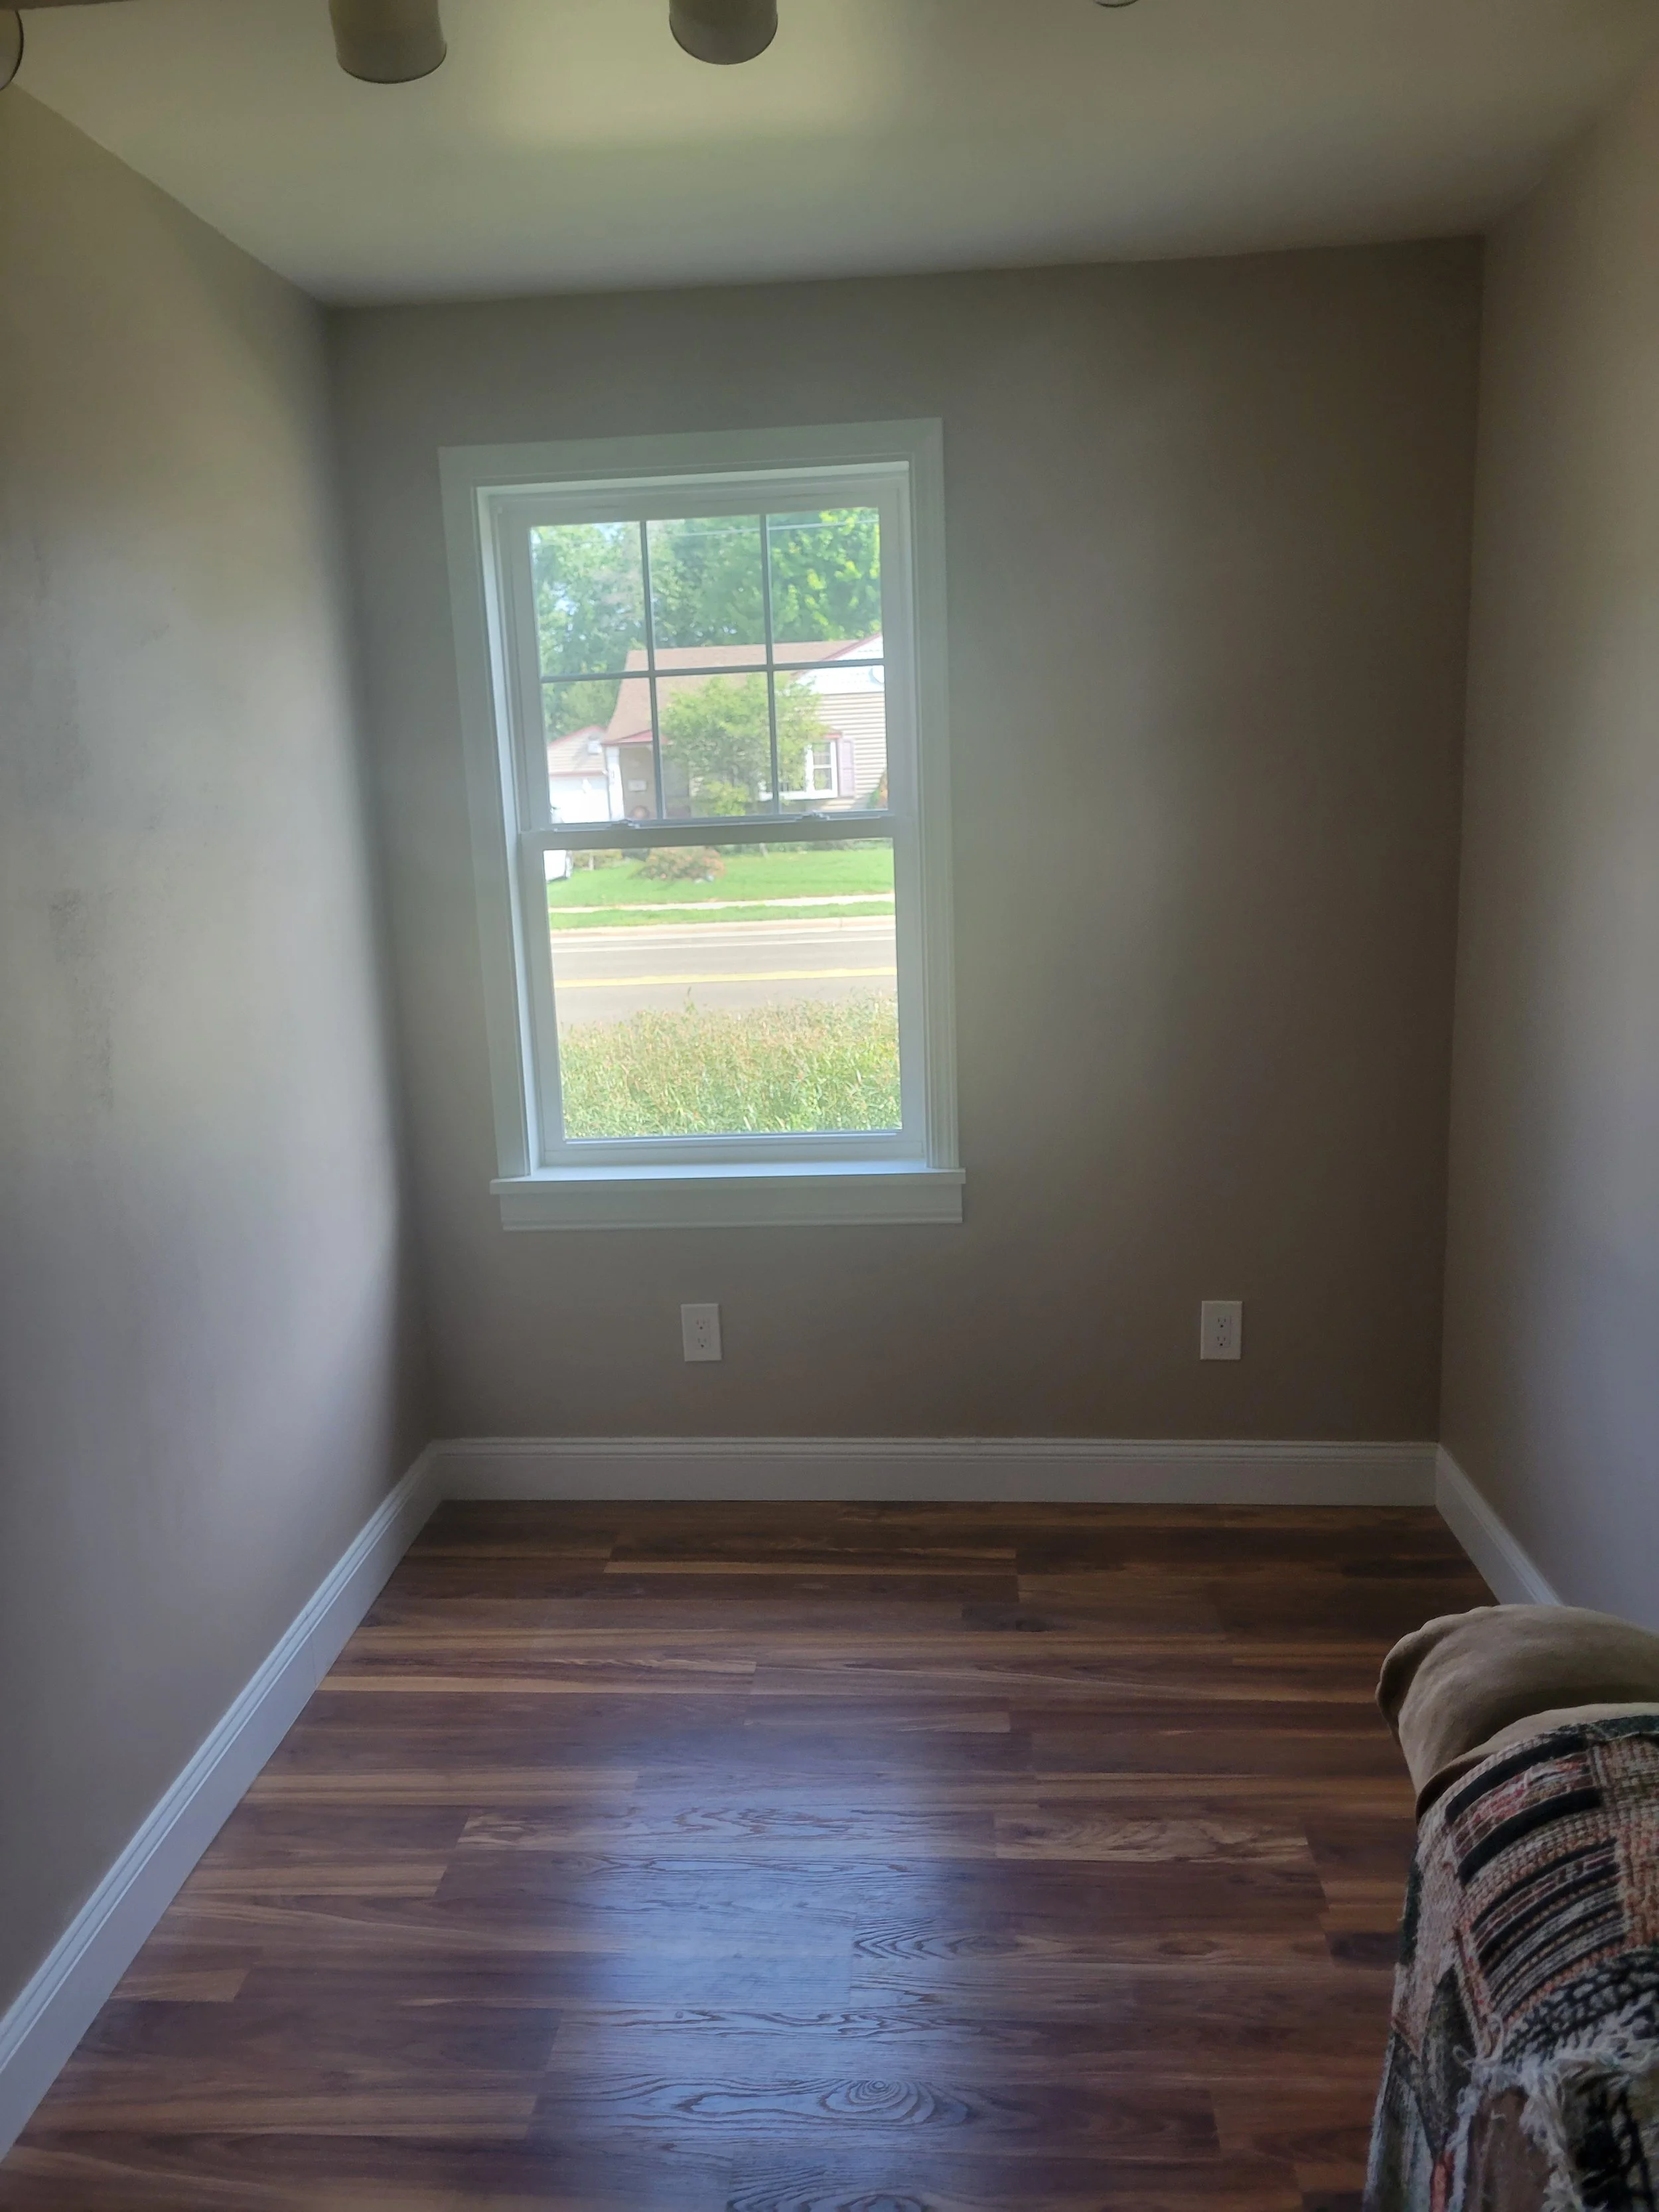
This window was a game changer as what used to be an odd and dark part of the living room was now a bright space, making the whole room seem bigger.

Replacing the front door with a window also let in so much light that for the longest time I would walk by the kitchen and think that the front door was open.
Another nice touch to this part of the remodel was painting the old concrete stoop with Rustoleum Rock Solid, which made it look not like a dump.
my biggest regret
I did end up installing all of my gutters myself. If I could change one thing I would hire this out. The amount of time it took and cost of materials added up to a valuable life lesson that I was not meant to hang gutters. I eventually got them up without leaks and I think I did better than whoever installed the previous gutters. But I won’t do it again.
The whole project took me about 3 months with some sporadic help from friends and family. Yes, I do have both. Half of that time was the demolition. Actually putting up the siding was a breeze, it was all of the prep work that takes forever. Ultimately the $15K investment will definitely pay itself back in terms of home value. TIME TO SELL BABY!