
Faking It

Make your doors so classy you want to buy them a drink.

The biggest asset in this blog, and my life, is the ability to fake it. Whether it’s fake wood or fake happiness, nobody knows the difference unless they really look hard for it. So it’s pretty fitting that I’d detail a big ol’ fake upgrade to my house. I can’t take the credit for the idea because I saw it on This Old House.
This is a picture of my bathroom door and trim. And a carpet that was more worn out by life than even me.

My house had original 1950 hollow-core doors that were still in pretty decent condition. As I had completely remodeled the house, I now had new floors and trim which were white. While everything was now updated, there was major clash with the old doors and door trim. And no matter how many times I told myself that I wasn’t going to bother changing it, after many hours of sitting alone staring at the ugliness like I do every morning in the mirror, I decided I had to do something.
So I started the way I start every project: by telling myself I’m not a failure and then looking at the easiest and cheapest way to not fail. Since I was not going to replace decent hollow doors with new hollow doors, I started to look at solid doors. Sadly I was reminded that I’m not rich. I then debated between just painting the doors white or adding trim to make the doors look like solid 6 panel doors. And I chose the latter because I haven’t totally given up on life yet.
Yes, I have a Plan. And I’m gonna Do It.
My first step was to measure all the doors and find out how much trim I needed. I then went to Menards and acted like I was lost and alone in the world. During this existential crisis, I found the best looking trim and the best price for me, which turned out to be a shoe moulding. I bought everything they had, waited a week for them to restock, and then repeated the process. Multiple times. Just to give you an idea, one 32” x 80” door uses 8 pieces of 8’ moulding, or 64’ of moulding. This accounts for both sides of the door. There is not much left for waste or errors, so don’t fuck up.
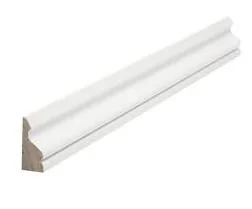
The exact trim I used is pictured to the right, and can be found here.
Remove the Doors
The first step was to remove the doors. Because I had limited space, I only did two doors at a time. If you are unfortunate enough to live with people, you may have to be strategic. I, on the other hand, just had to make sure that one bathroom had a door at any time because I don’t like my dog watching me handle my business live a pervert.
So I removed the door and all hardware from both the door and the frame because I was going to paint the door trim as well. Speaking of hardware: it is up to you of course, but I chose to reuse the hinges and knobs because I’m cheap and don’t like extra work. I bought a can of black matte spray paint and painted all of the hardware in an enclosed space so that I could enjoy the fumes. If you replace everything, you’re looking at another $20-50 per door and then you run the risk of needing to adjust the mortises for the hinges in the door and frame. If you don’t understand what I just said then please do yourself and favor and just paint the goddamn knobs.
Preparation is Key. But also boring as shit.
I then went over each door quickly with 80 grit sandpaper on my sander, just to scuff the finish so the paint would adhere better. You can skip this step if you trust your primer to stick. After sanding the doors I put a coat of primer on. I actually skipped the sanding on the door trim and went with a primer that adheres to glossy finishes. To my surprise, one thing in my life turned out alright and the primer adhered nicely to the trim. While I waited for it dry I did this process on another door. The primer only takes about one hour to dry.
Lay Out Your Panels. and Hope It works.
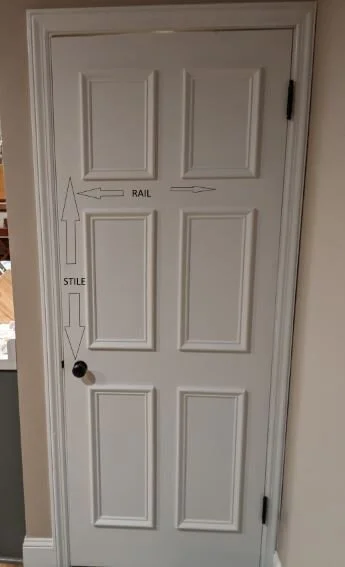
Before I try to convert my thoughts to cohesive statements, I figured I’d go into some door anatomy.
Solid doors are made up of 3 parts: rails, stiles, and panels.
Rails run horizontally. Stiles run vertically. Rails and Stiles connect to each other via special joinery and provide all of the structure for a door. Panels are the pieces that fill the voids, and they fit into grooves that are cut into the sides of the rails and stiles.
Think of a grid with a bunch of squares: Rails would be horizontal lines, Styles would be vertical lines, and panels would be the spaces in between.
The reason behind this is because if a door was a solid piece of wood it would expand so much in the summer that the door wouldn’t open, and it would shrink so much in the winter that there would be gaps. Using rails, stiles, and panels prevent this movement and also prevents warping.
If you are still lost, it’s OK. We’re all lost in this world, some of us are just better at pretending we know where we’re going.

So I proceeded to layout where I would place my trim to make the panels. At first I completely overthought this and confused myself, which is not unusual for me. For a six panel door you’re going to have 3 vertical stiles: one on each side and one in the middle. A little research revealed that these stiles are commonly 4” wide. Seeing as I wanted to use a spacer board that I already had which was 3 1/2” wide, I went with this measurement because nobody is going to know the difference.
This is a door with the primer on it and markings for the rails drawn on.

So if I have a 32” wide door minus the stile widths (3 x 3 1/2” is 10 1/2” total), I’m left with 21 1/2”. Since I’ll have two columns of panels, each panel will be 10 3/4” wide.
For a 6 panel door you’re going to have 4 horizontal rails that run between each panel and along the top and bottom. I wanted to have the following widths for the rails from bottom up: bottom 8” wide, next 6” wide, next 4” wide, top 4” wide. This was completely arbitrary with not much reasoning behind it. I then made the marks on my door to help size the panels. I should note that all of my doors are 79” tall which is pretty close to standard. I made my 8” mark from the bottom. I then centered the 6” rail on the door knob, marking one line 3” below and one line 3” above. This gave me a size of 25” for the bottom panels. I then marked my 4” rail at the top. At this point I had to size the rest of panels. I just chose 18” for the middle panels and 4” for the top panels and said this will look good. There was no logic behind it other than I thought it looked good. So for your doors, do whatever makes you feel good about yourself.
So Much Cutting

I then used my miter saw to cut all of the trim pieces to length. I mitered each end at 45 degrees so that they would form perfect square corners. I cut all of the pieces for one door front and back at a time. To save time measuring, and to make sure every piece was the correct length, I used a stop block. You just slide your wood until it hits the block and then cut. So easy, I could do it.
Notice how my stop block has a 45 degree miter. This is because the pieces will have the same miters when the butt against the block.
Nailer? I barely know her.

When it came time to attach the trim to the door, I first clamped my spacer board to one side of the door. I placed a square where I wanted the trim to be. I put my trim tight against corner and put 3 nails in each piece. I used 1 inch finish nails for this. I did one panel at a time, starting with one corner.

Once all 6 frames were completed on one side, I flipped the door and repeated the process. After everything I whipped out my caulk and filled some holes. I also put caulk in the corners to hide any gaps.
Once the caulk dried I painted both sides of the door. While I waited for the paint to dry I reflected on all of my misdeeds in my life and wept silently, careful to not let my tears mess up the paint job.
Get Busy Hanging

Once the doors and trim were painted I collected myself and reinstalled the door hardware and hung the doors.
All said and done I spent a solid week on this project, at a rate of 2-4 doors per day. It was a lot of work, but at least I look like a functioning member of society now.